
A-Z Guide to Setting up Your First Widget
You've finally got Dynamatic App set up and installed, and even spent some time designing and customizing your cart. Congrats 🎉
But you probably also looking at your clean but empty cart, and thinking "eh' so this is it?!" Well worry less, I'm here to guide you to the finish line.
While it would be near impossible to cover every single element of our app in this document, what I'd like to do is walk you through the entire process of setting up a widget and getting it to display on your store. Note: If you haven't yet, make sure to read our Intro and starter documents which cover the relationship between widgets, audiences, and placements.
Table of Contents:
To make navigating this guide easier, below are some links to help you skip around as needed. If you are already familiar with a section, simply skip to the section you feel you need some help with!
Step 1: Create a Placement
Step 2: Create an Audience
Step 3: Create a Widget
Step 4: Create a Campaign
Introduction:
I'm going to assume you've got the Dynamatic Cart set up, and for this guide we will be focused on adding a tiered bar to the top of the cart. Tiered bars are an awesome way to gamify the customer shopping experience, and helps increase average order value as it prompts customers to spend more to achieve some milestone that instantly rewards them. 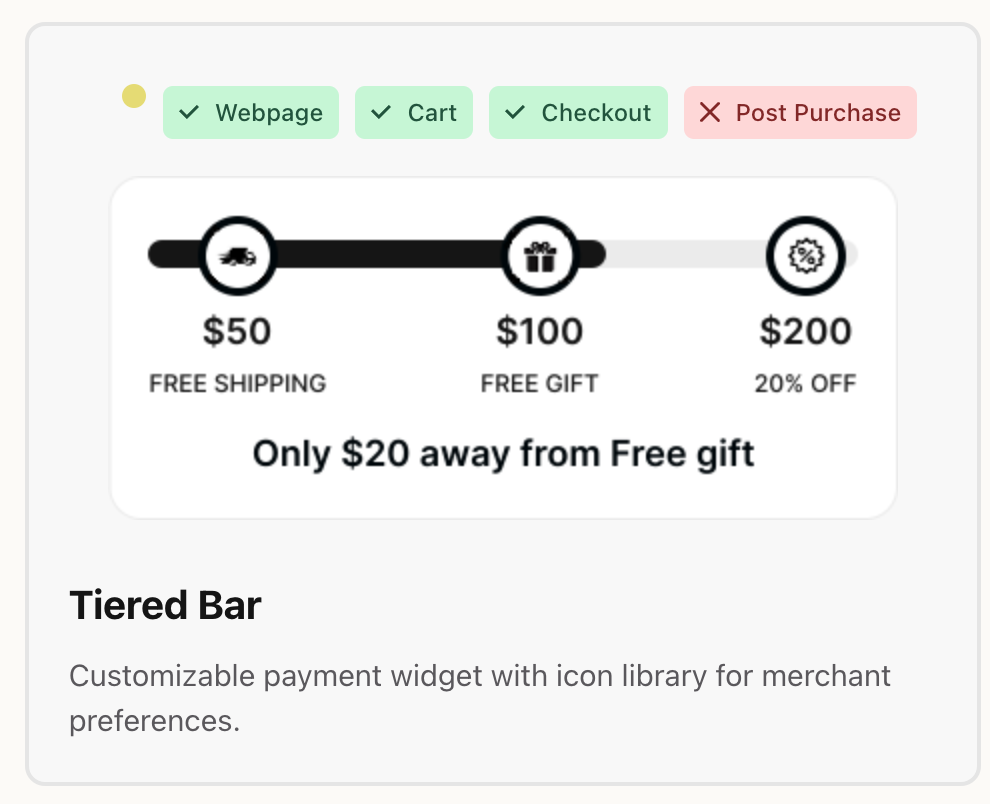
As a quick recap, for a widget to display on the cart, we are going to need to create a widget, placement, and audience before we can create a campaign and experience.
Widgets = What should the customer see and engage with.
Placements = Where should the widget display.
Audiences = Who should see this widget.
Once we have these 3 components set up, all that is then required is to create a campaign for the widget + audience + placement.
Step 1: Setting up a Placement:
Since you are reading this guide, it might be fair to assume you are just getting started and likely don't have many placements created; if at all. You can read this guide for a full rundown on placements. But as a quick refresher:
Placements are simply a placeholder on your store where you want a widget to be able to be displayed. Depending on where you plan on putting a widget, the process of creating that placeholder (or Zone as we call it!) can be slightly different.
For this guide, we are focusing on adding a widget to the slide out cart. Since the cart is entirely powered by Dynamatic App, creating that placement is going to be done in our app backend.
Head over to the Placements section of your app, select "Zones" and then click the "Create Zone" button. 
If you've never created any zone categories, you'll most likely just see two categories: Slide Cart | Post Purchase. Those are two default categories we add automatically to every store.
The slide cart category simply represents our Dynamatic Slide Cart Draw. The Post Purchase category is for Post Purchase Upsells. You can create as many categories as you want to help you organize and keep track of your different zones and placements. For this guide, we will be sticking to the Slide Cart, and so we do not need to create any new categories. However, here's a guide on categories.
Now that we are on the slide cart zone builder, you'll notice that we have predefined "slots" in the cart. These slots represent your cart and provides you with areas within your slide cart that you can drag a Dynamatic Zone into. 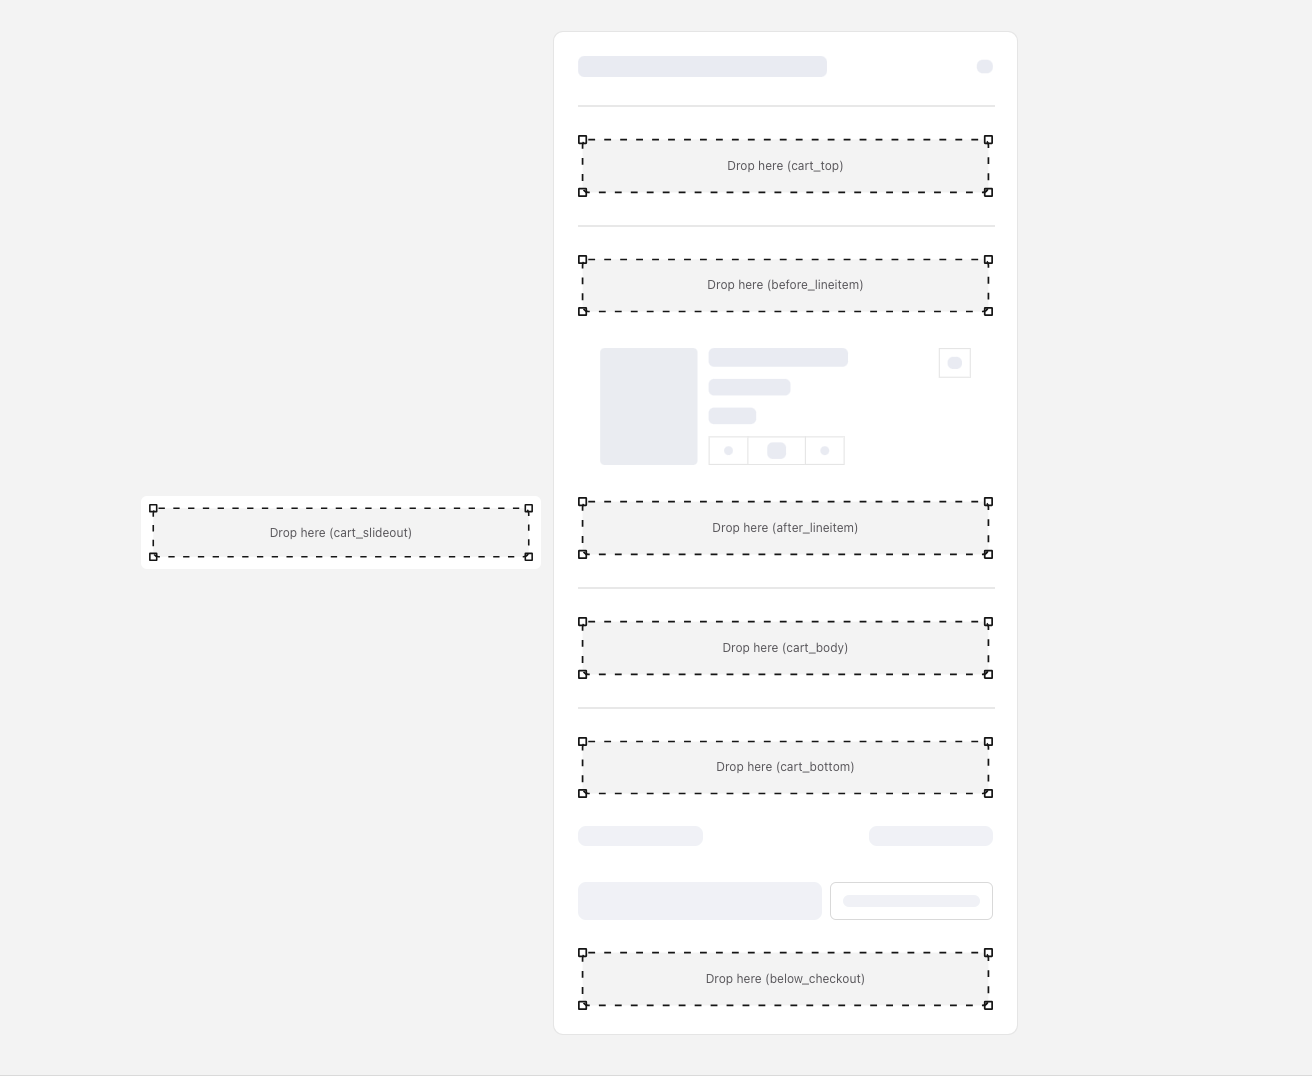
Above the drag-and-drop editor you'll notice this rectangle Zone that can be dragged to any position inside the cart editor. Since we want the Tier Bar widget to display at the very top of the Cart, we will drag it to the very first area "cart_top". I'm also going to name the placement "Demo: Top Cart" so that I can easily remember that placement when setting up my campaign. 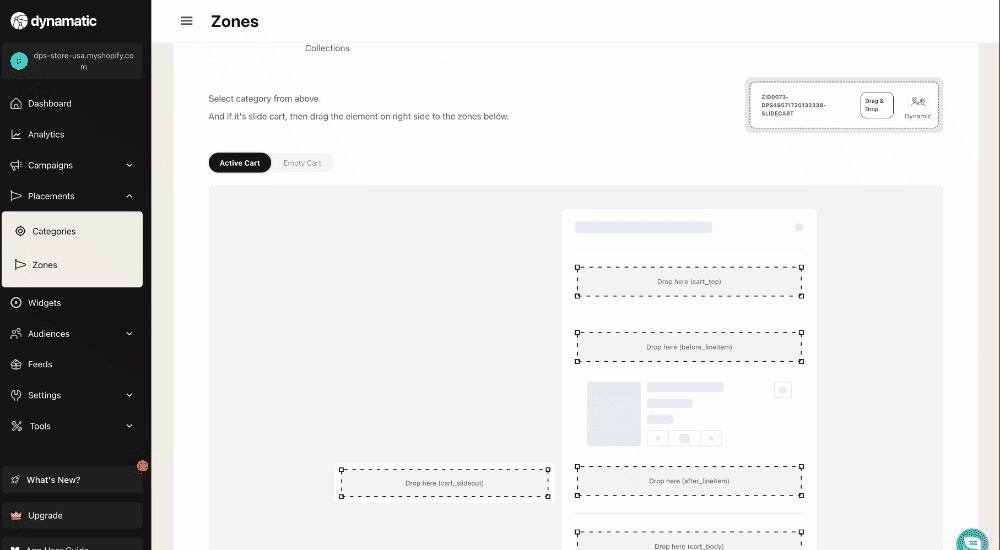
Once I click save changes at the bottom of the page, I have officially created a Zone in my cart that can populate a widget. 👏
Step 2: Create an Audience:
For a widget to be able to display on your store, you have to define "who" should see the widget. You may want a specific widget to be seen only for domestic customers and not international. You may want to have different milestones for USA customers vs. Canadian customers, or new customers vs. returning customers.
With Dynamatic, everything is designed to be personalized, and flexible. Our thinking has always been: No two customers are alike, and being able to treat different customers in their own unique way is a big part of taking e-commerce to the next level.
What is an Audience?
Audiences in Dynamatic are essentially a segment of your site visitors / customers. You can create audiences based on over 200+ data points including site behavior, Geo data, past historical purchases, and more. For a full guide on audiences click here.
Let's keep it simple: Our goal is to show a Tier bar on our cart, and let's assume we want all customers to be able to see this tier bar. In short, we won't be excluding any site visitors. However, since Dynamatic is built as an engine, it still needs a defined "audience."
Let's create an Audience that represents "All site Visitors."
Head over to the "Audience" tab in our app, Select Audiences, and click on "Create Audience." 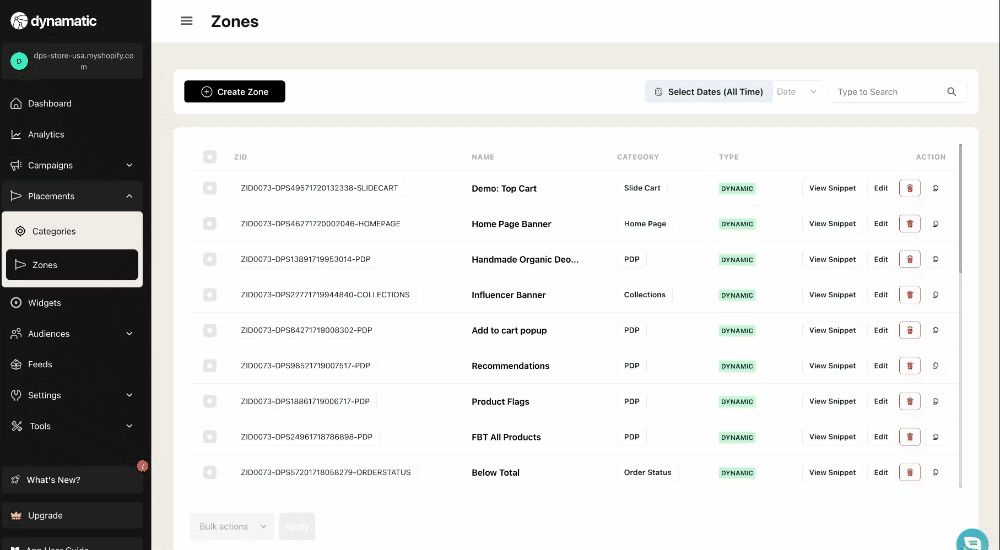
Now we are ready to create our first "Evergreen" audience that represents "All site visitors."
To get "all users" we are simply going to select, "If someone" is active on site. This essentially represents all active site visitors. We will then name it "Evergreen: All Users: which again is simply a friendly name to remember and recognize the audience as. 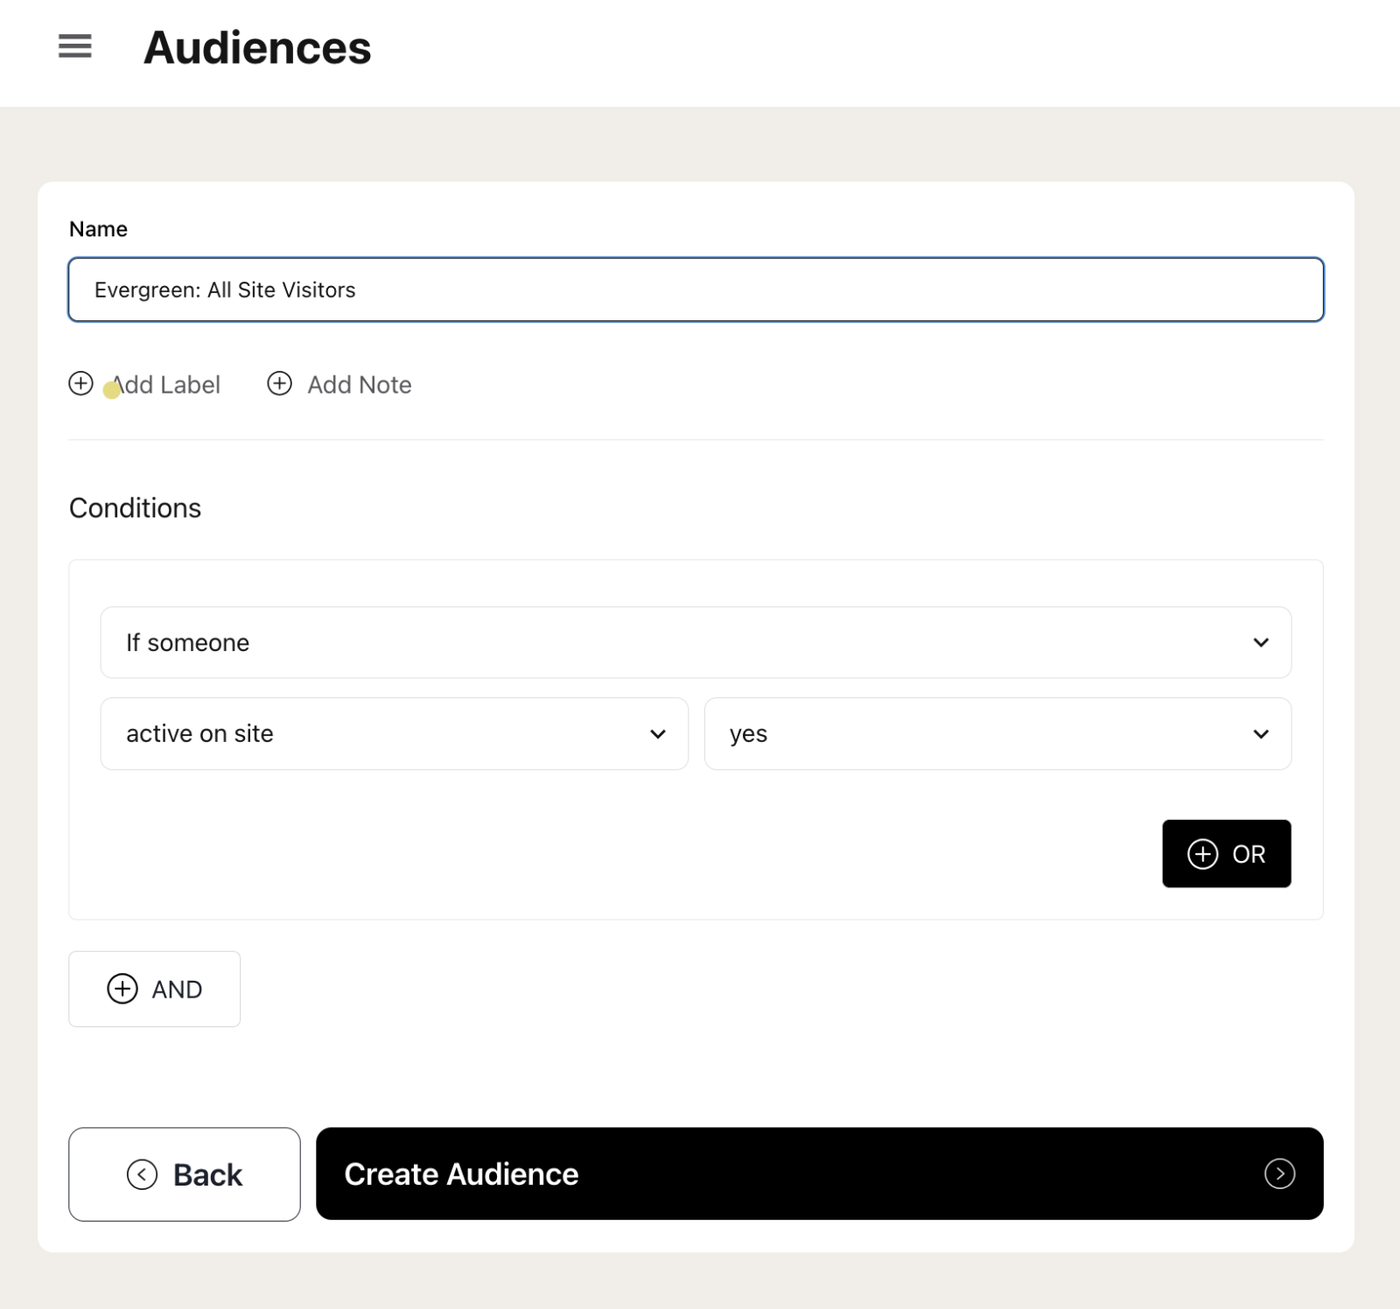
We then click "create audience" and we've officially created our first audience! 🥂
Step 3: Create a Widget:
Widgets as mentioned above are essentially pieces of content that can be placed in various locations within your store targeted to specific users/audiences. A widget can be anything from a list of upsells or recommendations, a timer for "reserved cart", a banner displaying on top of a product or home page, and so on.
The Fundamentals of Widgets?
Depending on the widget and its purpose, widgets can have a variety of built-in settings like discounting, product selection, and other settings you need to create or set for the widget to perform. While no widget is exactly alike, they do share some similar fundamentals.
All widgets typically will have a three-tabbed system: Content, Style, and Advanced. These tabs allow you to control the widgets functions. 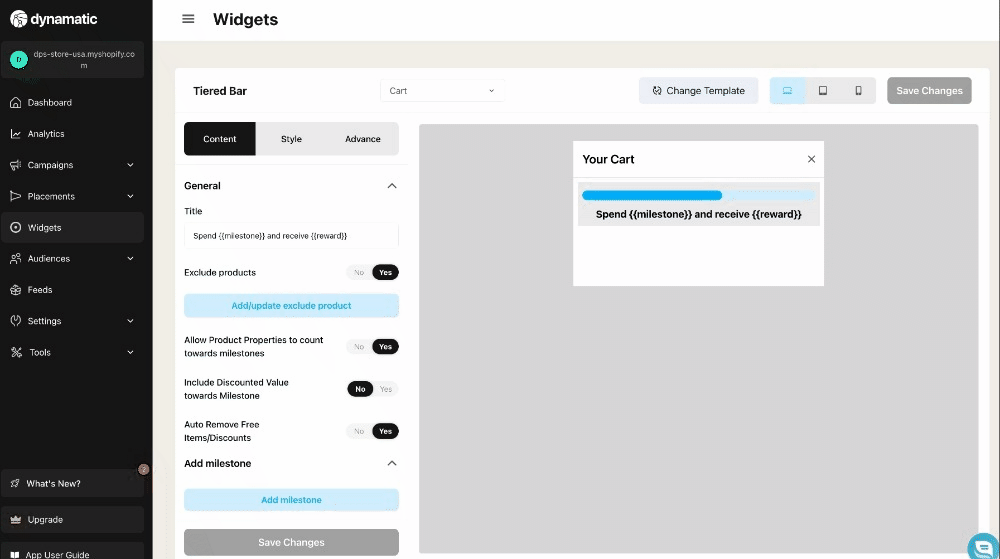
Content Tab
The content tab in each widget controls the core functionality of a widget. If the widget is a tier bar, this section is where you set the tiers, and the award a customer receives for each milestone they hit. If the widget is a banner widget, the content tab would house the area to upload banners, add destination URLs, etc. In short, the content tab is responsible for all the core features of the widget, but no styling or customization.
Style Tab
The style tab houses all the customizable design elements of a widget. This includes the ability to change colors, fonts, sizes, and the look and feel of the widget. It doesn't control the actual features or behaviors of the widget just the design elements.
Advanced Tab
The advanced tab allows you to customize the widget by adding custom CSS, as well as limiting a widget to a specific device type, etc. In short, anything that is a bit more advanced will typically sit in the Advanced tab.
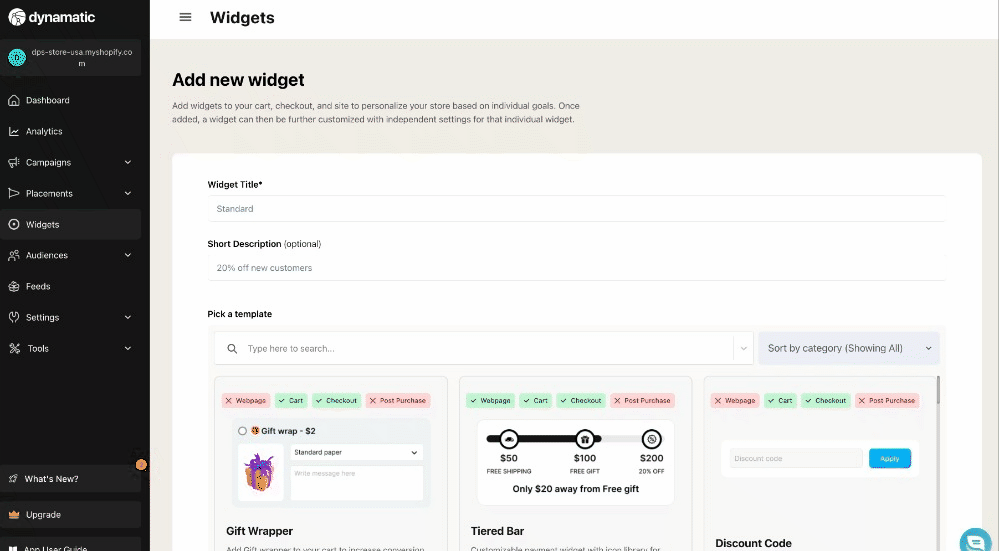
Widget Templates & Placement Category
Some widgets have multiple versions or "templates" of the widget that you can choose from. The purpose of having multiple widget templates is a combination of both aesthetics and minor functionality. For example, we may have four or five-tier bar types, with the difference being how the milestones display within the tier bar. A widget for a clock timer might have different styles clocks.
While every widget includes the style tab to customize look and feel, the templates add a more complex layer of customization because it fundamentally offers a completely different look that can't be achieved by changing just colors, sizing, and fonts.
Selecting a widget template is usually the first step, once you've chosen a particular widget to create. However, you can change templates by clicking the "change template" button on the top of the widget editor.

Different templates may have slightly different settings or styling options that correspond to that specific template's design elements.
Similarly, the drop-down in the middle allows you to select the placement "category" you plan to add this widget to. Widgets can be added to Cart, Web Pages, Checkout etc. Because of how Shopify is built, some widgets have design limitations or setting restrictions depending on where the widget will be displayed.
Our cart placement type is naturally the most flexible since the slide cart is powered by Dynamatic App. However, widgets added using "Extensible Extensions" to checkout, thank you page, or Order Status pages are more limited by Shopify. While we are constantly working on upgrading widgets for these places based on Shopify's releases, the reality is that Extensions using Extensible are required to use only specific elements that shopify provides.
Before beginning with customizing a widget, make sure you select the placement area you plan to add the widget as it can change what settings and styling options are available.
Let's Create a Tier Bar Widget!
Now that we've covered the fundamentals of the widget structure, let's begin with creating a Tier Bar widget and adding it to our demo store. As mentioned earlier, we will be adding this to the Top of the Cart placement we created earlier. For this test, we will create two different tiers or milestones.
First we'll create a free shipping option for customers who spend $50 or more. Then we'll create a milestone for a free gift for orders $100 or more.
Let's have a quick look at the settings on the Content Tab of the tiered bar widget. 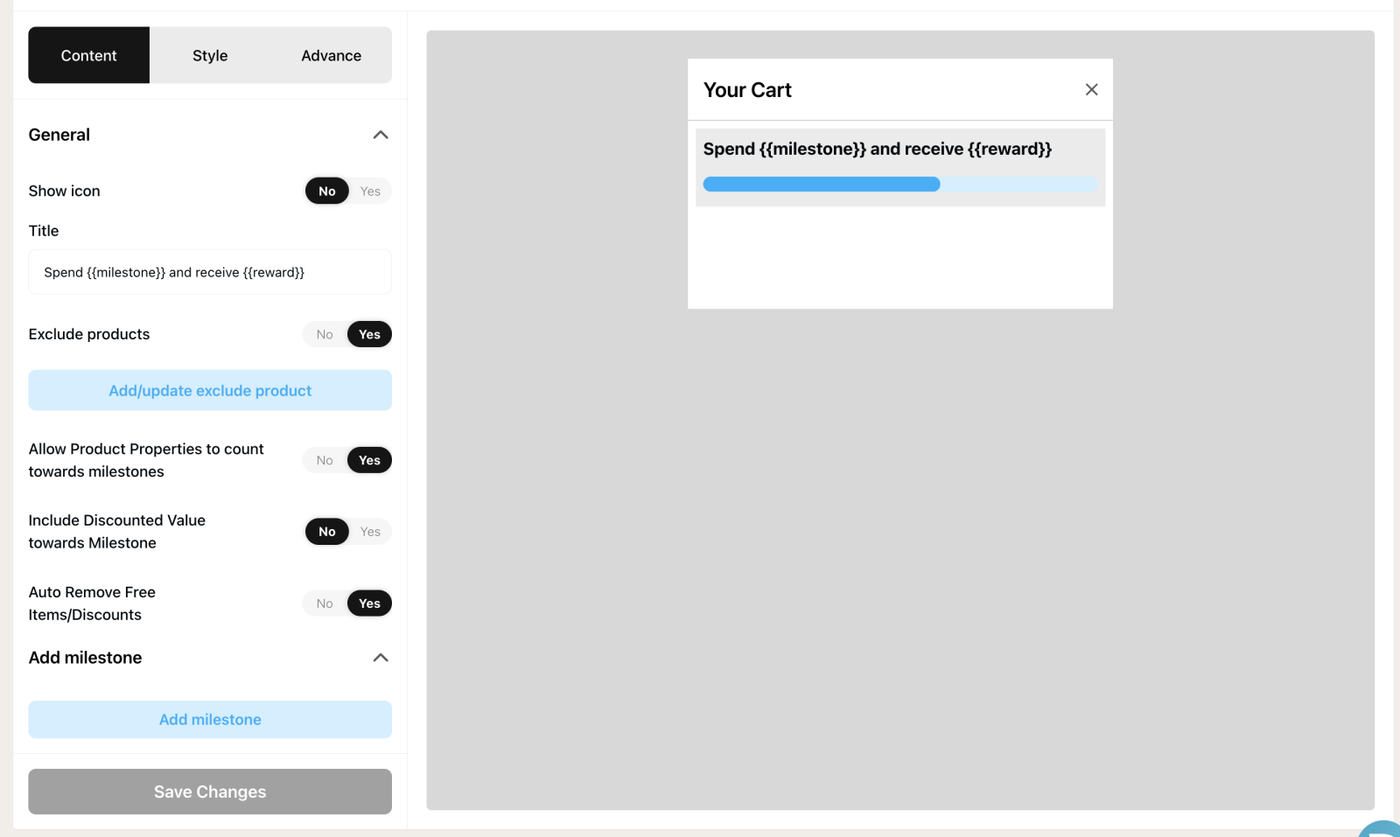
As you can see, the widget has a few basic settings that are more global in nature to the tier bar, and then the option to "add a milestone."
You can exclude items you don't want to count towards a tier/milestone, as well as set whether the free item or discount is automatically removed from cart if the milestone is no longer met. By clicking "Add Milestone" you can then begin to build out those tiers.
I'm starting with the Free Shipping for $50 or more. 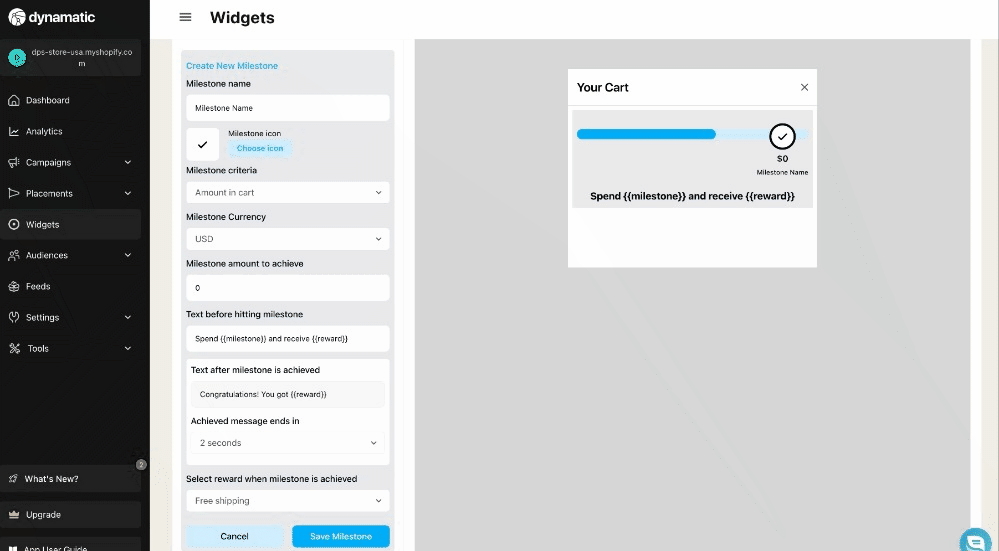
Now that I've added that, I can add the second milestone for a free gift if the customer adds more than $100.
This milestone will require I pick the "gift" as well. 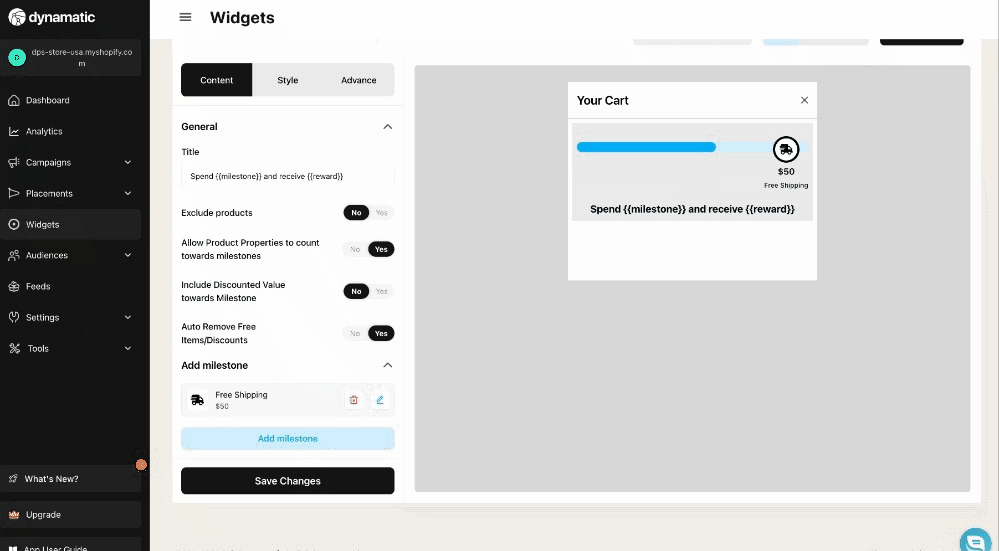
Note: You can change the icons as well, so that those cute little icons display in the tier bar!
Once I've set the milestone criteria, I add the item I want to be the gift, and the method of how this gift will be discounted to "free." Dynamatic App offers a variety of ways, including using a hidden item (you'd simply select the duplicate "free item") or by actually discounting an item to free using Shopify Functions. 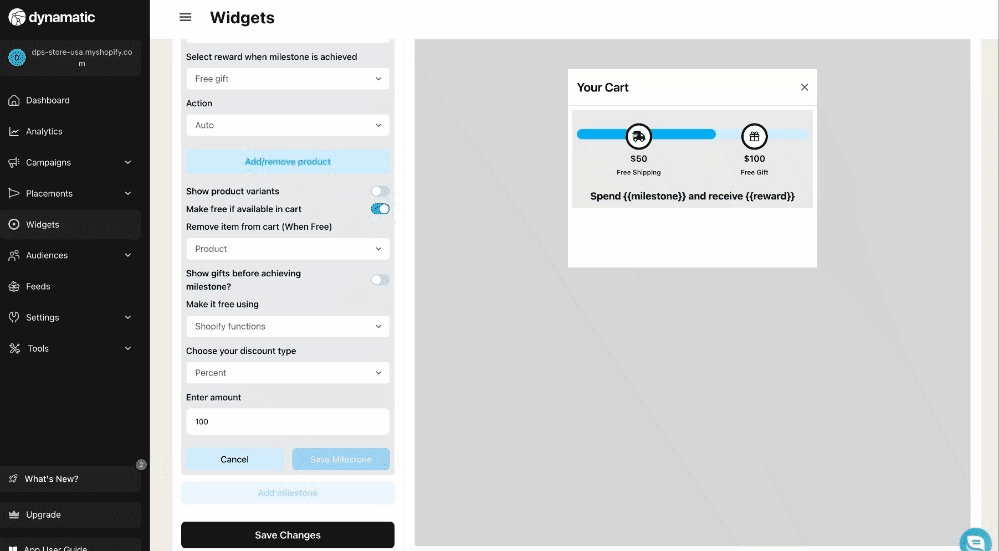
You'll notice I also set the gift to be automatically added, and for it to make it free if the item is already added to cart. Meaning, if the customer already has the "gift" added to cart at full price, instead of adding a second one that is free, we can simply discount the existing item to free. Of course, this is totally optional, since you might prefer that the customer buy 2 items, one that they pay for and one that was given as a gift.
Once done, I save the milestone, and save the widget, and we are done! The widget has officially been created.
Let's create a Campaign!
At this point we've now created everything we need to get our new Tier Bar live on the site. We've got our placement, audience, and widget dialed in! However, to get the widget live, we must create a campaign to tell Dynamatic App that we want this widget to display for these people in this placement.
Head over to the campaigns tab in the Dynamatic App backend, and click "Create a campaign."
Campaigns in Dynamatic App are like folders, and they house "Experiences" which are most easily described or resemble an "ad set" or group of rules and instructions. Essentially, the Experience is where you assign an Audience + Placement + Widgets. 
Naming campaigns is essentially up to you, with the goal of trying to create campaigns that house specific strategies or goals you are trying to accomplish. You might have a campaign for all evergreen cart-related widgets, and a separate campaign for all promotional type widgets.
For this test, we'll just call the campaign "Cart-Test" and have our experience "Tier Bar-Test". We now can select our audience, zone/placement, and select the tier bar widget we created earlier.

Once publishing live, we can always edit a campaign and add more experiences. We can also add additional widgets to an existing experience and re-order the widgets in that placement by dragging them up or down. 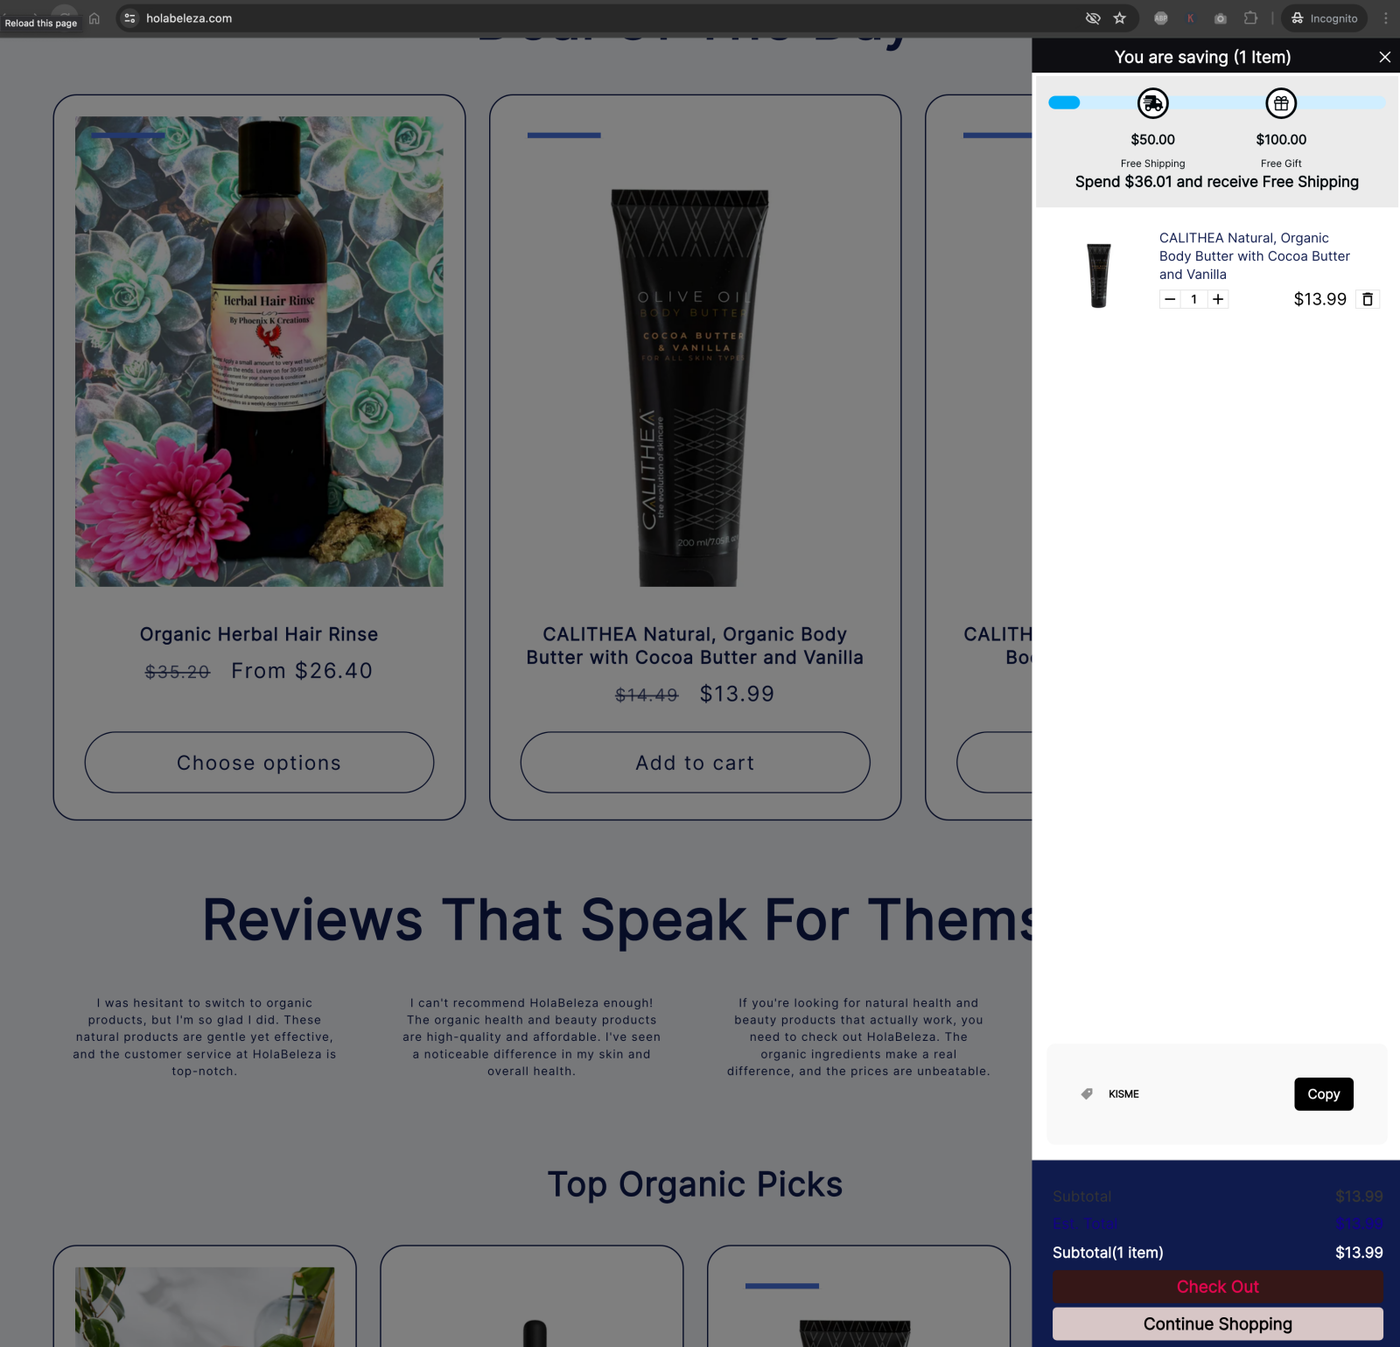
The widget is now live, and we can see the tier bar displayed above the line items at the very top of the cart!
That's really all there is to it! 😀