
Placements & Zones: What are they?
Let's discuss placements and zones! If you haven't already, please check out our overview of "What is Dynamatic App" which briefly explains the over-all structure of the app. But let's begin with a quick intro to Placements & Zones.
Table of Contents:
Introduction to Placements & Zones
Placement Categories
Placement Types
Creating a Dynamatic Zone & Zone IDs
Creating Zones for Theme Pages
Creating Zones for Checkout (Shopify Plus Only)
Creating Zones for Thank You Page/Order Status
Dynamic Zones vs. Static Zones
Creating Zones for Dynamatic Slide Cart
Introduction to Placements & Zones
In the following section, we'll do our best to give you a quick overview of what placements are, how they work, and why they are important!
What are Placements and Zones?
In the easiest terms, placements or zones are designated areas in your store that a Dynamatic widget can display. Imagine you owned a blog or News site, and your goal is to make money from display ads. You'd essentially work with a developer to create areas on different article formats, home page, etc where ads can be displayed. These would then be set up with an ad network and ad server so that you can easily display ads in those slots.
Similarly, the Dynamatic App utilizes the same concept, where different blocks can be created, and widgets can display inside that Placement/Zone. You don't have to display anything of course, and if your audiences, or campaigns don't qualify for a widget in a specific placement or zone, then nothing will display in that slot.
What type of Placements do you offer?
We utilize theme extensions, checkout extensions, and our own drag-and-drop editor to create these zones on your store. Depending on where you plan to add a zone, you need to use the correct method. These methods are dictated in large by Shopify rather than us! Below are the type of zones you can add, and step by step guide to adding those zones.
Regardless of where you plan to add a zone, you'll still need to create a Zone ID, which is a dynamatic ID that connects the dots between an extension added on the theme and our backend system. More on that later!
Understanding Placement Categories
When creating placements, it can easily start to get out of hand as you attempt to keep track of what placements are where, why you made them, and being able to find them. To combat confusion, and as a way of organizing zones/placements, we've created a basic category structure or "folder" that you can place zones into.
Simply put, categories don't play any active role at this time inside Dynamatic. They are purely a tool to help organize zones. When you first install, we add automatically two zone categories: Slide Cart | Post Purchase. These two categories are there because one represents zones being added to our slide cart specifically which must be done inside Dynamatic (more on that here). Post-purchase as well are not really a zone in the typical sense, because they simply display in real-time based on rules once you've selected Dynamatic to be your post-purchase tool.
You can create new categories easily by simply selecting the categories section in the Dynamatic App backend, and adding a new one like this: 
When you then create a Zone in Dynamatic, you will be presented with the option of selecting a category for the zone, and your new category will then be displayed and become available for selection. 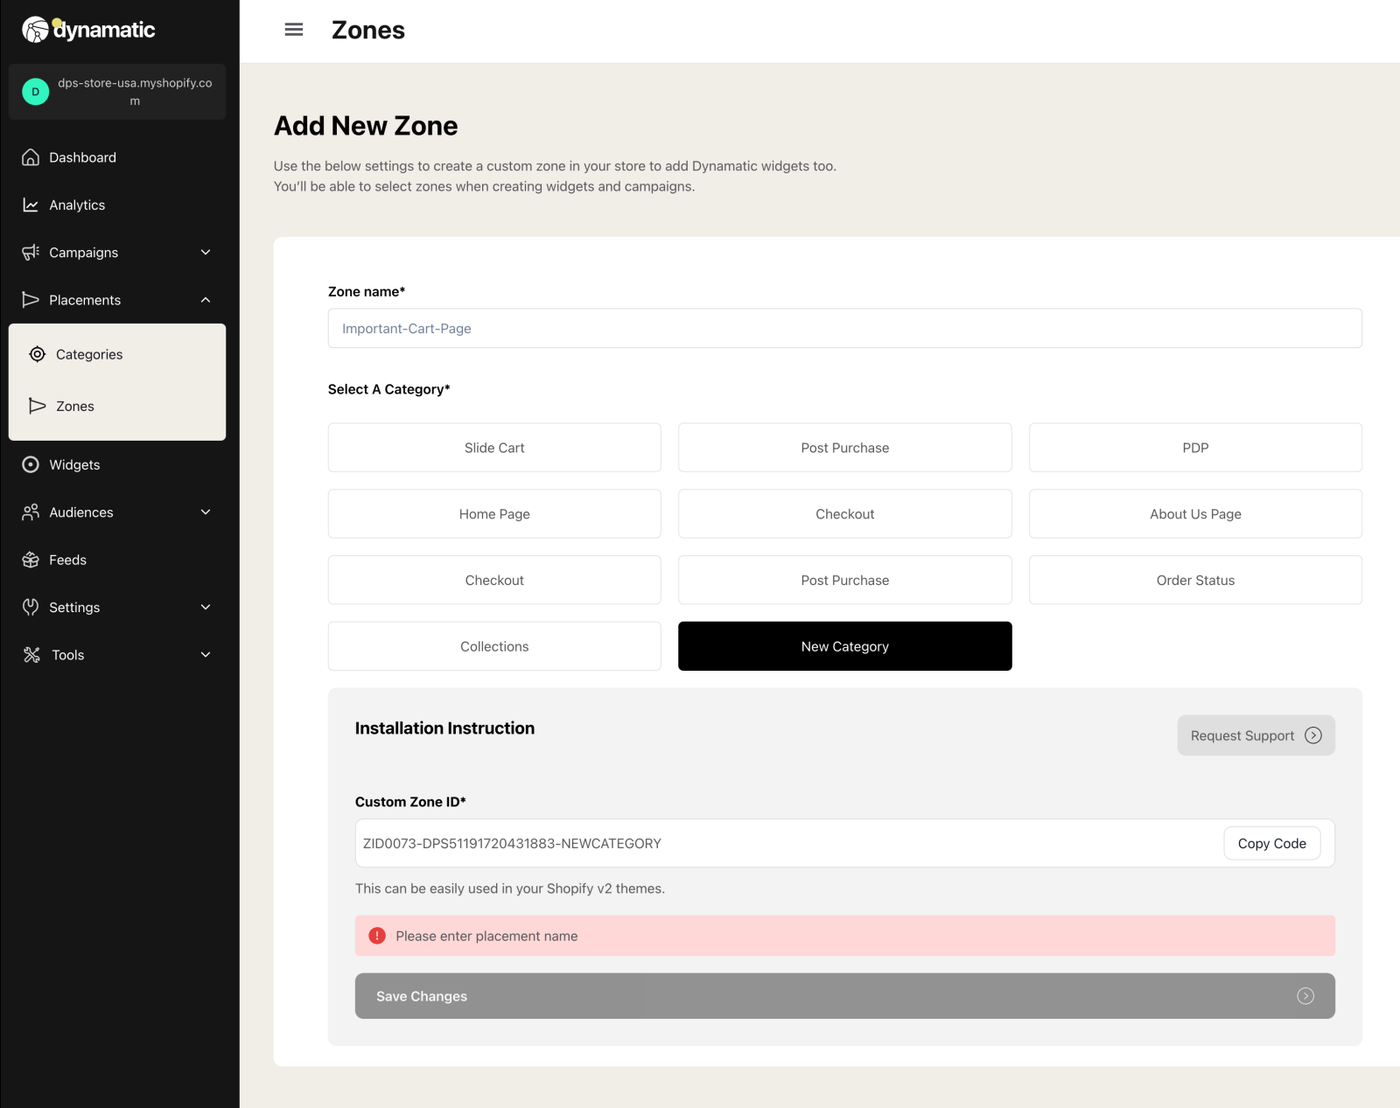
Best Practices for Categories
With every business, there are so many different use cases and methods of organization. Some merchants like to have categories per each page type: Home Page, Collections, PDP (Product Detail Page), etc. Others like to build out their categories around promotions or campaign types. At the end of the day, I'd argue that it doesn't matter a whole lot, so do what is most comfortable for you!
Placement Types
Shopify has multiple methods of managing various pages across your website, and because of that, Dynamatic has 3 primary methods of creating a zone depending on where you plan to create and add widgets. Below we will explain the various methods, and how they are different.
Type 1: Theme pages:
Theme pages would be any page other than checkout, customer accounts, our slide cart, thank you page, and order status pages. Essentially we are talking about Home Page, Collections, Product Detail Page, 404. Search, and any other page on your theme. These pages utilize sections and blocks in the built-in shopify theme editor.
Type 2: Checkout Extensions (Shopify Plus Only)
Shopify Plus merchants have the added benefit of being able to customize their checkout on Shopify. This is a feature that Shopify provides to their Plus merchants, and is not something related to Dynamatic App, or your pricing plan with Dynamatic App. The ability to add content or upsells etc to checkout is limited by Shopify to plus merchants, and is the same for any app on the Shopify app store.
Checkout Extensions are a unique method shopify introduced as part of their "Extensible Checkout" which has limitations in design, as well as layout and functionality. In short, Shopify dictates what functionality can be available and used in Checkout, as well as the design elements developers can utilize when adding and creating "checkout extensions."
The Dynamatic team has worked on checkout extensions from the very first day it was introduced, and we've discovered work-arounds and loop-holes that allow for additional functionality. However, with all of that, there are absolutely limitations, and that is important to note.
While you may have some options for styling and design on a widget when you plan on adding it to a product page, or our cart, you may not have that same level of customizability for checkout.
Checkout extensions are added to the store by utilizing the Shopify Checkout Editor, and can be accessed either via the Shopify setting or via the theme editor. Below are examples of both:
Editing via Settings
Editing via the Theme Editor
Practically there is no difference which method you choose to access the checkout editor. The only difference I can think of is that by accessing it from the general settings > checkout you have the ability to select a duplicate version of checkout that isn't published live yet, and can then add extensions to that area without it going officially live.
Type 3: Customer Accounts, Thank You Page, Order Status Page
A recent update from Shopify brought the "extensible accounts" to all shopify plans. In the past, editing the thank you page required custom code on the "additional scripts" area of the checkout settings. Shopify is sunsetting that option and has replaced it with "extensible" for these pages. This means, similar to how the Plus stores can customize checkout, all shopify merchants can now create additional content on Thank You, Order Status, and Customer accounts.
Accessing these pages is done through the theme editor, by selecting those pages from the drop-down in middle of the top bar. 
Again here, since these utilize the new Shopify "extensible" framework, the elements available to developers are more limited than traditional extensions you would be able to add on regular theme pages. However, it is available to all shopify plans, so I guess that is a move in the right direction!
Type 4: Dynamatic Owned Content (ie. Slide Cart)
Another type of Placement is the Dynamatic Cart. Since Dynamatic's slide cart is wholly powered by us, adding placements to Dynamatic can not be done in the shopify theme editor. Instead, placements and zones are created inside our app backend.
When selecting the "slide cart" category in the "create a zone" area, you'll notice the bottom page displays a drag and drop editor. This allows you to create a placement/zone for your slide cart!
At the moment only the slide cart requires using the Dynamatic drag and drop editor to create placements. This might change in the future if we create additional features! 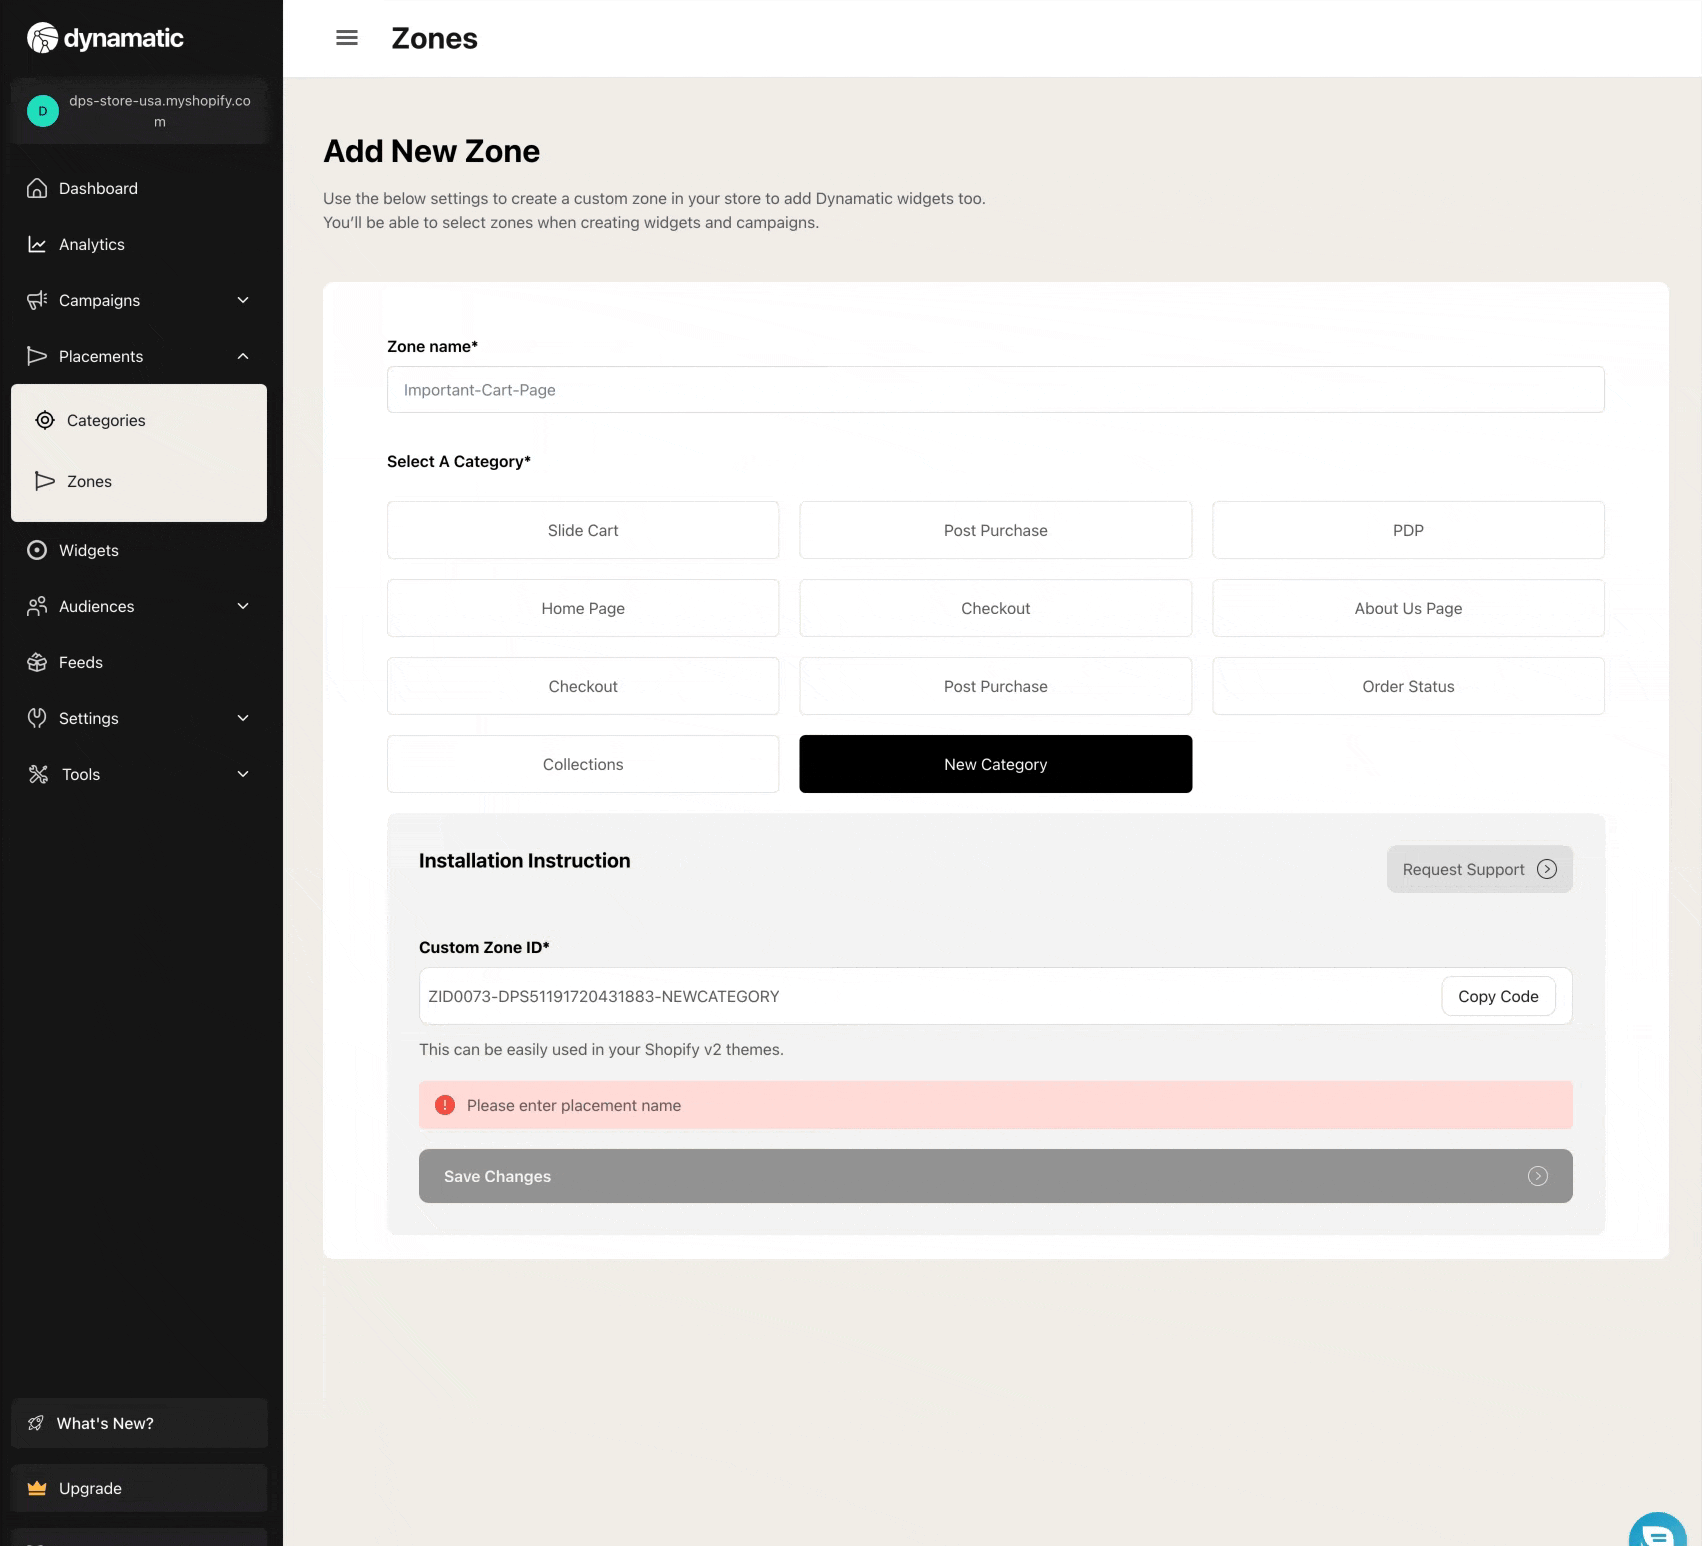
There you have it! That is the four main placement types, and a quick over-view of the differences between them.
Dynamic Zones vs. Static Zones
To streamline our platform for merchants we recently added the option to create static zones. Static zones are essentially zones that you'd create if you have no intention of changing the widgets in that zone based on audiences, campaigns, or seasons. For example, if you wanted to add a trust badge to your cart, and you want that to always be there, you could use a static zone for it.
Static zones don't require campaigns or audiences and can house one single widget at a time. If you select a static zone, that static zone will immediately begin showing as soon as you assign a widget to it.
Conversely, a Dynamic zone is built to be able to house multiple widgets in the zone based on campaigns, audiences, schedules etc.
While some merchants might find the static zone useful, I prefer dynamic ones, and to just create an evergreen campaign and audience that includes (all active users) as a way around it. But, my personal preference is nothing but my opinion and so you get to choose!
When creating a zone, you'll see the choice pop up. If you select a Static placement, that will forever be a static zone, and can't be changed. You can of course delete that zone and have a dynamic one replace it.
Creating Zones & Zone ID's
Creating a zone to be used for Dynamatic Widgets is a fairly simple process. Visit our app backend, and select the Placement tab from the navigation, and select "Zones."
You'll be taken to the list of your current Zones, with some basic information for each zone displayed in the list. Note: The zone ID is easily copied right from the listing page, when you click the zone ID.
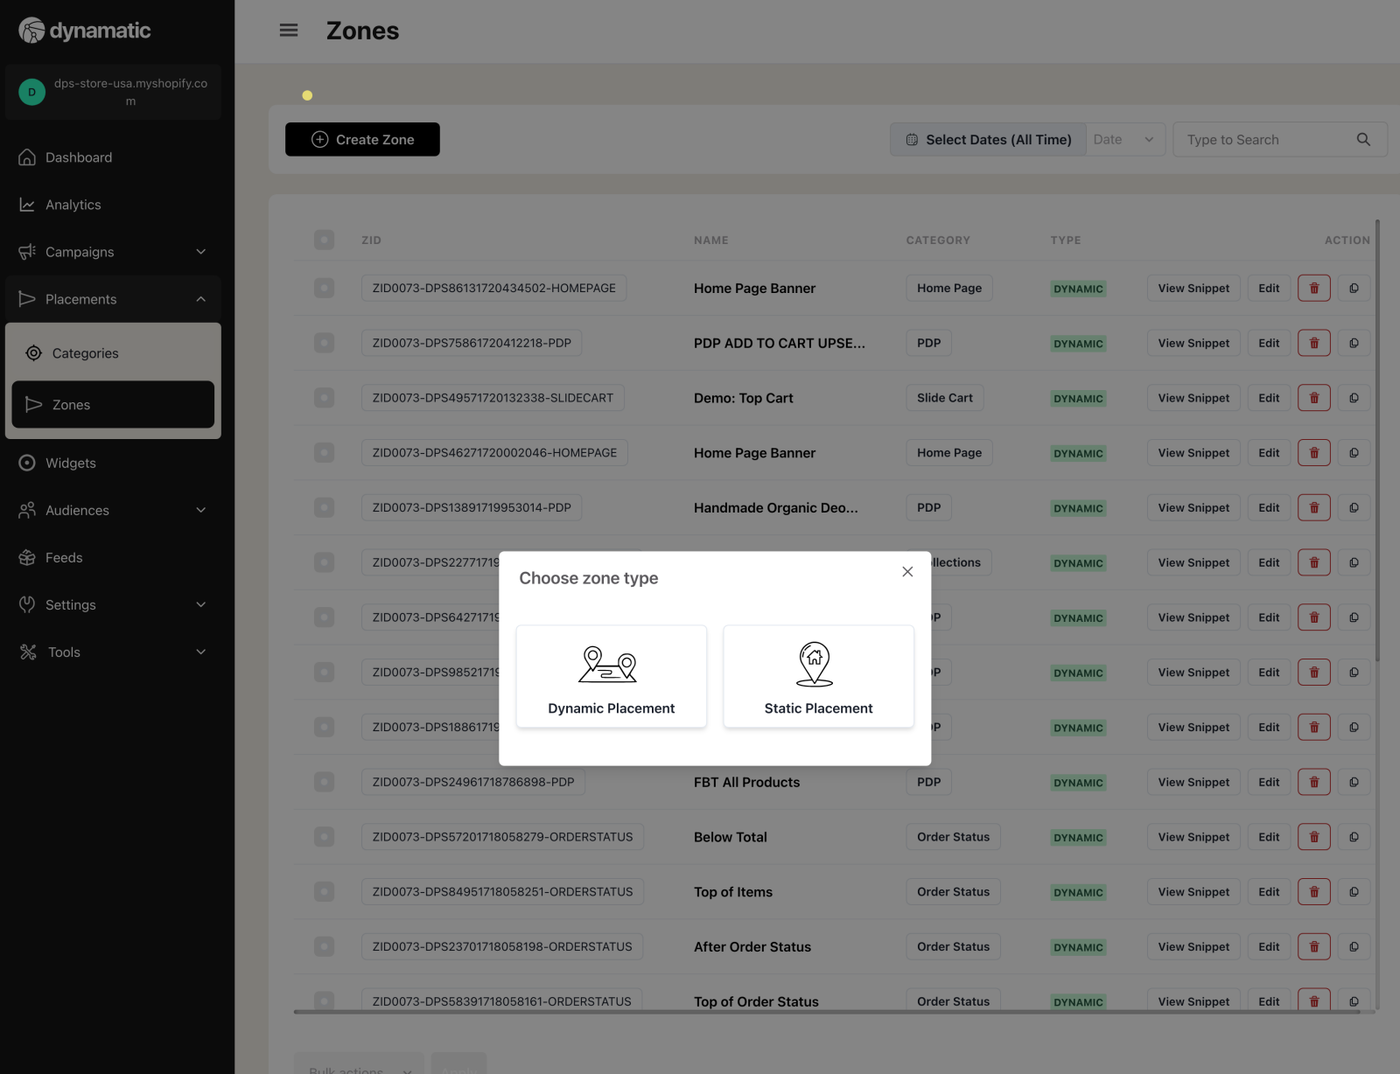
If you are creating your first Zone, or trying to create a new one, simply click the button "Create Zone". 
You will then be taken to the Zone Creator page where you can select a category. As mentioned above, depending on the category, the process of actually creating the full zone is slightly different. We have created walk-throughs of each of those types of placements below.
Creating Zones for Theme Pages
Creating a zone for a theme page is a two-step process.
Theme pages are essentially any page on your store controlled by the theme editor that isn't: Checkout, Customer Accounts, Thank You/Order Status, or the Dynamatic Slide Cart.
Step 1: Create a zone inside Dynamatic and Retrieve the Zone ID.
Simply put, we need to create a zone in Dynamatic that will be associated with the block or section being added to the theme. You do this as mentioned above by visiting the "Placements > Zones > Create Zone> and selecting the category you created that matches the type of Zone you plan to create.
For this demo, let's assume we will be adding a placement on the Home Page to display a banner.
As demonstrated below, you'll select the category, name the Zone, and click "Save Changes." The name of the zone is a friendly name to help you find the zone when creating a campaign/experience. We use the Zone names in a drop down, so naming the Zone something you'll remember is a best practice! 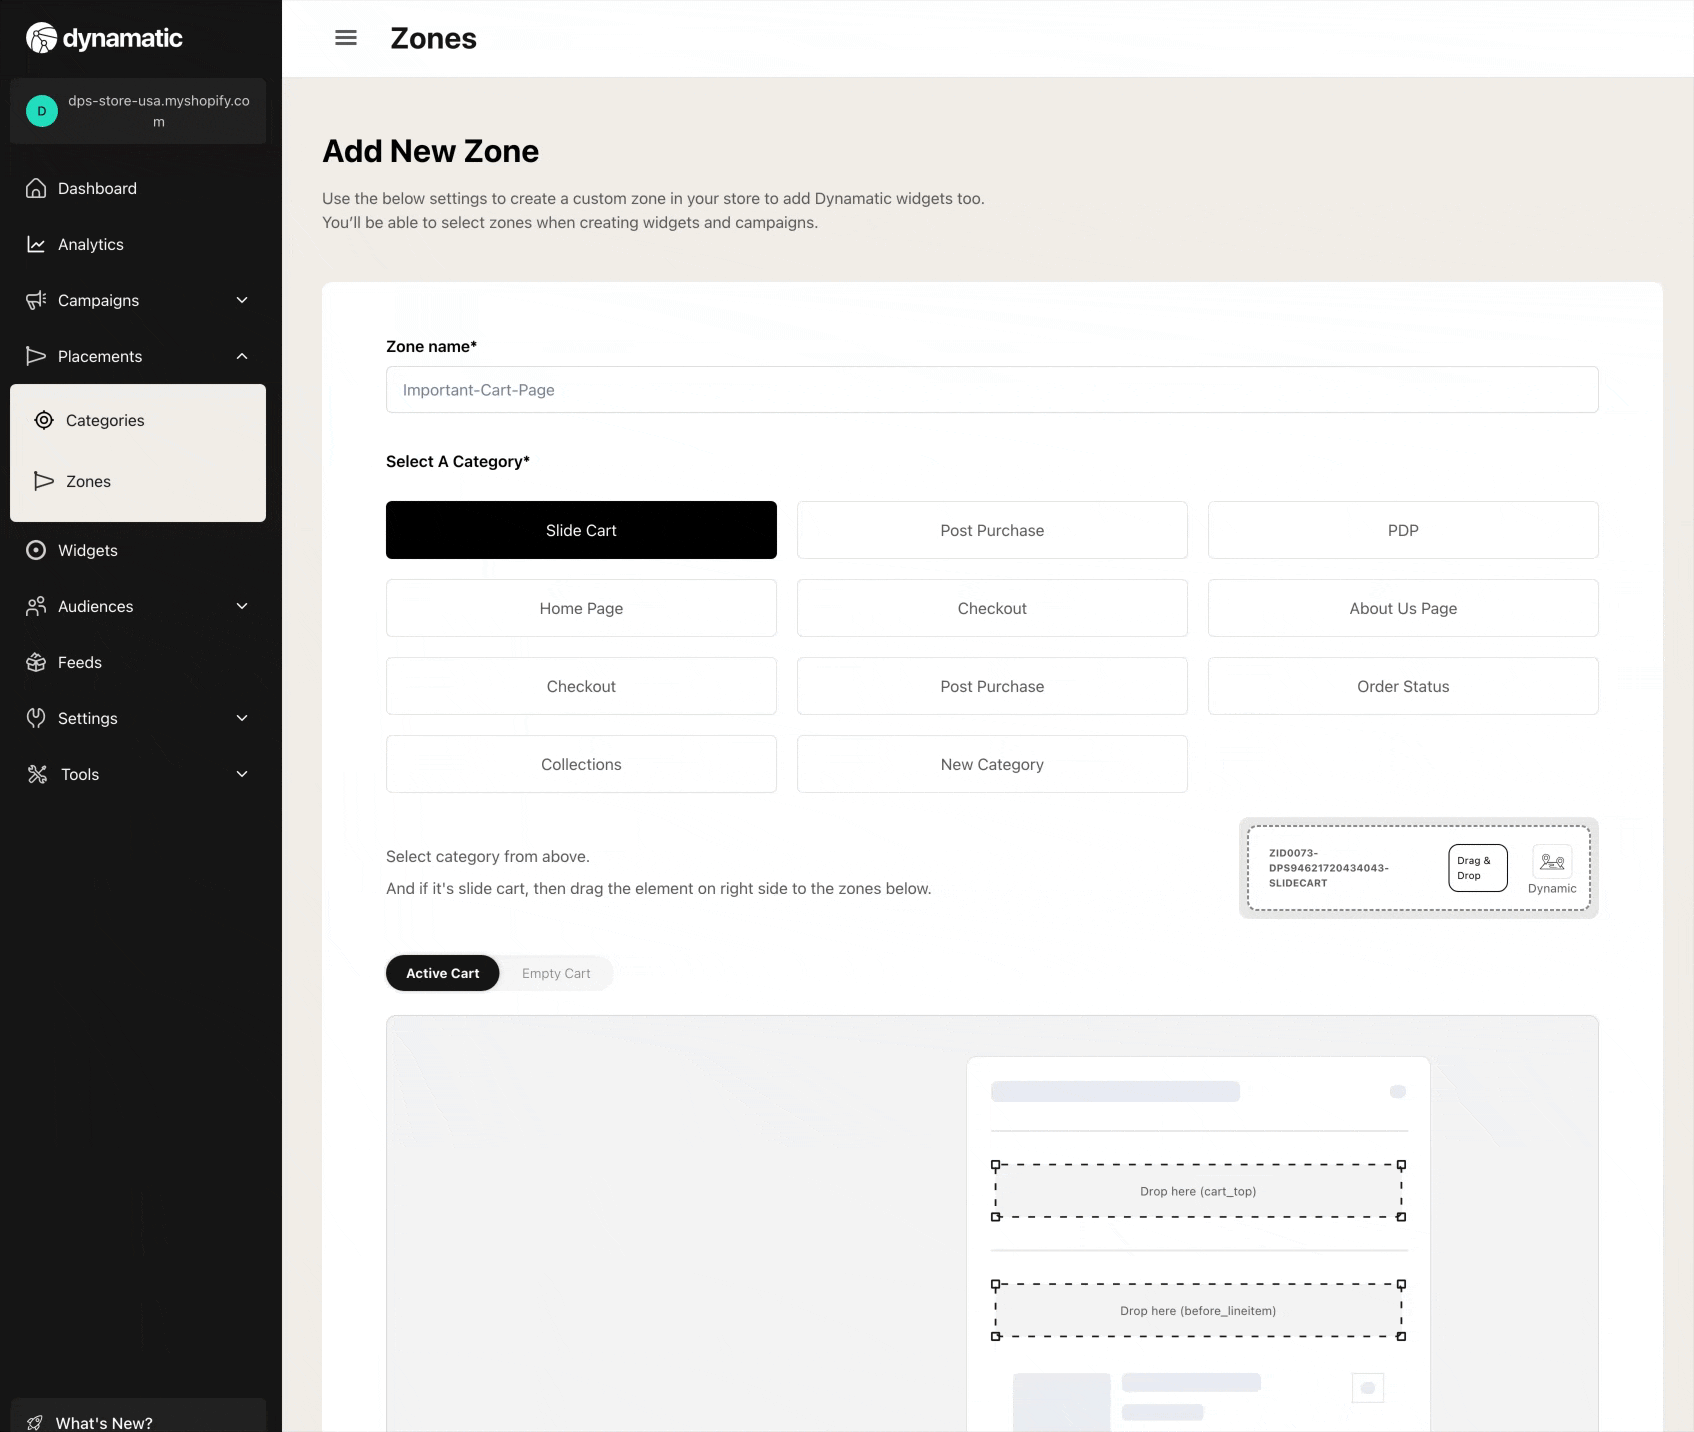
We now should have a Zone ID for our newly created Zone called "Home Page Banner" that we categorized under the Home Page category.
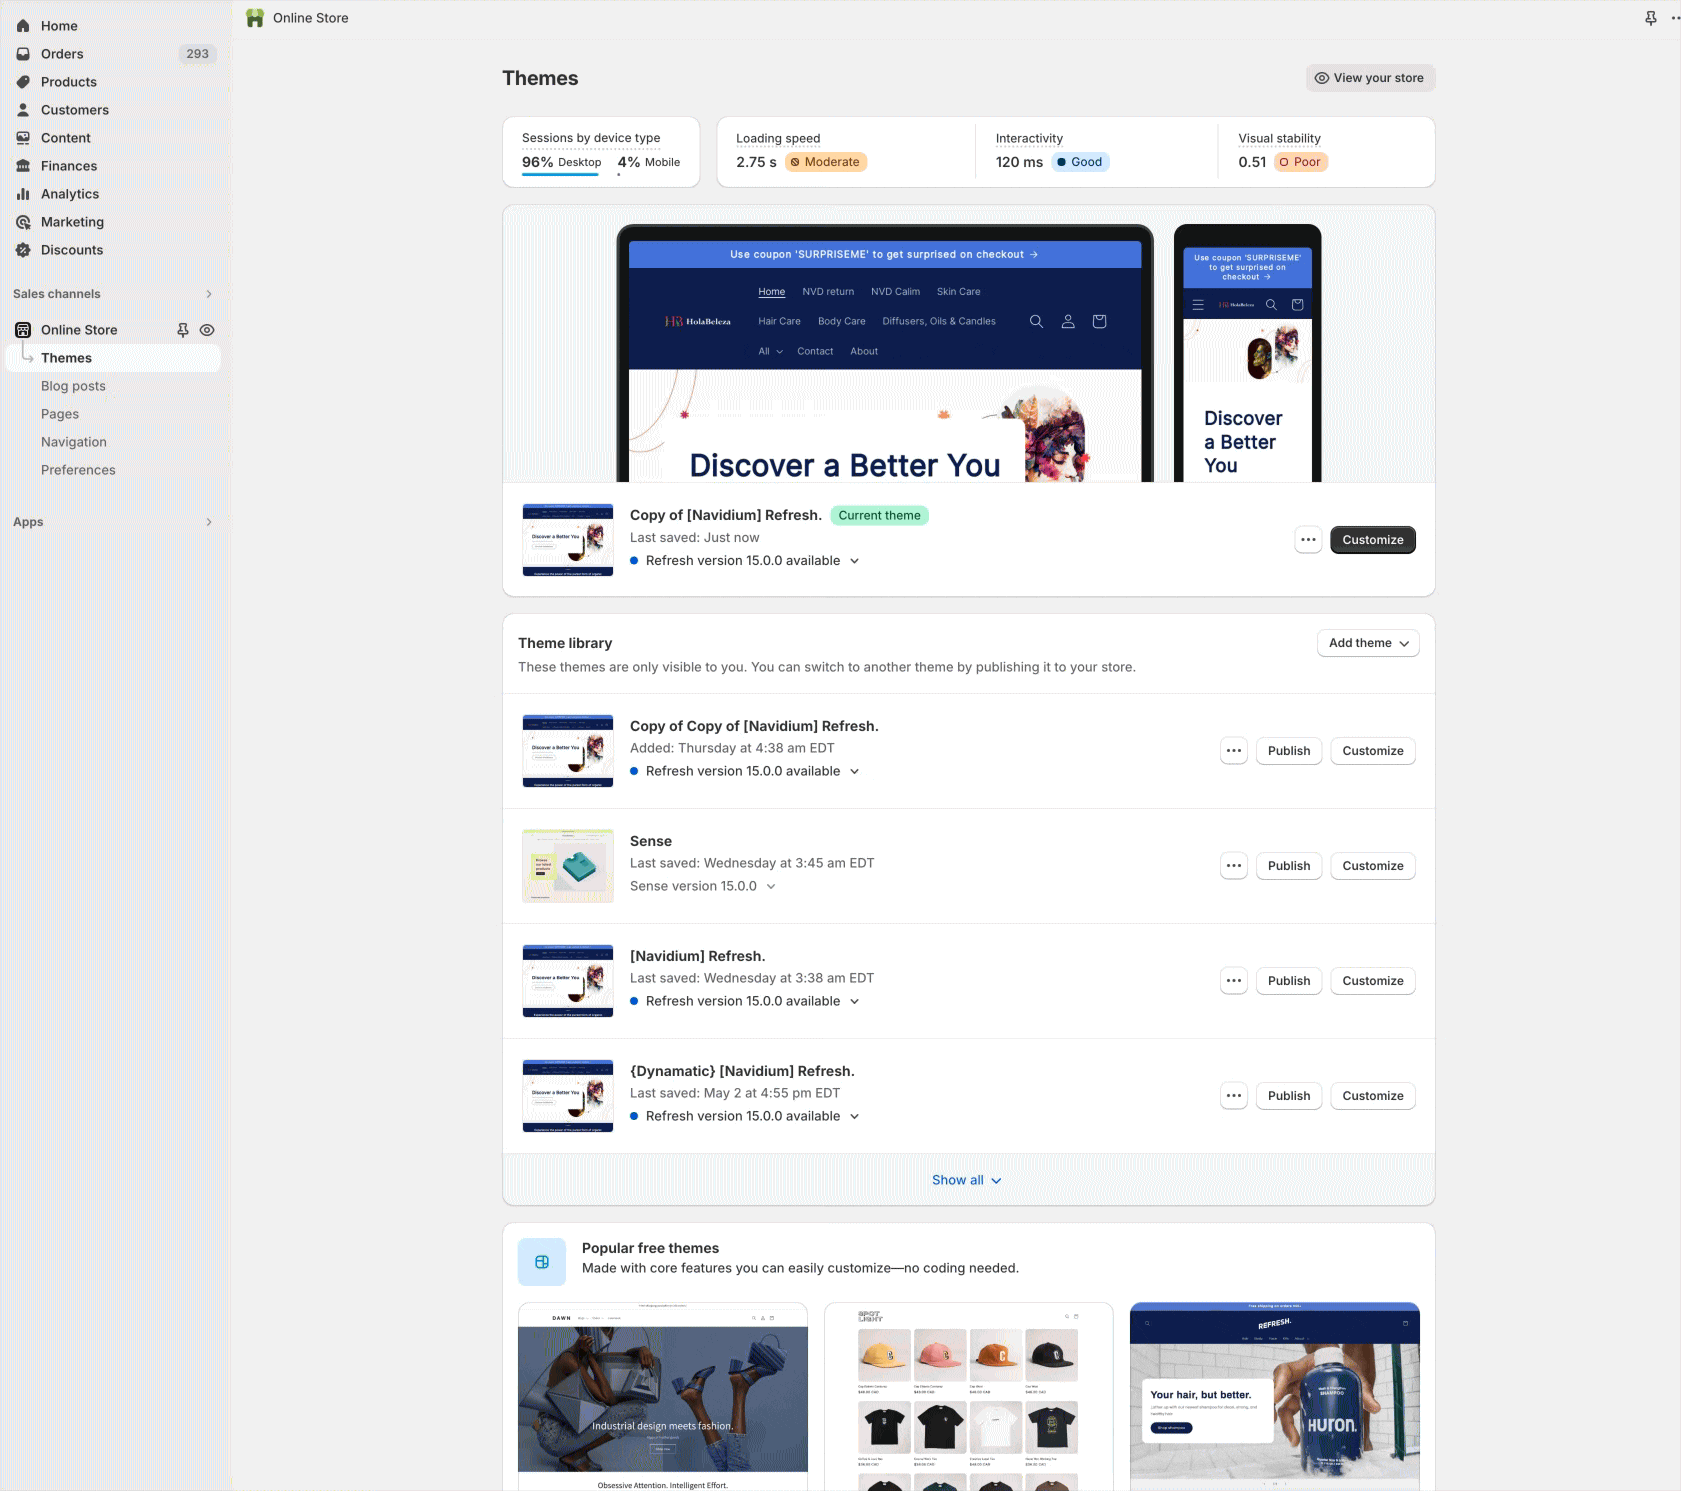
Step 2: Create a Section Block in the Shopify Editor
While a zone was created in Dynamatic, we still need to create an actual slot in our store's theme so that a widget can appear on the store. Creating a zone in Dynamatic alone would not help display a widget on the store, since there is no code or block created on the actual store.
In this step, we will walk you through the process of creating that section block on your theme.
TIP: We recommend having a duplicate theme for testing so that you can see how the widget looks in that placement before actually impacting the live site!
Head to: Sales Channels > Online Store > Themes in your shopify admin, and click customize on the theme you plan to add the Dynamatic placement to. 
Shopify will now load up your Home page by default, but you can ultimately scroll around the site, or use the drop down in the middle of the top bar to navigate to pages, products, etc within the shopify admin.
You can now identify the area you want to add a Dynamatic section block to, via the left side bar in the editor. Click Add Section or the "+" and select the "App" option from the pop up. Then Search for Dynamatic, and you should find a Dynamatic Zone option to add.
Once added, you should see the right side of the editor display a field to add a Zone ID. Paste the Zone ID you received from Dynamatic and click save! 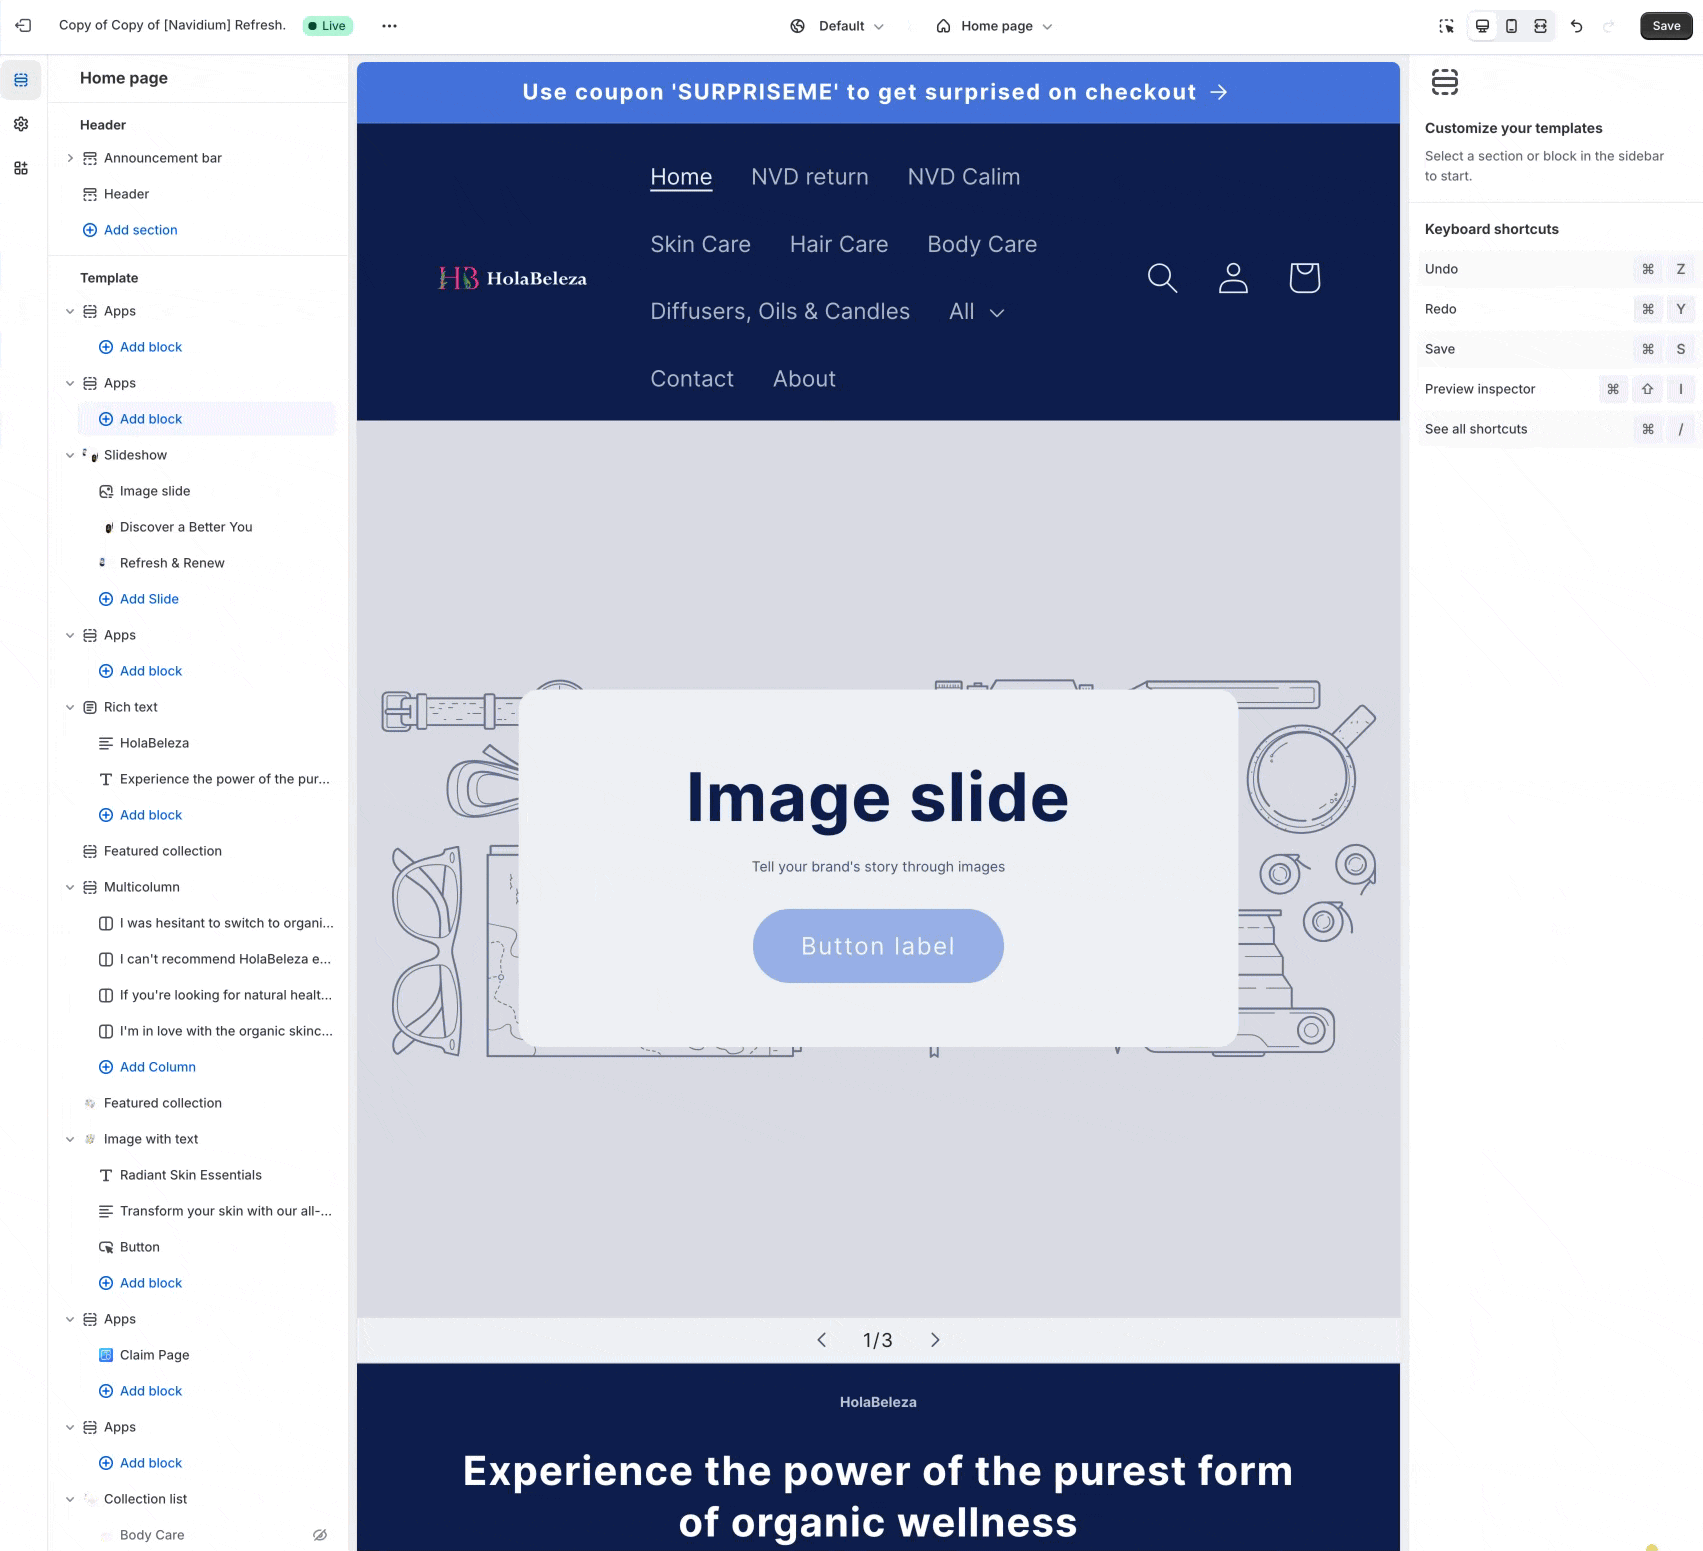
Congrats! You've now officially created a Zone. This placement can now be used with any Dynamatic Campaign and Experience and display any widget you like that is applicable to this page.
You can add as many zones as you like, as well as drag and drop that zone to a different area in your theme editor as desired. As long as the Zone ID matches that zone, it will display widgets you set for that zone.
Creating Zones for Checkout (Shopify Plus)
Creating a zone for checkout is quite similar to create a zone for theme pages, with the exception that you must utilize the checkout editor rather than the normal theme editor on shopify.
Step 1: Create a zone in Dynamatic and retrieve the Zone ID.
Head over to our app navigation and select > Placements > Create a Zone > and select the "Checkout Category." If you don't see a checkout category, you likely haven't created one yet, so simply create a new category called "Checkout."
You'll then receive the Zone ID, and save the zone with a friendly name. 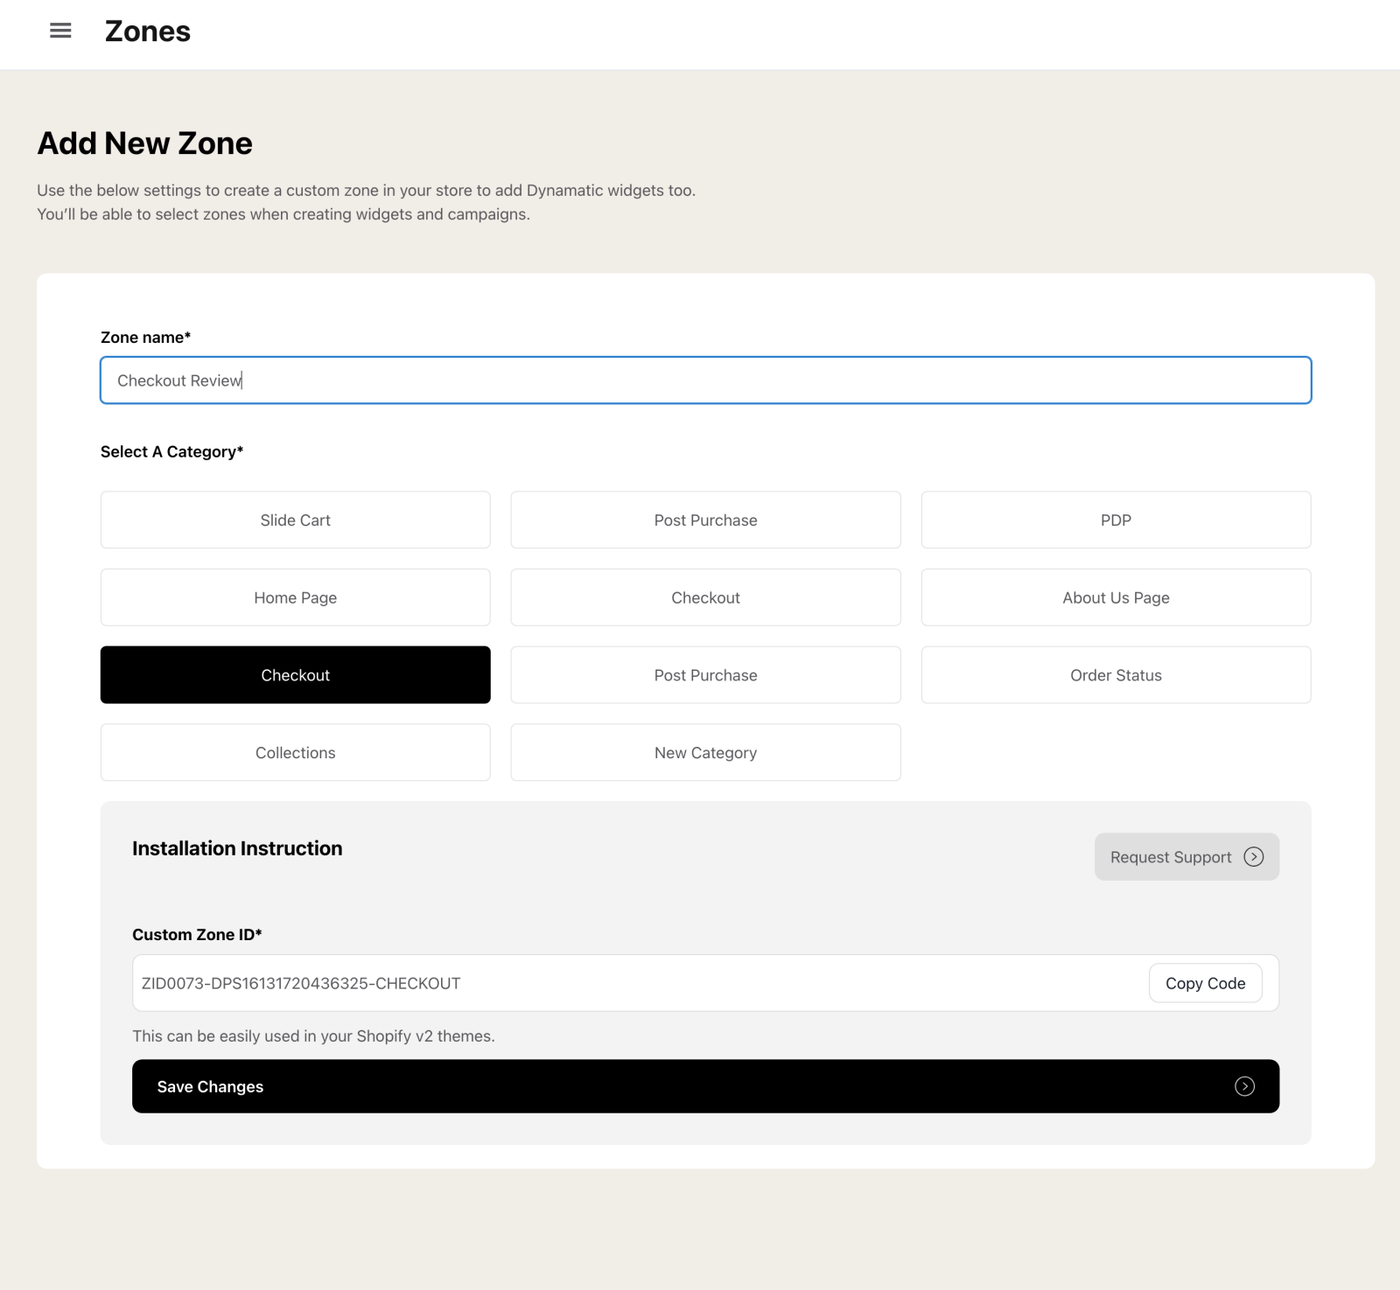
Step 2: Add the Dynamatic Checkout Extension to Checkout
As mentioned above checkout extensions can be edited by visiting your shopify admin and going to settings > checkout > edit checkout. This allows Shopify plus merchants to add additional content to their checkout. Shopify uses a similar drag and drop design like regular themes, but it is dedicated for "Checkout."
Noteworthy, depending on how you set up your checkout, extensions in checkout can be moved around anywhere Shopify allows for either one-page-checkout or the three-step checkout layout. However, if you are using the three-page layout, moving between checkout page steps requires selecting the page from the drop-down in the middle of the top bar of the Shopify editor. If you do use the three page layout, you can add zones/placements that only display on one of the pages depending on where you place it!
Click "Add app block" anywhere on the Shopify left editor bar, and select the Dynamatic Zone, and then place the Zone ID you copied from Dynamatic App into the checkout extension. Once saved you'll have created the relationship between that specific block and the Dynamatic system! 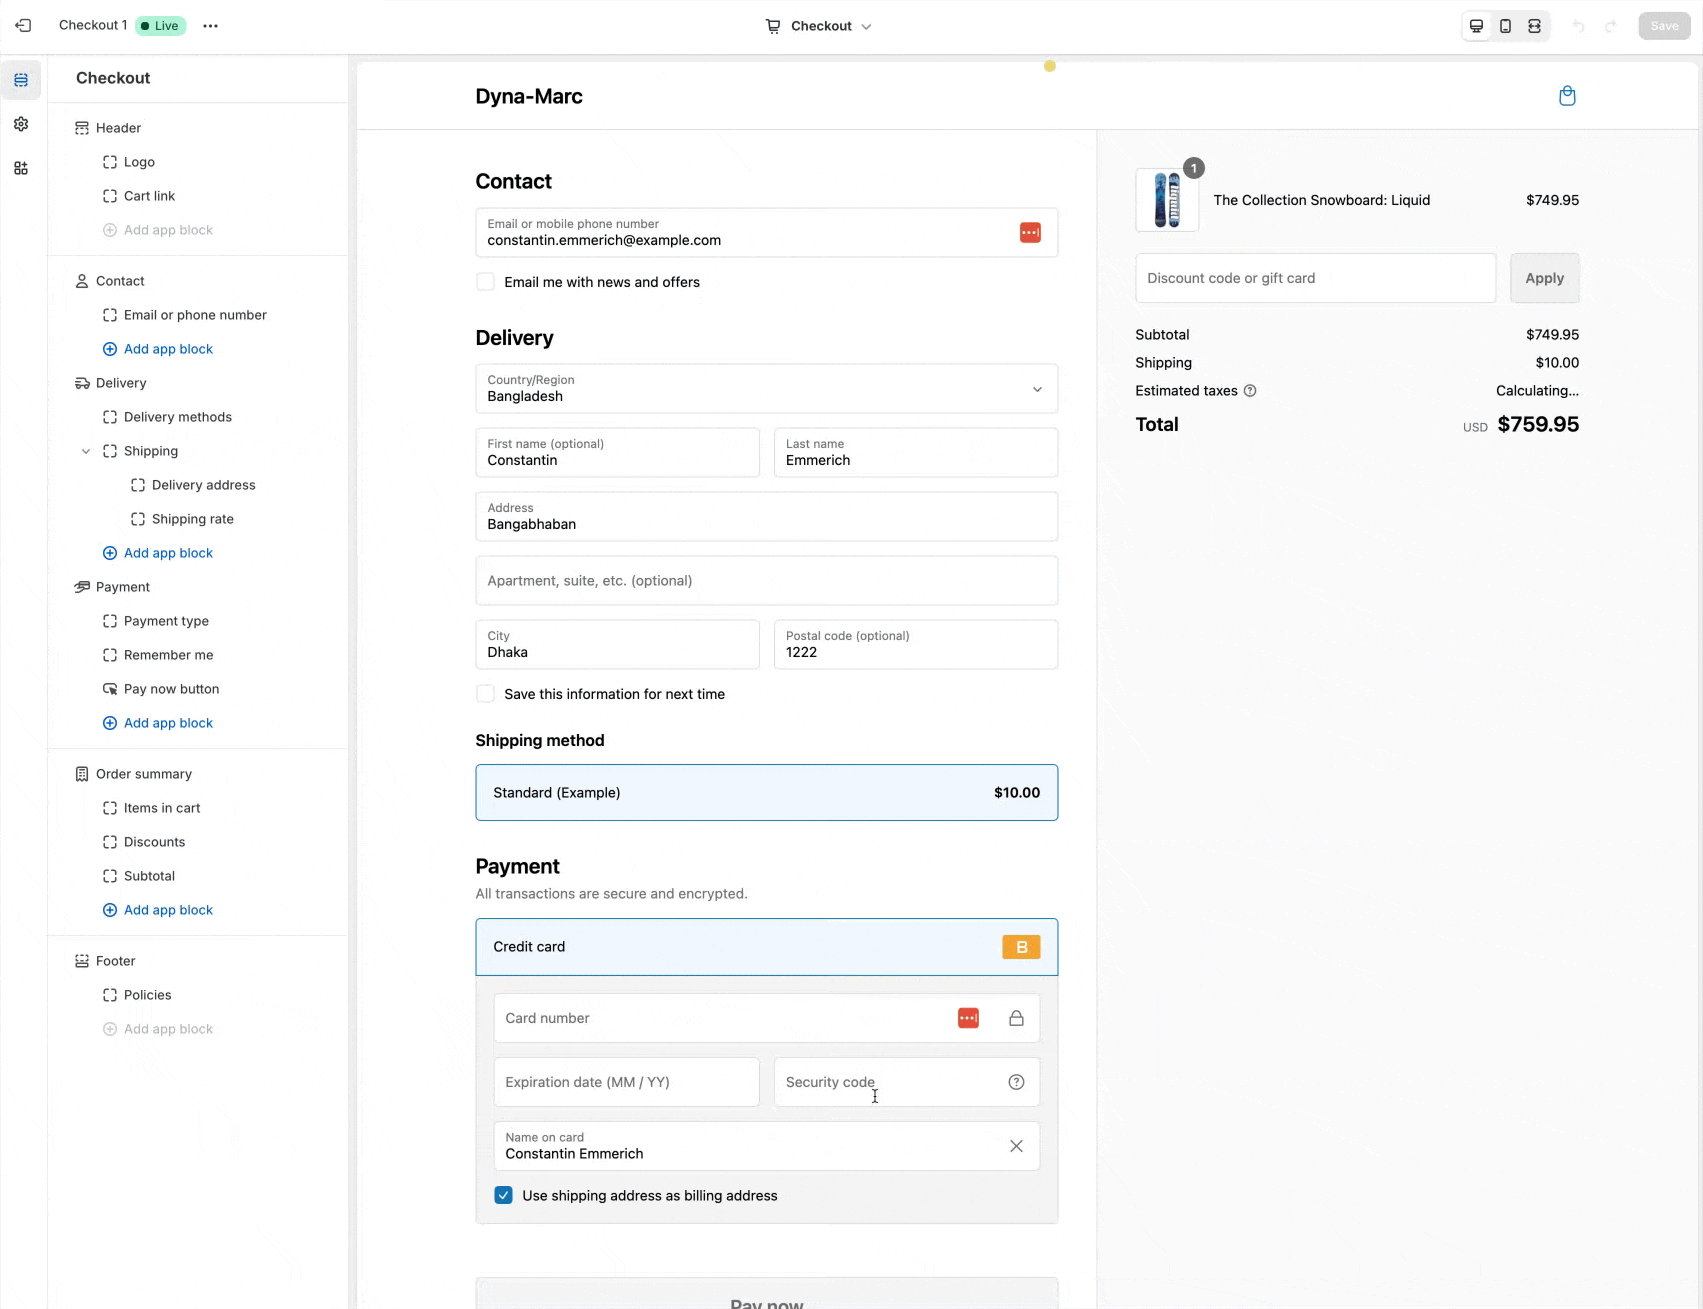
You can then drag and drop that zone anywhere you want within the shopify sections of checkout!
Creating Zones for Thank You Page / Order Status Page
Creating a zone for Thank you pages or Order Status pages is quite similar to creating a zone for theme pages, with the exception that you select those specific pages from the Shopify Theme editor.
You'll be selecting those by editing customer accounts in the shopify admin settings.
Step 1: Create a zone in Dynamatic and retrieve the Zone ID.
Head over to our app navigation and select > Placements > Create a Zone > and select the "Thank You Category." If you don't see that category, you likely haven't created one yet, so simply create a new category called "Thank You Page."
You'll then receive the Zone ID, and save the zone with a friendly name.
Now that you have that Zone ID, we can head over to shopify to complete the set up!
Step 2: Add an Extension to the Thank You Page
Adding extensions to the thank you page is now done by editing the Customer Accounts section.
Regardless of Shopify Plan, you can now add and customize the thank you page as well as the order status page. If you select "checkout" from the theme editor drop down on the top bar (right in the middle), you will then be taken to the checkout extensible editor. Non shopify plus plans won't see an option to add apps to the checkout, but they can use the drop down menu on top again to change to the order status page or thank you page.
You then click "add app" at the very bottom left corner of the screen, select Dynamatic Zone, and paste the zone ID in. 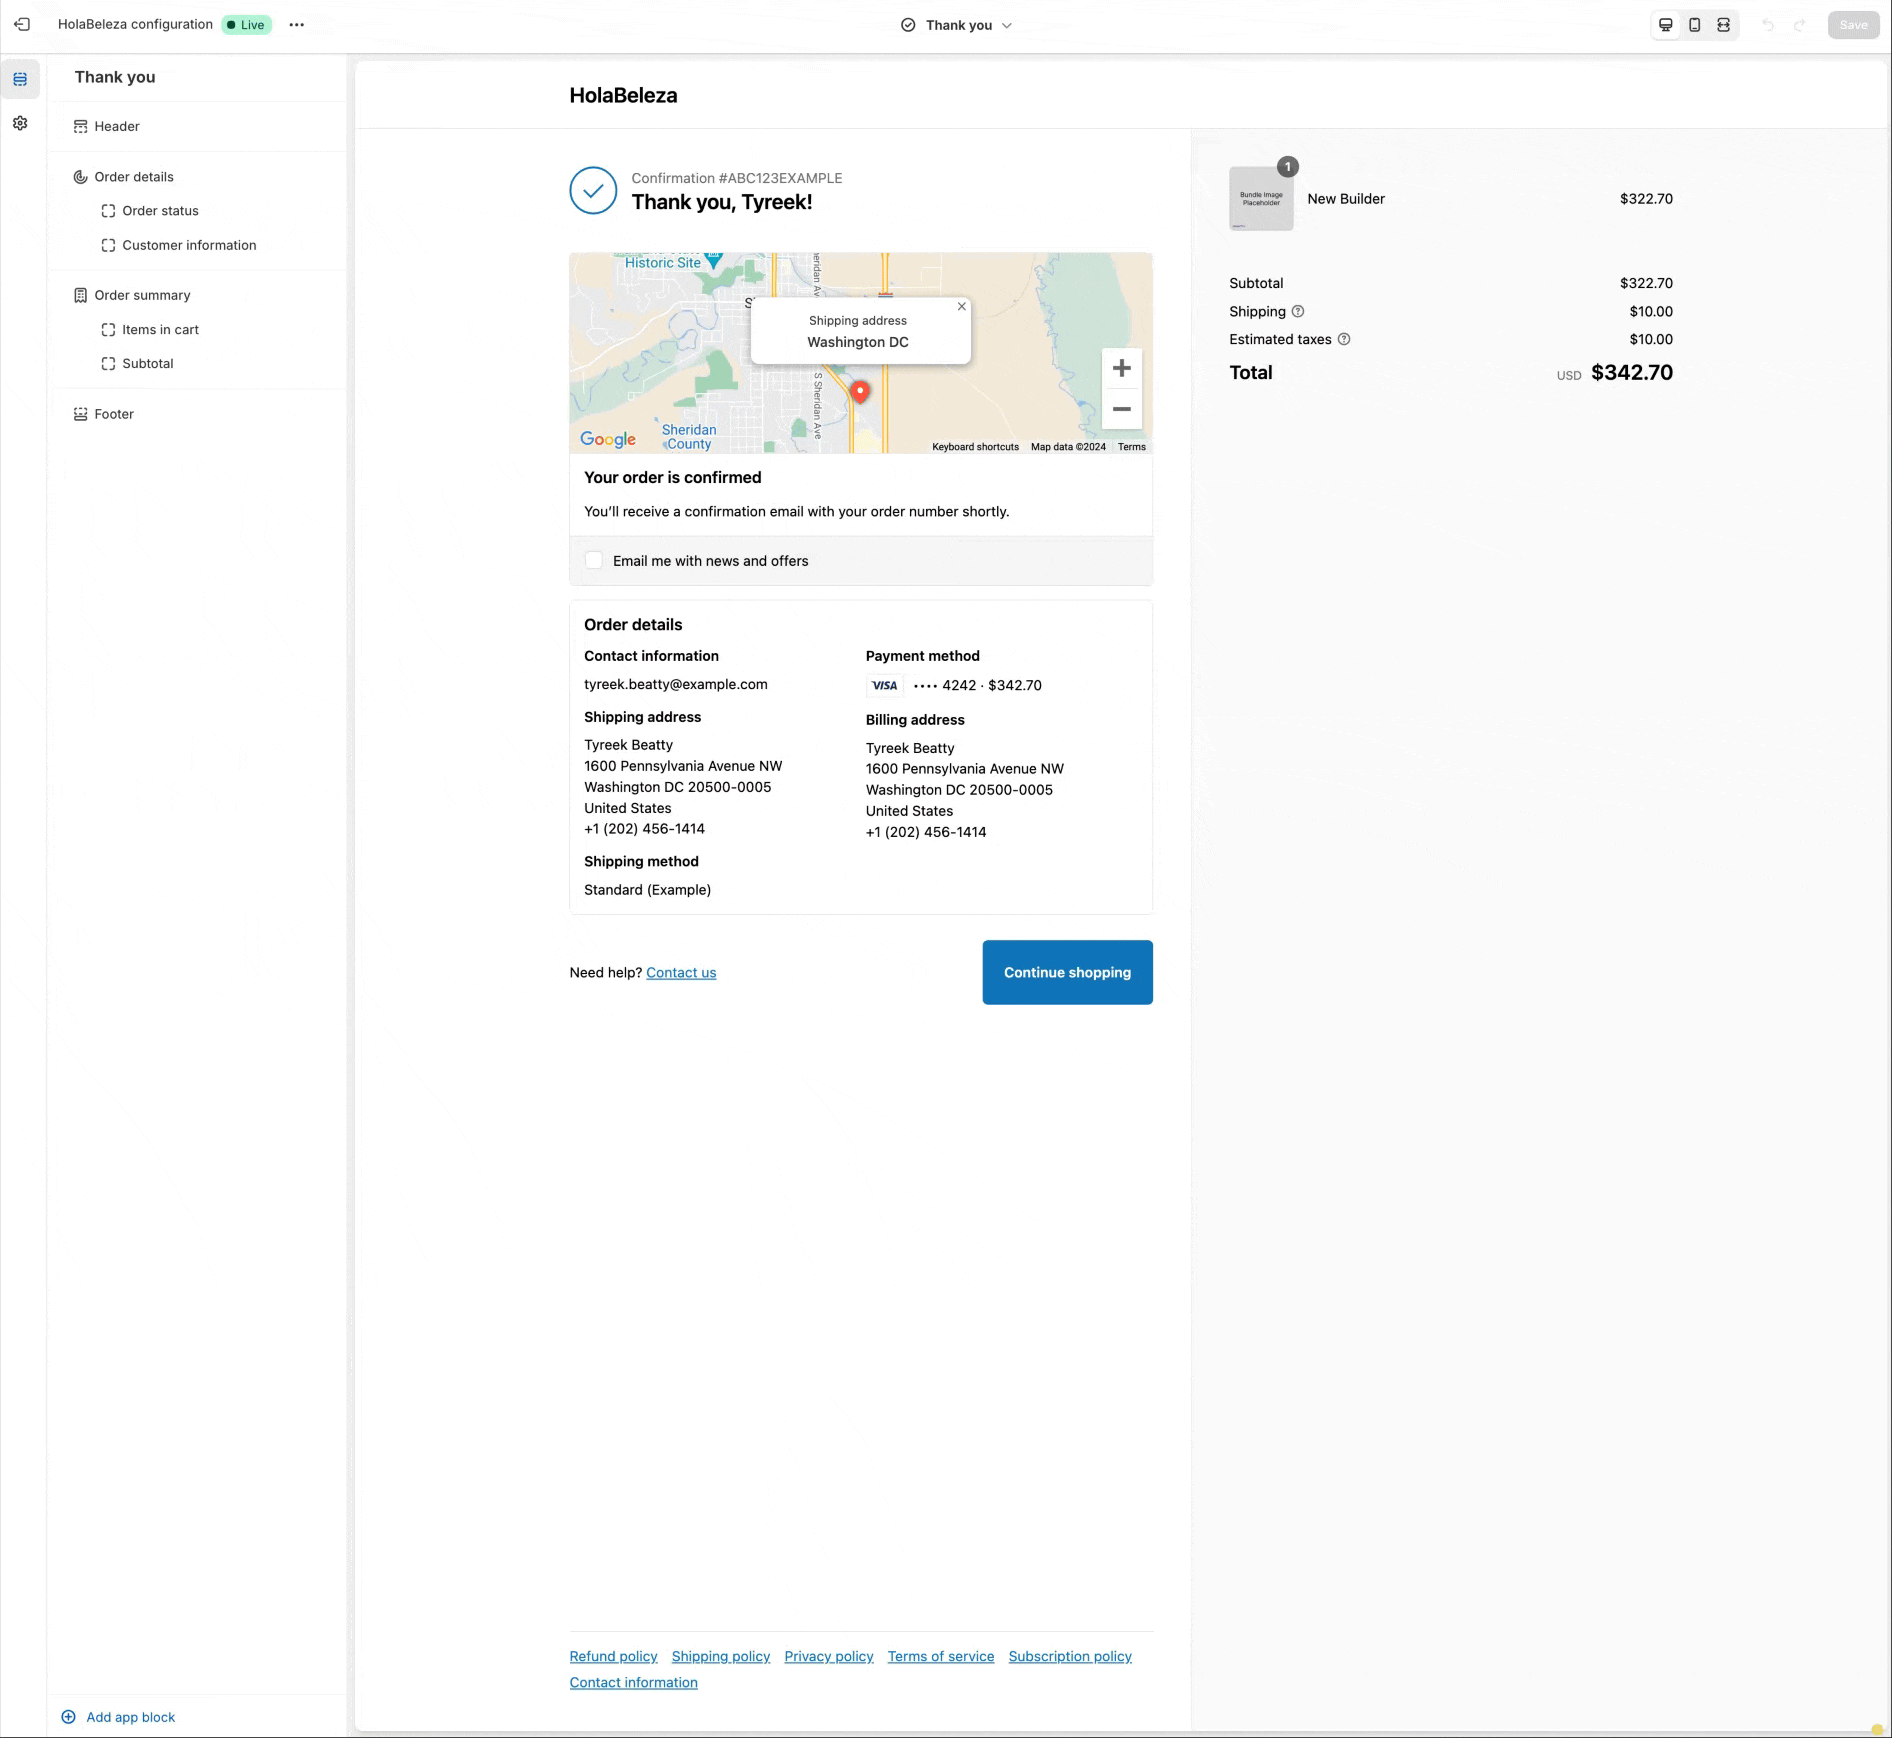
You can add multiple zones, as you wish, just make sure that you have separate zone ID's in each one, so that the same widget doesn't appear multiple times across zones.
That's it! You can now customize both the Order Status page and Thank You page with various Dynamatic widgets!
Creating Zones for Dynamatic Slide Cart
Slide cart zones are placements created inside the Dynamatic powered slide out cart draw. Since this cart is powered by Dynamatic, all the content of the cart is controlled from inside the Dynamatic App.
For example, if you wish to change any of the cart styling, you'd have to do so using the app's built-in settings. Similarly, adding widgets to the cart requires first defining a placement and zone in the cart.
We utilize a drag-and-drop interface in the dynamatic zone creator to do just that! When you select the "slide cart" category, you'll be presented with our drag-and-drop builder. 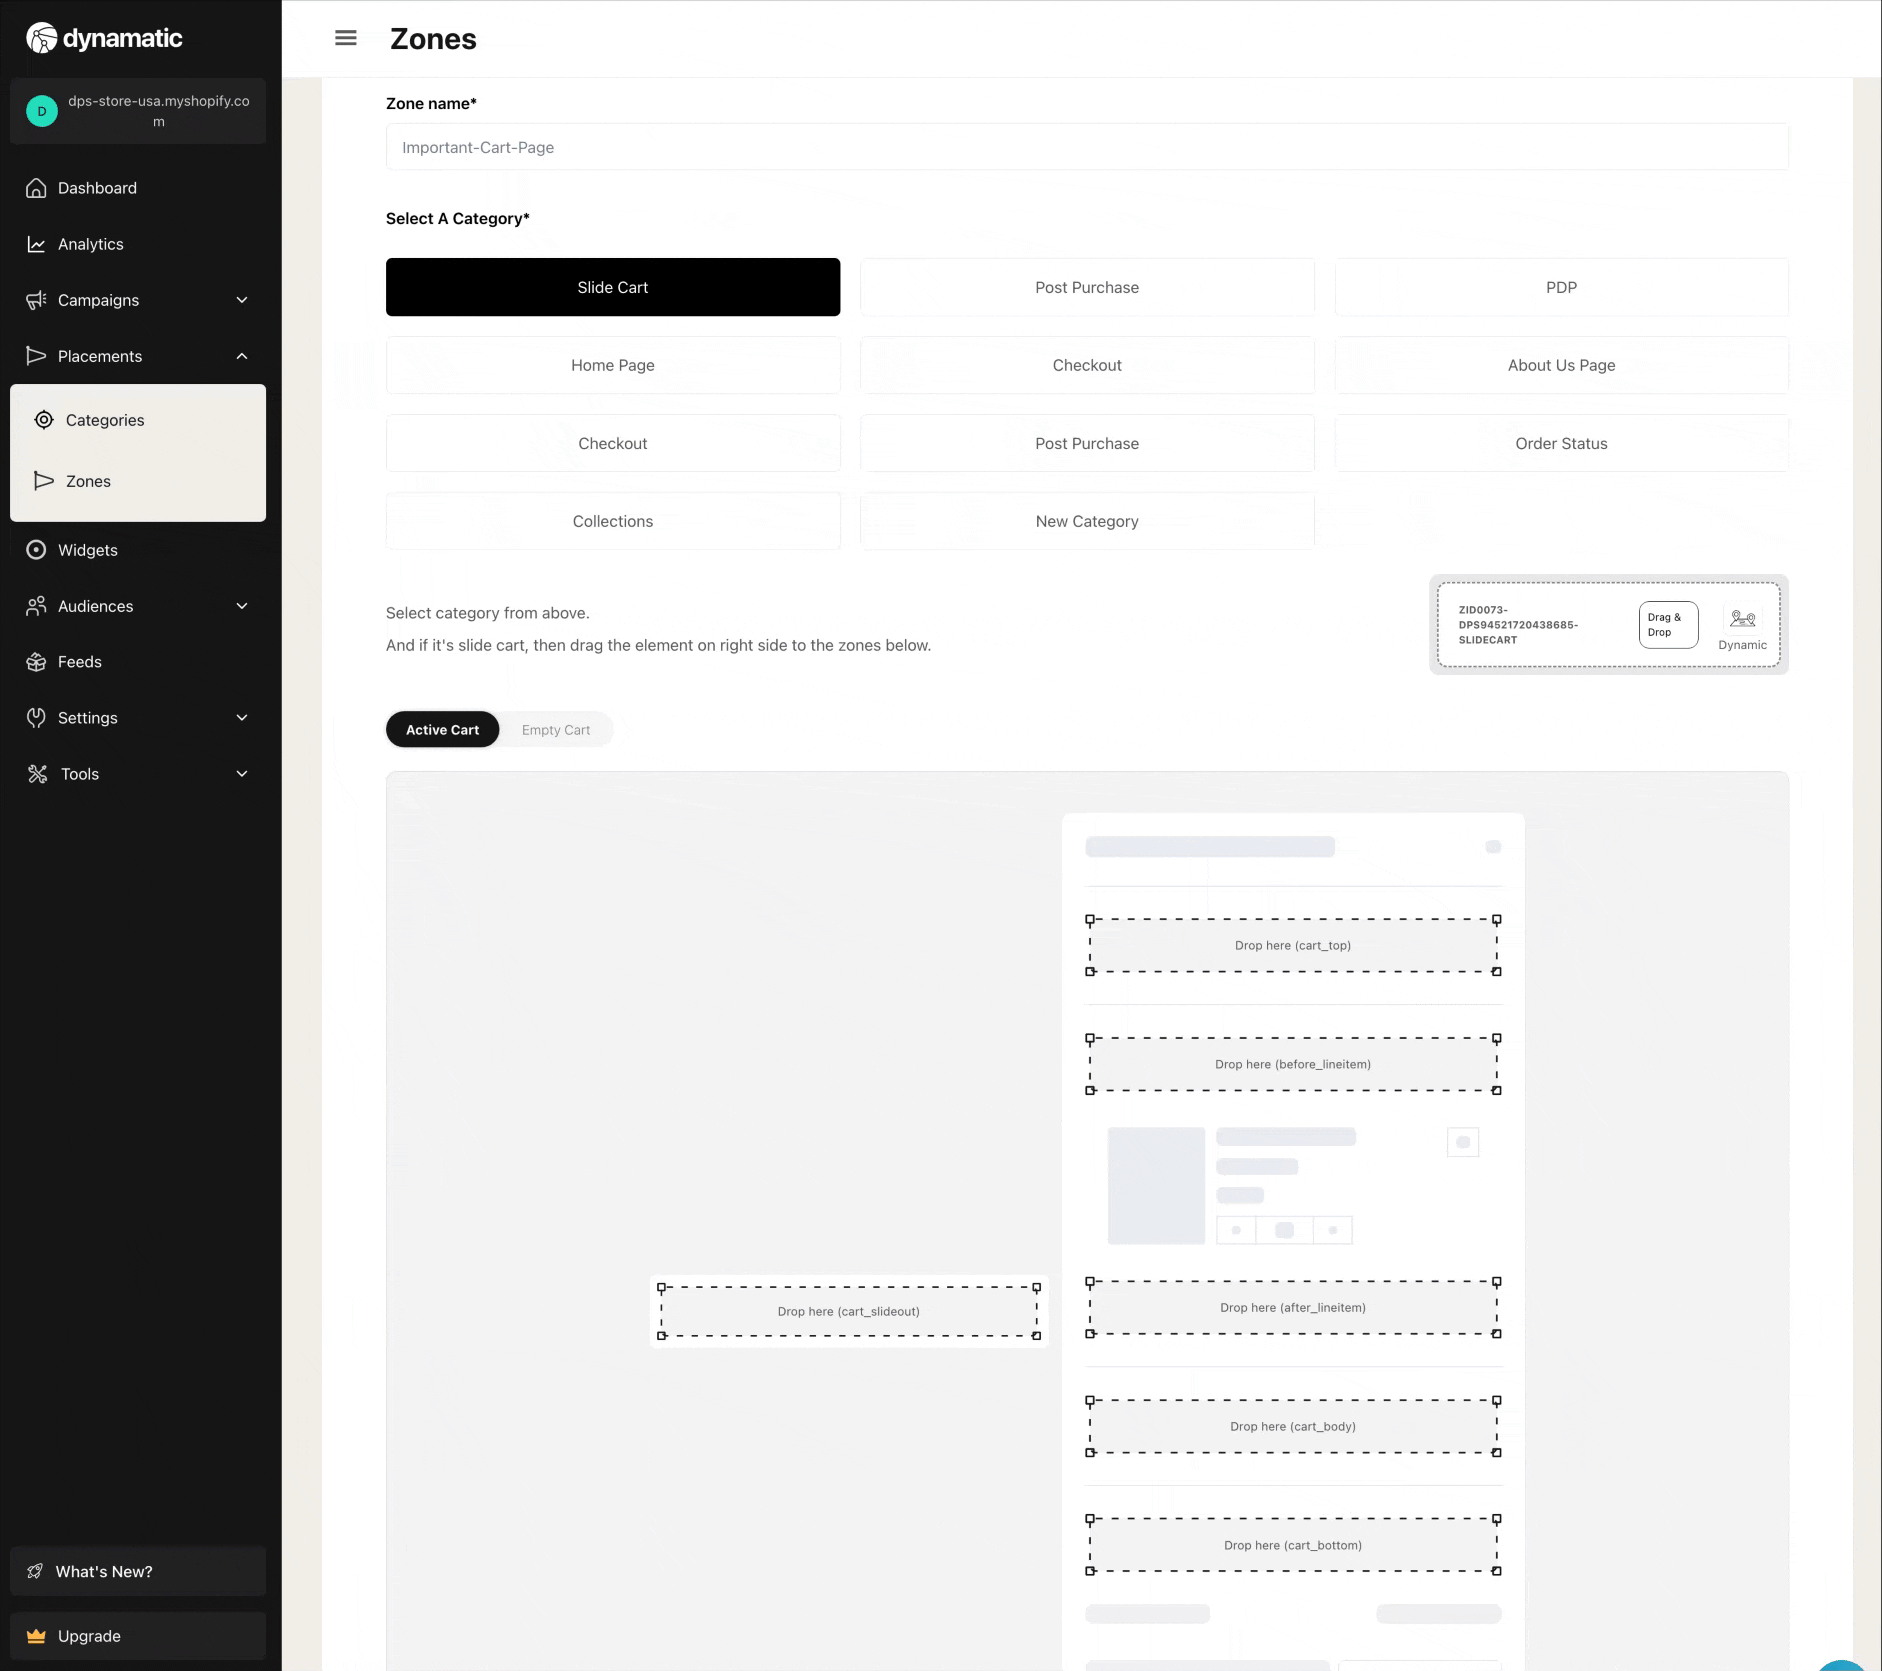
Since we power the cart, you don't need to create a zone ID, or paste anything when adding zones to the cart. Simply drag and drop, add a friendly name, and save it!
Important! If you noticed, when adding a zone to a slot in the cart, we display all previously created zones in that same cart section. The reason for this is so that you can drag and drop the new zone to reorder the priority of this new zone relative to other existing zones in that same space.
Say for example you have a tier bar always showing at the Top placement in the cart. As holidays approach you might want to add a banner promoting a sale, and have that be positioned above that placement. Creating a new zone for the holiday and dragging it above the tier bar placement will allow you to add something above it for however long you plan on running the banner holiday promotion!
Also note, by switching the Active/Empty Cart switch, you can create placements dedicated for the empty cart as well!