
Styling & Customizing Your Cart
As part of the onboarding experience, one of the key features Dynamatic brings is a fully customizable slide cart draw. This draw is packed with features allowing merchants to add widgets to their cart that are personalized based on Campaign and Audience.
The following will cover some of the key elements of customizing your cart.
Introduction to Our Cart
Before getting into styling it is important to understand how our cart is built and how it operates.
Our cart has two main portions:
1) Cart Shell: this is the main cart body. which includes the buttons, the line item layout, the size of the cart draw, fonts, colors, borders, etc. This does not contain the widgets that you can add into the cart like: Timers, terms & conditions, trust badges, upsells, recommendations, free shipping bars, etc. Those are all considered "widgets" and can be added to the cart on a campaign + audience level so that different customers can see different widgets.
2) Cart Widgets: These are the elements that can be added into the card according to placements you set up, as well as campaigns and audiences. Widgets can be assigned to audiences so that some customers see one set of widgets in the cart, and others see something entirely different.
The guide here is focused on the cart shell only. All cart customizations done in the "general settings" is related to the cart design and look and feel, not the actual widgets that display inside. Styling for the free shipping bar, or for timers etc are done on an individual level for each widget under the Widgets section of the app.
Active Cart vs. Empty Cart
Dynamtic App has two cart states:
Active Cart: This is a cart with at least 1 item in the cart.
Empty Cart: Is a cart with no items in it.
It is important to note that we allow merchants to customize both cart states, so that you can add widgets like recommendations or banners etc to the empty cart as well. The empty cart is displayed whenever someone clicks the cart icon while having no items in the cart, or if they remove all items in the cart.
You can style both the active cart and empty cart, but they have separate sections in the General Settings, as well as individual placement slots for widgets to appear in when adding widgets to the cart. When creating Zones in the cart you'll see a small switch to toggle between "Active Cart" and "Empty Cart". 
Cart Shell Features
Our cart has a few unique features that are important to highlight before beginning to style the cart.
Share Cart
This feature allows you to add a Share Cart button to the bottom of the cart. When clicked, Dynamatic App will generate a link and automatically copy it to your computer/mobile clipboard that when pasted or clicked will recreate an exact replica of your cart with all the items in it.
This feature is often used by Customer Service teams or Sales Teams who would like to be able to provide a customer with personalized suggestions that fit the customer's needs. While they can of course use a draft order, and send the customer an "invoice", the downside to that is that Draft orders can't be easily edited by a customer, and the entire experience of searching items in Shopify's backend isn't quite intuitive.
By allowing the support/sales team to browse your site's front end, and easily select items, and add it to cart, the entire experience is a lot smoother, and easier to use. They can then simply share the link with the customer who can make any changes, and then complete the purchase.
Here's how it works:
The customer or sales/support team shops as usual, and adds some items to the cart. They then see the "Share Cart" button on the bottom of the cart. Once pressed, it generates a custom URL that when pasted into a browser or clicked, will automatically re-generate a replica copy of the cart. 
At this point, once that link is pasted into a new browser, Dynamatic App will automatically create the exact same cart. While it's hard to see in the below screenshot me copy pasting the link to the browser, you will notice that I remove one of the items. When I refresh the page, after a moment the cart is recreated as it was before :) 
Share cart is an optional feature, and can be enabled or disabled in the app settings: Visit Settings > General > Cart Customizations and find the Share Cart settings. When enabled, you'll be able to customize the button size, color, font, etc as well! 
Saved Cart
The saved cart feature is another powerful feature offered to all Dynamatic App merchants regardless of plan. Essentially, Saved Cart enables a built-in "wishlist" to the Dynamatic Cart. The wishlist behaves similar to how brands like Amazon/ASOS, and others offer their customers the option to save items for later.
When enabled, Dynamatic App adds a tabbed system to the cart draw. Customers also see a small "Save for Later" link below each item they add to cart. Customers can then add items to the "Saved Items" tab, or move them back to the cart at will. 
Customers who aren't logged in, will have their items saved on that browser/device only until they clear their cookies/cache. However, we do prompt the customer to create an account or login, so that the items remain saved across all their devices.
The account creation and login utilizes shopify's native accounts, and is fully synced up with your store accounts/customer profiles. They do not create a unique login related to Dynamatic.
You can enable or disable this feature in the General settings by going to Settings > General > Cart Customizations and finding the "Save Cart" section. Once toggled on, you'll be able to customize all the colors, fonts, sizing, and messaging of the tabs, the save cart links, and even the messaging of the account creation prompt. 
Expert Tip: Dynamatic App stores all the "saved items" in our system as well, and makes it available to be used as an endpoint or "product type" in all our product-based widgets. For example, when creating a carousel widget, you can select the source of the items in the carousel, from Manual, Feed, or "Saved Cart".
When you select "Saved Cart" we will display any saved cart items to that customer specifically. This is a powerful way to help convert customers who have items saved but have not yet added it to cart. These widgets (list, carousel, single, etc) can be placed anywhere from the Home page, in the cart on repeat visits, user account, or at checkout (if you are on Shopify plus). They can also include a discount or not.
Use this to help increase lifetime value, and remarket saved items to customers!
Accelerated Checkout Buttons
We offer the option of adding on accelerated checkout buttons to your cart draw. This includes Gpay, Apple Pay, Shop Pay, Paypal etc. You can enable or disable these buttons in the General settings under Settings > General > Cart Customization
When enabled, you can choose whether the buttons display stacked or in-line depending on how much space you want it to take up in the cart. 
Scrollable Checkout Section
The Dynamatic Cart supports multiple placement options inside the cart for widgets to be placed in when you create a zone.
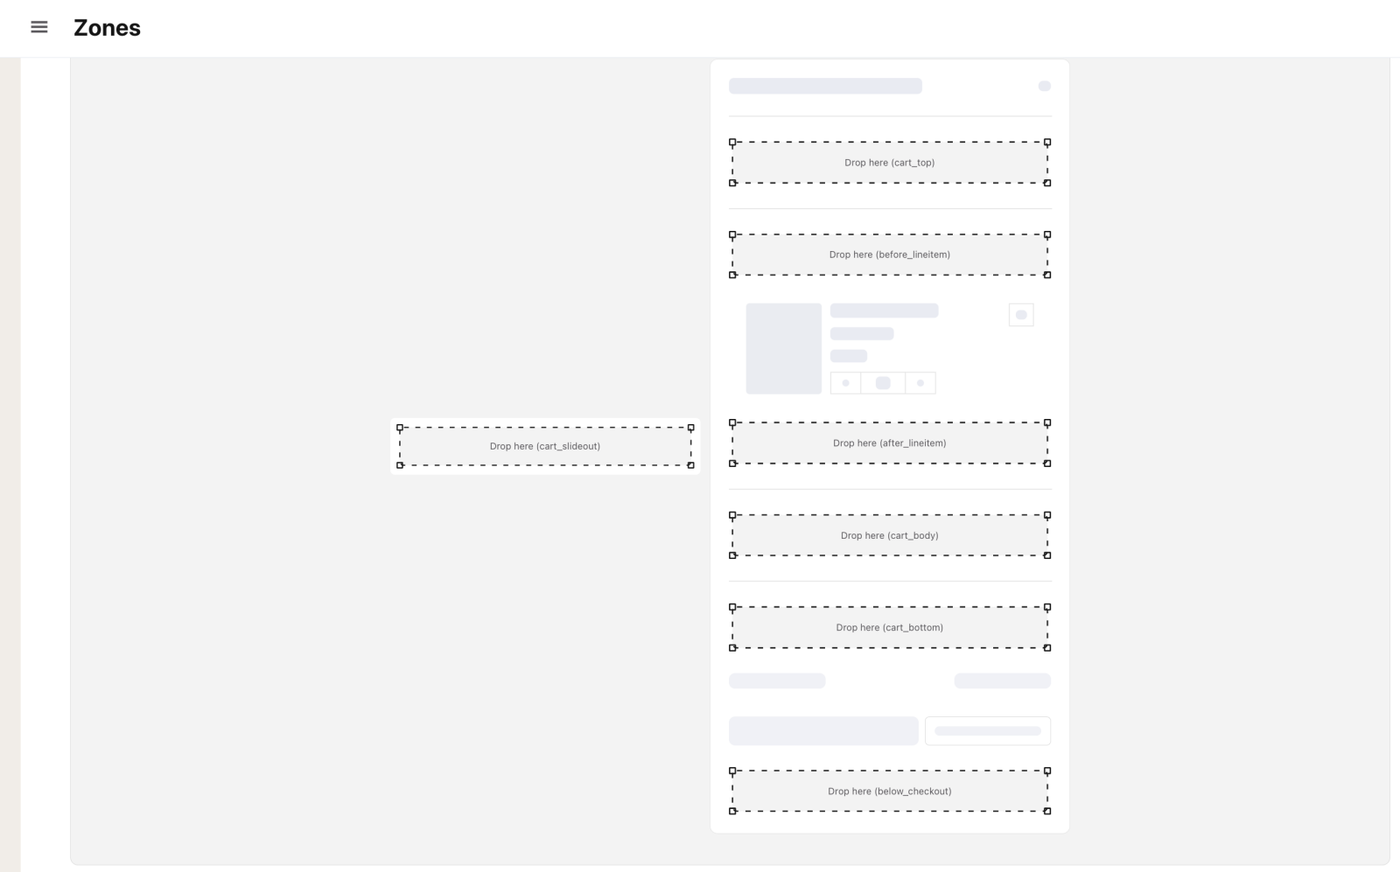
One of these placements is below the checkout buttons, which would allow you to add widgets that are hidden from view, and are only seen if the customer scrolls the cart.
However, by default our cart is set up to stay sticky, where the subtotal + checkout buttons are always at the bottom of the cart draw, and always visible. Only the middle portion of the cart scrolls, while leaving the subtotal and checkout buttons fully visible.
Should you want the cart to be scrollable, you can easily enable this by enabling scrollable cart in the general settings. Visit Settings > General > Cart Customizations, and look for the "Is checkout scrollable" switch beside the "accelerated checkout" switch. 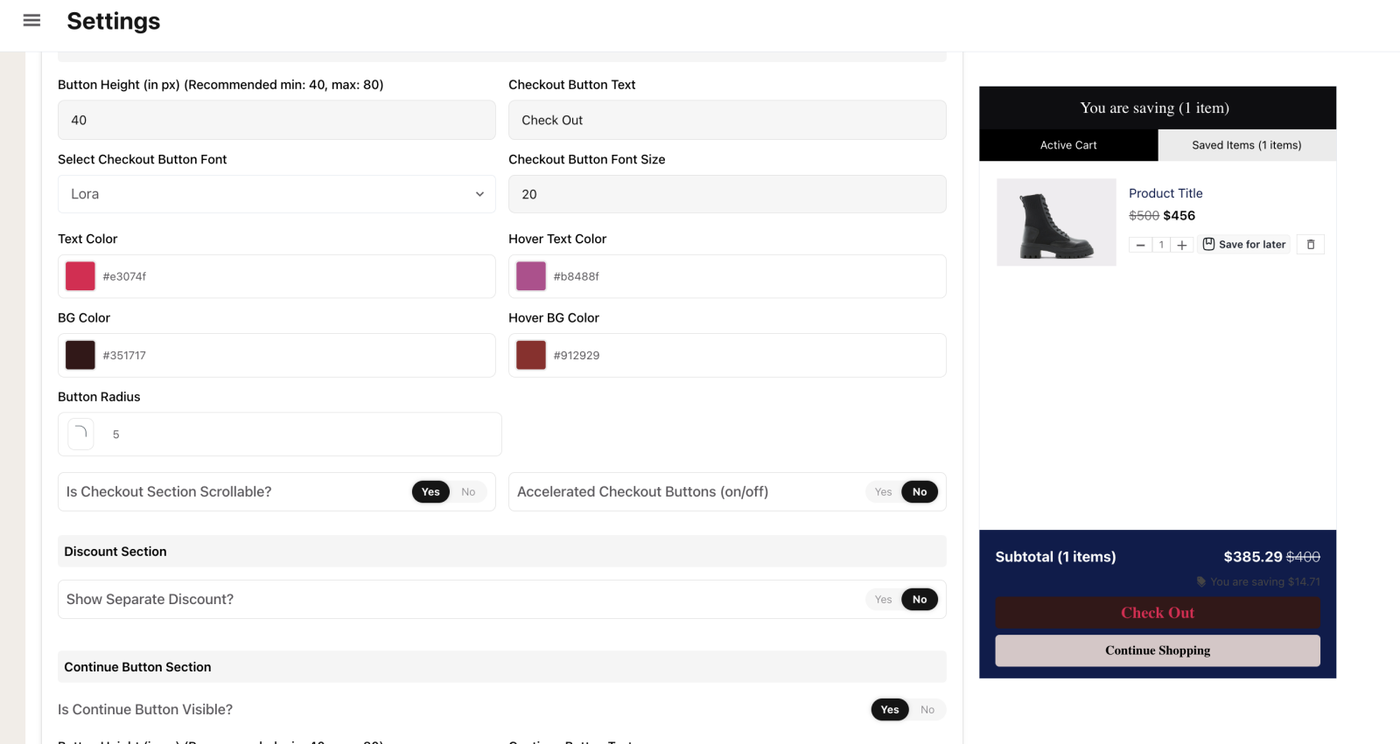
Once enabled, any widgets you add to placements set below the checkout button will be able to display. If you do not enable this, widgets will not be visible even if you create a placement/zone below the checkout button.
Cart Styling Settings
Below is a detailed guide on the various settings our cart allows in terms of customization and styling. For purposes of usefulness, we've broken them out to match the sections as named in the Cart customizations setting options.
Cart & Cart Headings
The cart settings controls the size and shape of the cart. 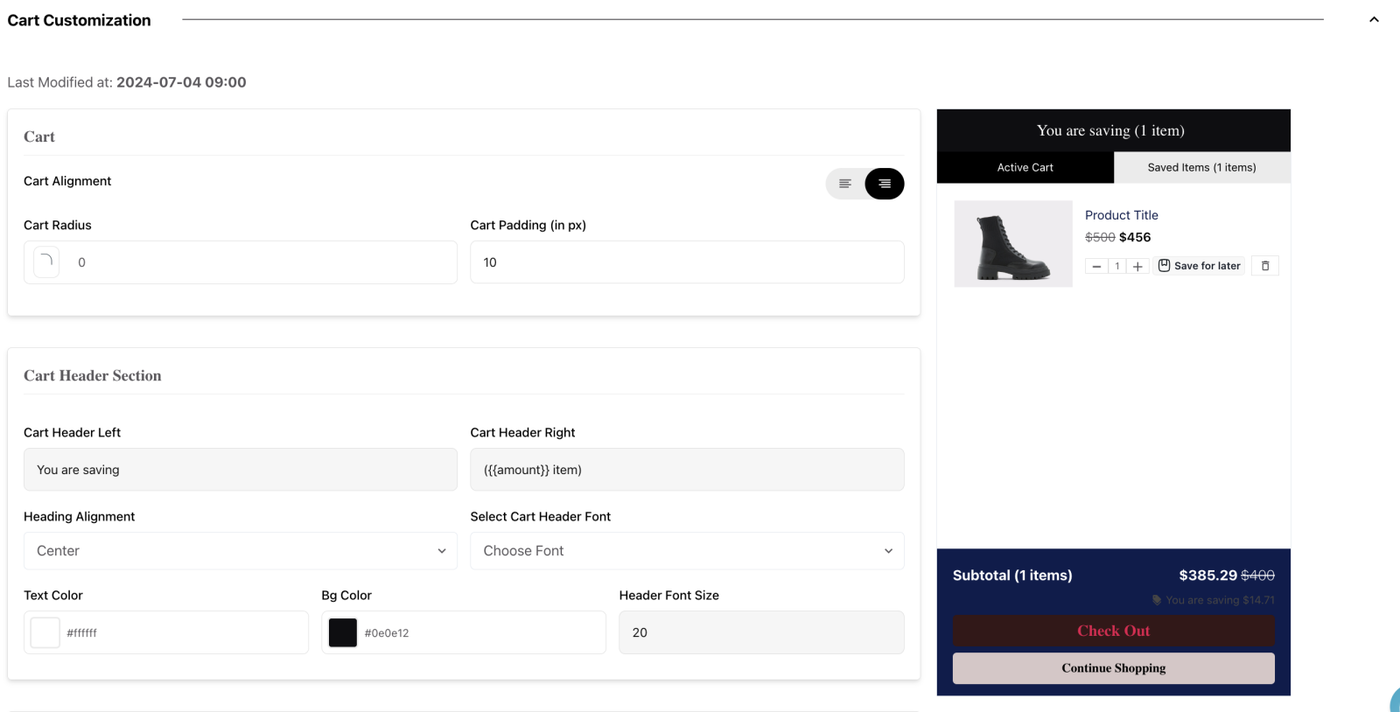
Cart Alignment: Controls whether the cart displays on the Right side of the storefront or the Left side.
Cart Radius: Allows you to turn the corners of the cart draw from square to round. As you increase the pixels the more round the cart corners will get.
Cart Padding: Using pixels you can control how wide the cart is.
Cart Header Right/Left: We split the header of the cart in two, so you can change the text easily should you want to. This is so that if you want to call it "Bag" instead of "Cart" or simply want to rename it based on local language etc.
Heading Alignment: Controls whether the header of the cart is left, center, or right leaning.
Cart Header Font: Choose the font for the text of the header: ie. Cart 2 Items
Note: You can add fonts in our General settings under Custom Fonts if you haven't yet added your custom fonts.
Text Color: Is the color of the actual text in the header. You can utilize our color selector or HEX codes. 
Bg Color: Is the background color of the header. Again here, you can use our color selector, as well as HEX codes.
Header Font Size: Is the font size of the text in the cart header: ie: Your Cart: 1 Item
Line Item Section
Checkout Section
The next portion of the cart style editor controls the bottom portion of the cart where the Checkout Button and subtotal sits. 
The following covers each of the individual settings and options:
Subtotal Section
Show Subtotal with Checkout: This controls whether the subtotal is displayed in the cart as a separate line or it gets added to the actual checkout button text. Turning this on will add the total price to the text of the actual checkout button.
Subtotal Text: Allows you to change the text of the Subtotal field ie. Total Price/You Pay/Subtotal etc.
Subtotal Title Font Size: Controls the font size of the Subtotal Text.
Subtotal Text Color: Allows you to select the color of the subtotal text.
BG Color: This sets the color of the background of the entire cart checkout footer.
Subtotal Font Weight: This sets the font weight of the Subtotal text from Bold to Normal etc.
Select Subtotal Title Font: This allows you to select the font type for the Subtotal Text.
Savings Section
Save Message: When a discount is applied to the cart either by entering a discount code (if you have the discount box widget enabled) or via Shopify Functions, Scripts, or Automatic Discount we show the amount the customer is saving in the cart. This field controls the text language of this field.
Font Size: Controls the Font Size of the "you are saving" text
Text Color: Controls the color of the text for the "you are saving".
Font Weight: Controls whether the text is Bold or Normal for "you are saving"
Select Font Family: Allows you to choose the font type for "you are saving" text.
Checkout Button Section
Button Height (in px): Allows you to set the height of the "Checkout" button
Checkout Button Text: Allows you to change the text of the Checkout button. You can add emojis, or arrows, or trust icons etc.
Select Checkout Button Font: Controls the font of the text on the Checkout Button.
Checkout Button Font Size: Sets the font size for the Checkout Button Text.
Text Color: This is the color of the "checkout" text in the checkout button.
Hover Text Color: This is the color of the "checkout" text in the checkout button when hovering on the button.
BG Color: Is the color of the checkout button background.
Hover BG Color: Is the color of the checkout button background when hovering.
Button radius: Controls whether the button has rounded or square corners. The higher the number the more round the button's edges will be. 0= Perfectly square corners.
Is Checkout Scrollable?
The Dynamatic Cart supports multiple placement options inside the cart for widgets to be placed in when you create a zone.
One of these placements is below the checkout buttons, which would allow you to add widgets that are hidden from view, and are only seen if the customer scrolls the cart.
However, by default our cart is set up to stay sticky, where the subtotal + checkout buttons are always at the bottom of the cart draw, and always visible. Only the middle portion of the cart scrolls, while leaving the subtotal and checkout buttons fully visible.
Should you want the cart to be scrollable, you can easily enable this by enabling scrollable cart in the general settings. Visit Settings > General > Cart Customizations, and look for the "Is checkout scrollable" switch beside the "accelerated checkout" switch.
Once enabled, any widgets you add to placements set below the checkout button will be able to display. If you do not enable this, widgets will not be visible even if you create a placement/zone below the checkout button.
Accelerated Checkout Buttons
We offer the option of adding on accelerated checkout buttons to your cart draw. This includes Gpay, Apple Pay, Shop Pay, Paypal etc. You can enable or disable these buttons in the General settings under Settings > General > Cart Customization
When enabled, you can choose whether the buttons display stacked or in-line depending on how much space you want it to take up in the cart.
Discount Section
The discount section allows you to choose between showing separate line items for each discount or having it all grouped together into one total savings.
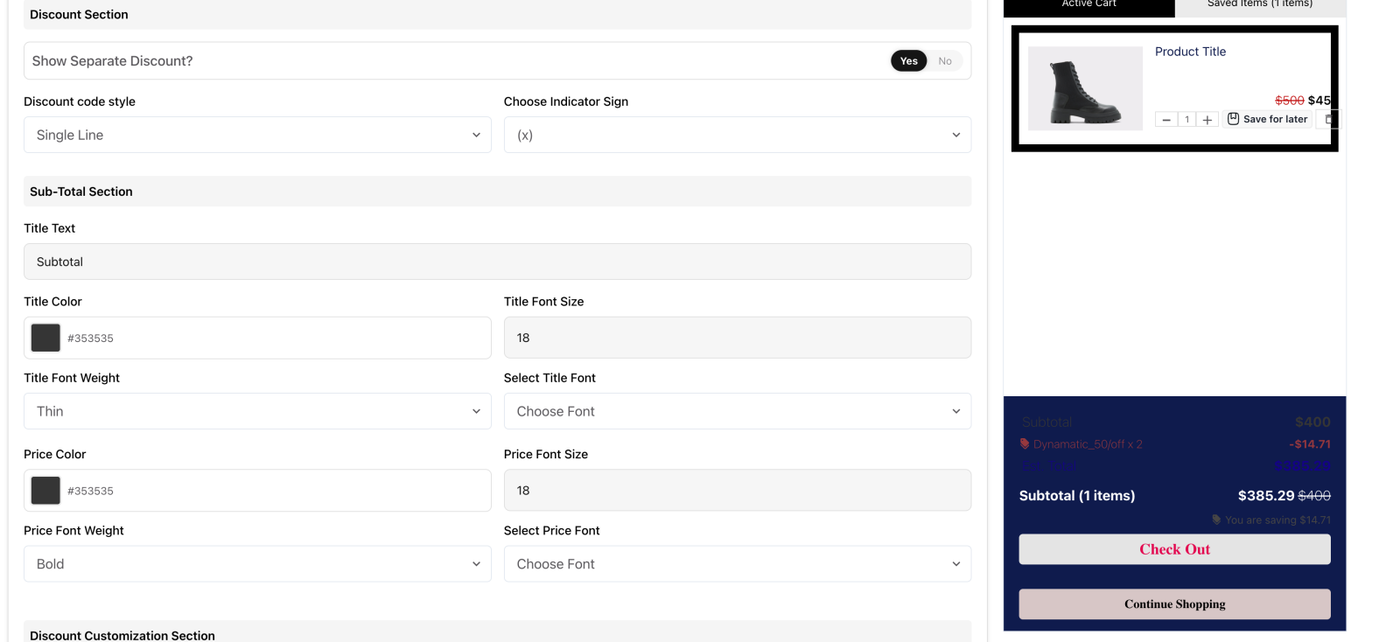
If enabled, we will show each discount name and amount as a separate line item broken out under the subtotal. As a customer claims additional discounts, an additional line item below will show. Otherwise, the total amount savings would simply be displayed above the checkout button as "You are saving x amount" but without any indicator of what specific discounts were applied.
If the same discount is applied to the cart multiple times, you can choose whether we show each one as a single individual line item, or group them together and display it x2. 
In addition, if you have the "Sub Total" section enabled, you can then select all the fonts, colors, and sizes of each field of the Subtotal.
Share Cart Section
This feature allows you to add a Share Cart button to the bottom of the cart. When clicked, Dynamatic App will generate a link and automatically copy it to your computer/mobile clipboard that when pasted or clicked will recreate an exact replica of your cart with all the items in it.
This feature is often used by Customer Service teams or Sales Teams who would like to be able to provide a customer with personalized suggestions that fit the customer's needs. While they can of course use a draft order, and send the customer an "invoice", the downside to that is that Draft orders can't be easily edited by a customer, and the entire experience of searching items in Shopify's backend isn't quite intuitive.
By allowing the support/sales team to browse your site's front end, and easily select items, and add it to cart, the entire experience is a lot smoother, and easier to use. They can then simply share the link with the customer who can make any changes, and then complete the purchase.
Here's how it works:
The customer or sales/support team shops as usual, and adds some items to the cart. They then see the "Share Cart" button on the bottom of the cart. Once pressed, it generates a custom URL that when pasted into a browser or clicked, will automatically re-generate a replica copy of the cart.
At this point, once that link is pasted into a new browser, Dynamatic App will automatically create the exact same cart. While it's hard to see in the below screenshot me copy pasting the link to the browser, you will notice that I remove one of the items. When I refresh the page, after a moment the cart is recreated as it was before :)
Share cart is an optional feature, and can be enabled or disabled in the app settings: Visit Settings > General > Cart Customizations and find the Share Cart settings. When enabled, you'll be able to customize the button size, color, font, etc as well!
If enabled, the following settings are available to customize the share cart button:
Button Height (in px): Allows you to set the height of the "share cart " button
Share Cart Button Text: Allows you to change the text of the share cart button. You can add emojis, or arrows, or trust icons etc.
Share Cart Button Font Size: Sets the font size for the Share Cart Button Text.
Text Color: This is the color of the "share cart" text in the share cart button.
Hover Text Color: This is the color of the "share cart" text in the share cart button when hovering on the button.
BG Color: Is the color of the share cart button background.
Hover BG Color: Is the color of the Share Cart button background.
Saved Cart Section
The saved cart feature is another powerful feature offered to all Dynamatic App merchants regardless of plan. Essentially, Saved Cart enables a built-in "wishlist" to the Dynamatic Cart. The wishlist behaves similar to how brands like Amazon/ASOS, and others offer their customers the option to save items for later.
When enabled, Dynamatic App adds a tabbed system to the cart draw. Customers also see a small "Save for Later" link below each item they add to cart. Customers can then add items to the "Saved Items" tab, or move them back to the cart at will.
Customers who aren't logged in, will have their items saved on that browser/device only until they clear their cookies/cache. However, we do prompt the customer to create an account or login, so that the items remain saved across all their devices.
The account creation and login utilizes shopify's native accounts, and is fully synced up with your store accounts/customer profiles. They do not create a unique login related to Dynamatic.
You can enable or disable this feature in the General settings by going to Settings > General > Cart Customizations and finding the "Save Cart" section. Once toggled on, you'll be able to customize all the colors, fonts, sizing, and messaging of the tabs, the save cart links, and even the messaging of the account creation prompt.
Expert Tip: Dynamatic App stores all the "saved items" in our system as well, and makes it available to be used as an endpoint or "product type" in all our product based widgets. For example, when creating a carousel widget, you can select the source of the items in the carousel, from Manual, Feed, or "Saved Cart".
When you select "Saved Cart" we will display any saved cart items to that customer specifically. This is a powerful way to help convert customers who have items saved, but have not yet added it to cart. These widgets (list, carousel, single, etc) can be placed anywhere from Home page, in cart on repeat visit, user account, or checkout (if you are on shopify plus). They can also include a discount or not.
Use this to help increase life time value, and remarket saved items to customers!