
Price Testing
What Is Price Testing?
Price Testing is a powerful A/B testing tool designed to help merchants scientifically determine the optimal price point for their products. Instead of guessing what customers are willing to pay, this feature allows you to experiment with different price variations in real-time to see which one drives the most sales, conversions, and total revenue.
Unlike traditional methods that require creating duplicate products or variants for every price test, Dynamatic’s Price Testing modifies the price dynamically on the storefront. This ensures your inventory remains clean and you do not need to manage multiple SKUs while gathering data backed by real customer behavior.
Key Benefits:
Data-Driven Decisions: Replace guesswork with actionable data on customer purchasing behavior.
Dynamic Execution: Change prices in real-time for specific audiences without altering your backend catalog.
Profit Maximization: Identify the "sweet spot" where price and conversion rate intersect to generate the highest revenue.
How to Set Up Price Testing
Setting up a Price Test involves a specific configuration process to ensure the app can visually update prices across your specific theme. Follow this simple setup process to launch your first Price Test inside the app.
Step 1: Global Theme Configuration (One-Time Setup)
Before you can run any price tests, the app requires a "map" of your storefront. Because every Shopify theme (e.g., Dawn, Prestige, or custom themes) uses different code to display prices, Dynamatic needs to know exactly which visual elements to target and update.
What you need to do: You must identify and enter the CSS Class Names used by your specific theme for any element where a product price is displayed. This ensures that when a customer visits your site, the app can instantly swap the original price with the test variation.
Navigate to Configuration: Go to Settings in your Dynamatic dashboard and find the Price Testing configuration tab.
Enter Class Names: Input the specific CSS class names for your theme's price elements. You will typically need to define:
Product Page Price: The main price shown on product details pages.
Collection Grid Price: The price shown on collection or search result cards.
Cart Price: The price shown in the cart drawer or cart page.
Featured Product Price: Any home page sections featuring specific items.
Save Configuration: Click Save to store these identifiers.
Why this matters: This step ensures the dynamic script correctly identifies and updates all instances of a price during the test. If a class name is missing or incorrect, the customer might see the test price on the product page but the original price in the cart, breaking the test data.
Critical Note on Multiple Themes: This setup is required once per theme. If you are testing on a Draft theme that is different from your Live theme, or if you switch themes seasonally, you must repeat this configuration for each one, as different themes use different class names.
Step 2: Enable the Price Testing Script
Configuring the class names provides the "map," but the Price Testing Script is the "engine" that powers the actual price swapping on your storefront. You must enable this App Embed for the changes to take effect.
How to enable it:
Open Theme Editor: Go to Shopify Admin → Online Store → Themes.
Select Theme: Click Customize on the specific theme where you want the test to run.
Note: This can be your Live theme or a Draft theme if you are testing internally first.
Access App Embeds: On the left-hand sidebar, click the App Embeds icon (it looks like a building block or paintbrush).
Toggle ON: Find the block named “Dynamatic Price Testing” and toggle the switch to ON.
Save: Click Save in the top right corner of the theme editor.
Important: The script must be enabled on the exact theme you will use for your test. Enabling it on your Live theme will not automatically enable it on a Draft theme. If you switch themes later, you must re-enable this embed.
Step 3: Create and Publish Your Price Test
Once the configuration (Step 1) and script activation (Step 2) are complete, you are ready to build your experiment. The Dynamatic campaign builder is divided into four easy-to-navigate tabs.
1. Setup (Metrics, Audience & Schedule)
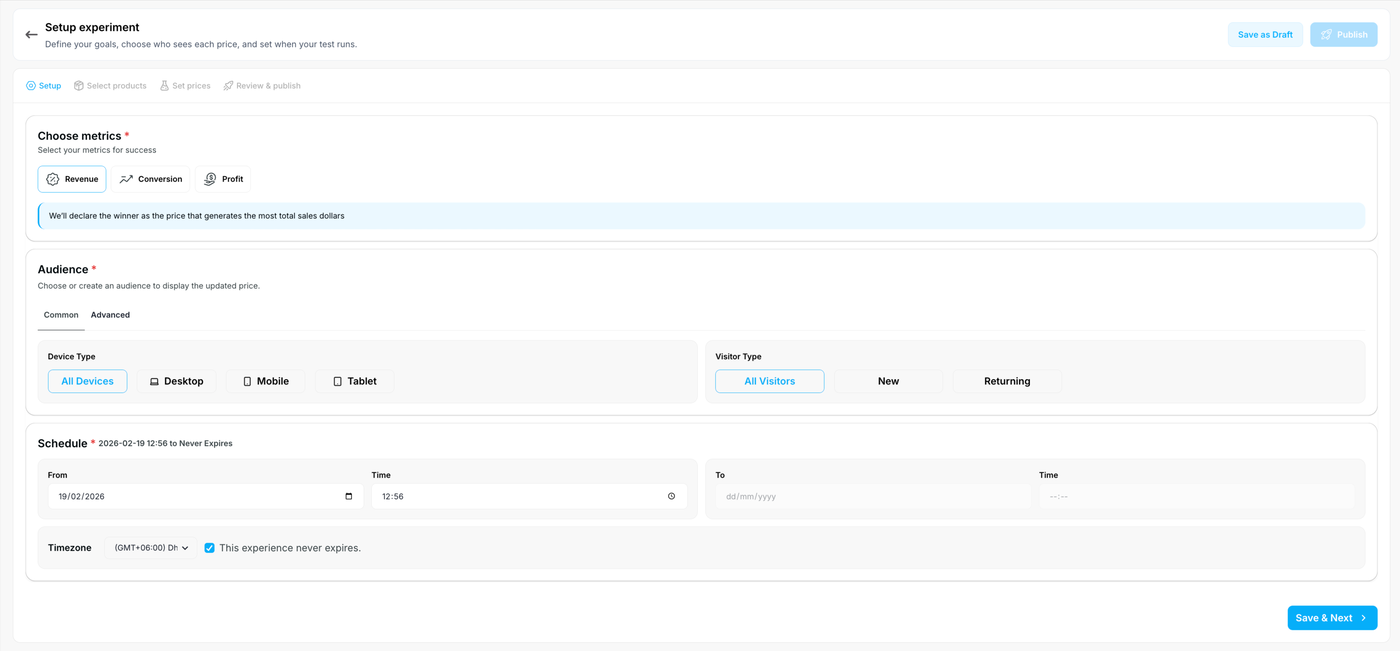
Choose metrics: Select the primary goal for your test. You can declare a winner based on Revenue (most total sales dollars), Conversion, or Profit.
Audience: Define exactly who sees the test. Under the Common tab, you can filter by Device Type (All Devices, Desktop, Mobile, Tablet) or Visitor Type (All Visitors, New, Returning). You can also use the Advanced tab to build custom audience conditions.
Schedule: Set a specific start date and time. You can select an end date or simply check the box for "This experience never expires" to let the test run continuously until you manually stop it.
2. Select Products
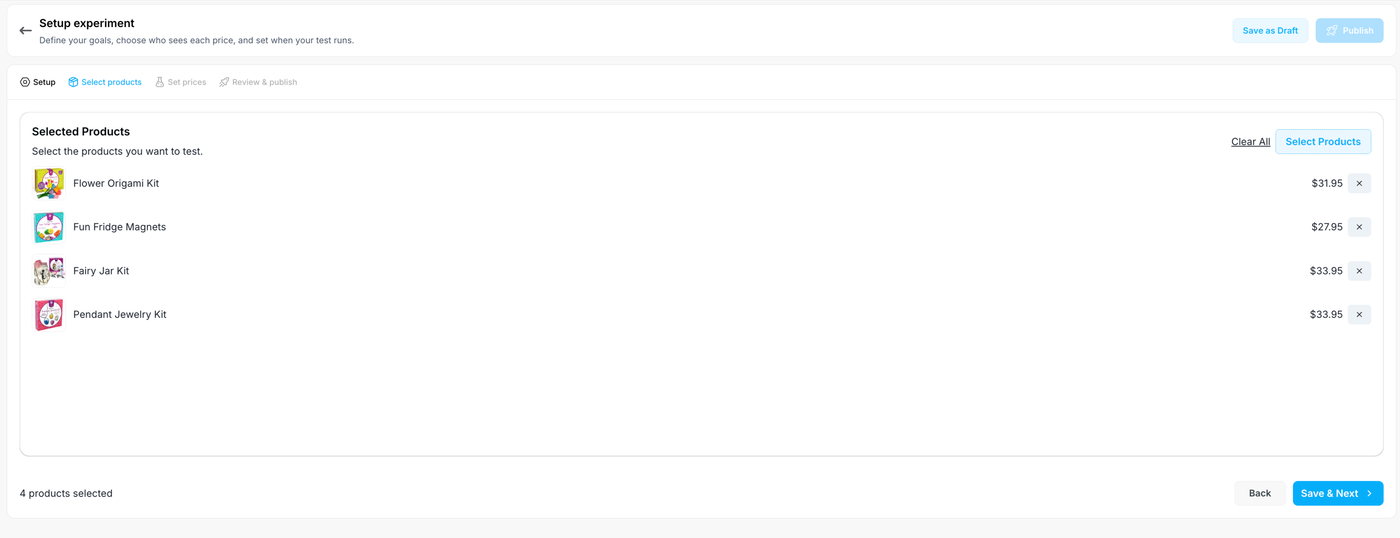
Navigate to the Select products tab to choose which items will be included in the experiment.
Click the Select Products button to browse and add items from your catalog.
Review your list carefully. The app will display a clear summary of your selected products alongside their baseline prices (e.g., Flower Origami Kit - $31.95).
3. Set Prices & Traffic Allocation
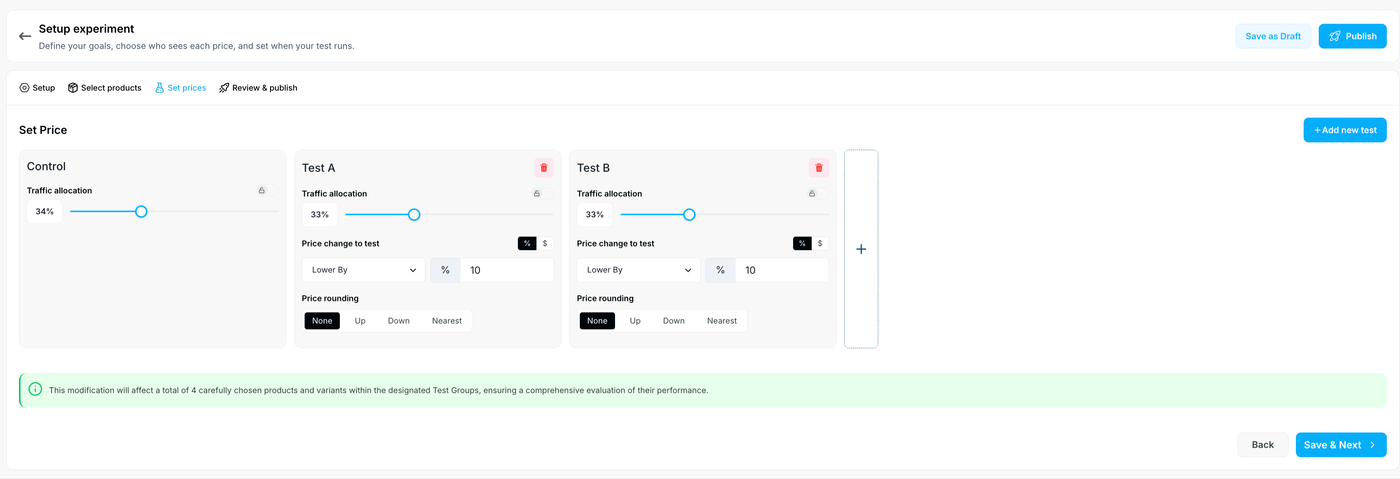
Add Variants: You can test against multiple price points at once (e.g., Control, Test A, and Test B) by clicking the + Add new test button.
Traffic Allocation: Use the sliders or enter a percentage to split your store traffic between the Control (original price) and your Test groups. For a three-way test, you might use a 34% / 33% / 33% split.
Price change to test: Define how the price shifts for each variant. You can choose to Lower By or Raise By a specific Percentage (%) or Dollar amount ($).
Price rounding: To keep your pricing visually appealing, apply a rounding rule to the dynamically generated prices. Choose from None, Up, Down, or Nearest.
4. Review & Publish
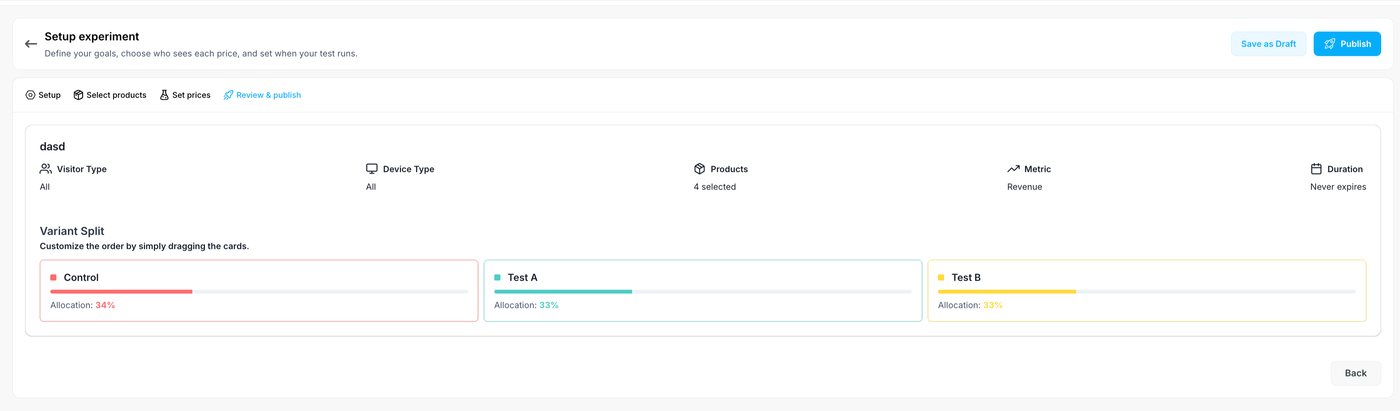
Go to the final Review & publish tab to double-check your experiment settings.
Review the top summary bar to confirm your configurations for Visitor Type, Device Type, Products, Metric, and Duration are accurate.
Look at the Variant Split visual timeline to ensure your traffic allocation is distributed exactly as intended.
When you are ready, click the blue Publish button in the top right corner to push the test live. If you need to come back later, click Save as Draft.
5. Measure Success (Post-Publish)
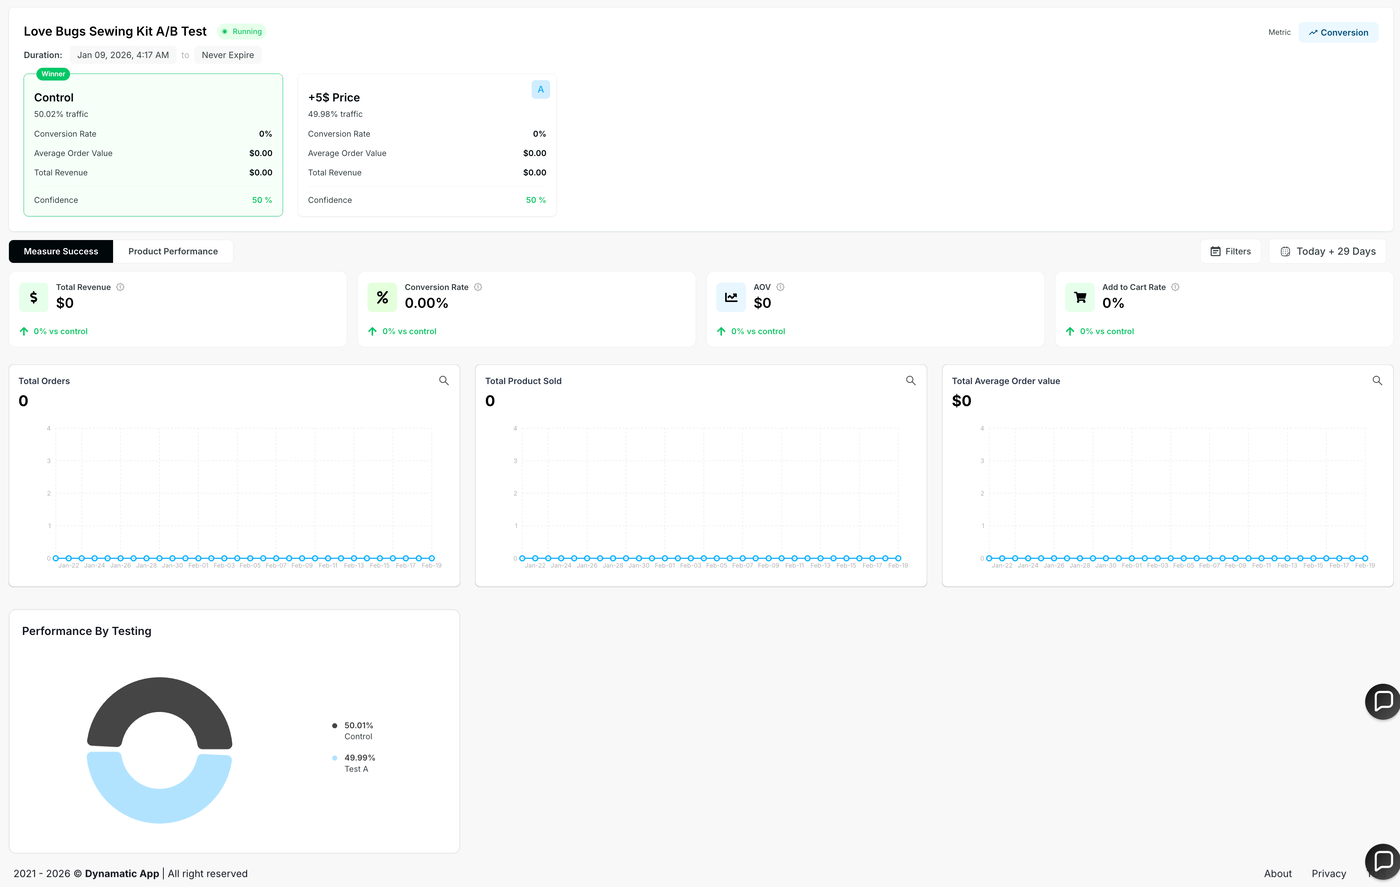
Once your test is running, Dynamatic provides a real-time reporting dashboard. You can monitor exactly how your new prices are performing by tracking Total Revenue, Conversion Rate, Average Order Value (AOV), and Add to Cart Rate. The dashboard visually compares your Control group against your Test groups, making it easy to see which price point is generating the best results and when a variation reaches statistical confidence.
To get actionable data that actually improves your profit margins, follow these best practices:
Test Meaningful Differences:
Why? Small price changes (e.g., changing $20.00 to $20.50) rarely change customer behavior enough to provide clear data.
Recommendation: Test distinct price points (e.g., $49 vs. $59) to clearly understand your customers' price elasticity and see which option maximizes total revenue, not just conversion rate.
Patience is Key (Run Long Enough):
Why? Data can be noisy in the short term. A few lucky sales in the first hour doesn't mean a price is a "winner."
Recommendation: Let your test run until you have reached statistical significance or a substantial number of visitors. Avoid stopping a test after just a day or two unless traffic volume is extremely high.
Maintain Stability (Avoid Mid-Test Changes):
Why? Changing your theme code or switching themes while a test is running can break the connection between the app and the price display.
Recommendation: If you must update your theme, pause the test, re-enable the "Dynamatic Price Testing" script on the new theme, and verify the CSS configuration before resuming.
Verify in Incognito Mode:
Why? Your browser cache or admin cookies might show you the original price even if the test is active.
Recommendation: Always check your storefront using an Incognito/Private window immediately after publishing to confirm the prices are swapping correctly on the Product Page and Cart.
TROUBLESHOOTING & COMMON PITFALLS
If your price test isn't working as expected, it is usually due to one of these three common setup errors:
1. The "New Theme" Trap
The Issue: You configured the CSS Class Names for your Live theme, but then published a new theme update.
The Fix: Class names often change between theme versions. You must re-enter the Global Theme Configuration settings every time you switch to a new theme file.
2. The "Draft Theme" Confusion
The Issue: You are trying to preview the test on a Draft (unpublished) theme, but it isn't working.
The Fix: App Embeds are unique to each theme file. You must open the Shopify Theme Editor specifically for that Draft theme and enable the "Dynamatic Price Testing" App Embed there, even if it's already enabled on your Live theme.
3. Accidental Code Changes
The Issue: A developer or designer renamed a CSS class (e.g., changing
.product-priceto.price-tag) during a design update.The Fix: This breaks the "map" the app uses to find the price. If prices stop updating, check your Global Theme Configuration and update the class names to match your current theme code.
PRE-FLIGHT CHECKLIST
Before you hit Publish, run through this quick 5-point check to ensure a smooth launch:
CSS Configured: Have you saved the price element class names for your current theme in the Settings tab?
Script Active: Is the “Dynamatic Price Testing” App Embed toggled ON in the Shopify Theme Editor?
Theme Match: Are you testing on the same theme where you enabled the script?
Variations Set: Have you defined clear price differences (e.g., Control: $50, Variation A: $45)?
Audience Defined: Have you selected who sees the test (e.g., "All Visitors" for a true A/B test)?