

Pre-built Bundles
The Pre-built Bundle is designed for curated collections where you define exactly what the customer buys — think "Bundle of 3 Regular T-shirts" or "The Complete Skincare Set." Unlike the Bundle Builder, customers don't choose their own items; they purchase the specific set you've configured.
The setup flows across three tabs: Add product, Discount & Pricing, and Settings.
Step 1 — Add Product
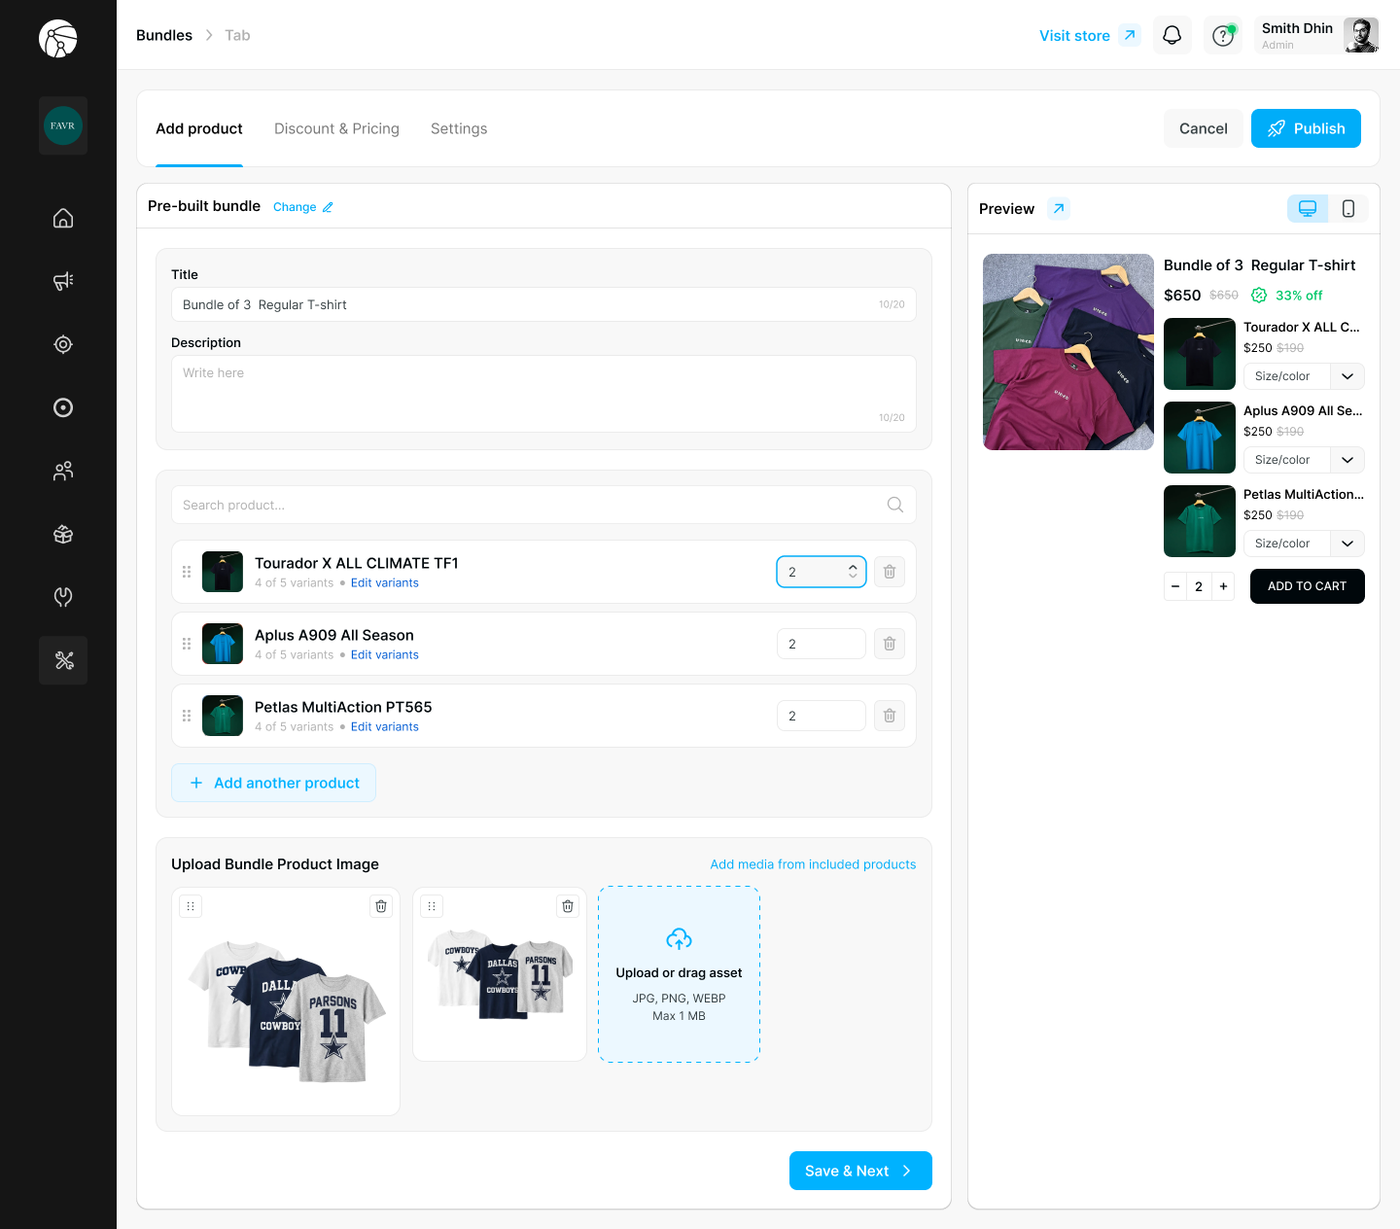
Bundle Title & Description
Field | Description |
Title | The public-facing name of the bundle shown on the storefront (e.g., "Bundle of 3 Regular T-shirt") — max 10/20 characters |
Description | Optional supporting text shown below the title |
Products
Use the search bar to find and add items to your bundle. For each product:
Field | Description |
Product | Select the item to include — displays variant count and an Edit variants link to restrict which variants are available |
Quantity | Set how many units of this product are included in the bundle |
Click + Add another product to include more items, or use the drag handles to reorder products in the list.
Upload Bundle Product Image
Upload images to represent the bundle as a whole. Accepted formats: JPG, PNG, WEBP — max 1MB per file.
Click Add media from included products to automatically pull in images from the bundled items instead of uploading manually.
Click Save & Next to proceed.
Step 2 — Discount & Pricing
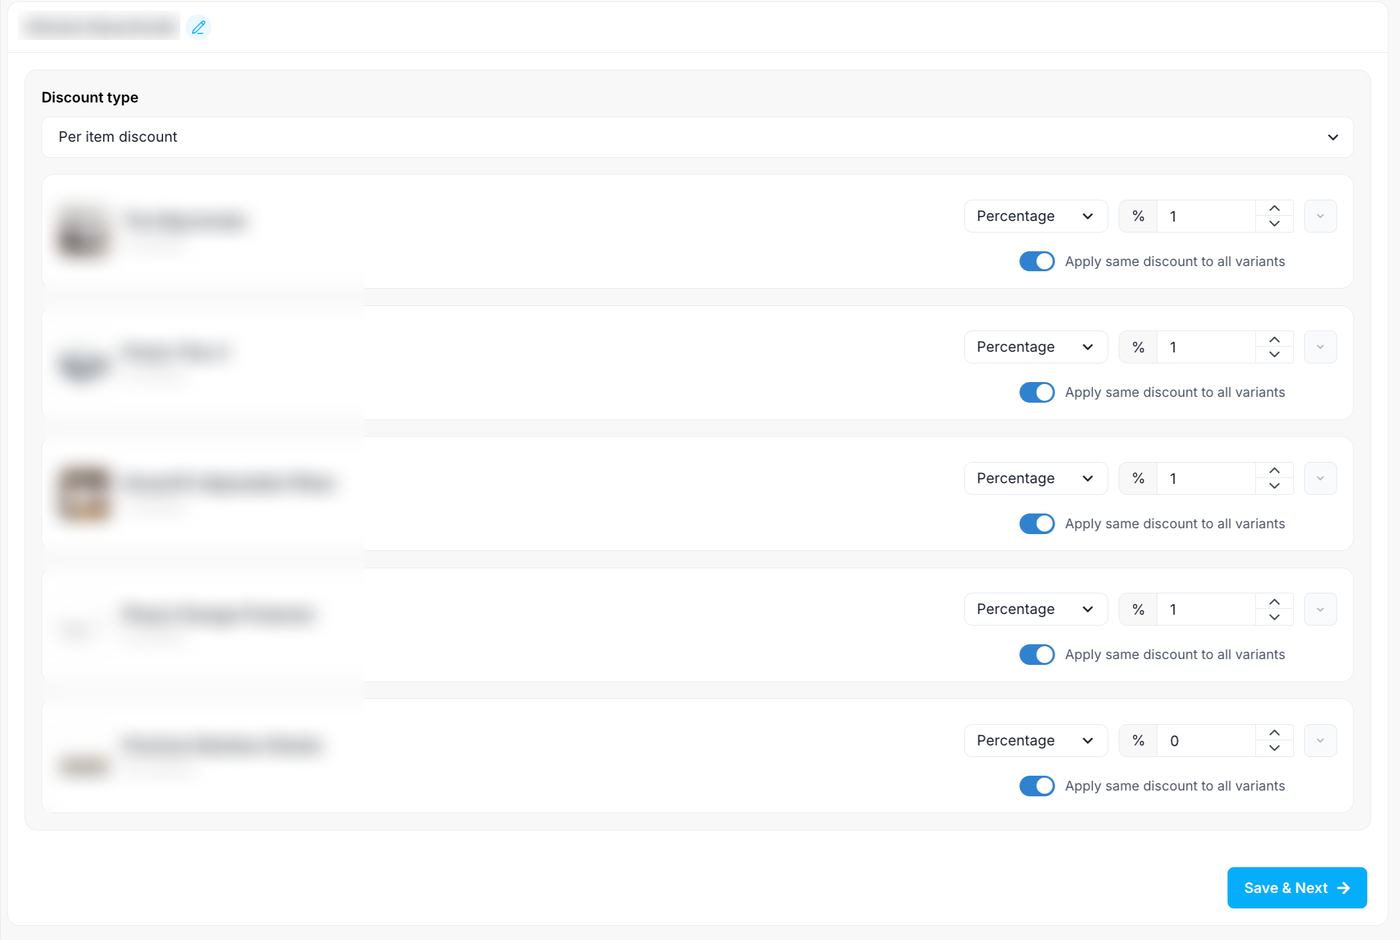
Per Item Discount
When you want granular control over how much is taken off each product — or each individual variant — in the bundle, choose Per item discount from the Discount type dropdown. Instead of applying one blanket discount to the whole bundle, this view expands a list of every product in the bundle so you can set a discount on each one, and optionally drill down to the variant level.
Discount type
The Discount type dropdown controls how savings are calculated across the bundle. Selecting Per item discount reveals the per-product list described below.
Option | Description |
Assign a price to each item | Set an explicit price for each item (shown as the default label; not selectable as an active method here) |
Percentage | Subtracts a percentage from the bundle total |
Fixed discount | Subtracts a specific dollar amount from the bundle total |
Per item discount | Applies a discount to each product (and optionally each variant) individually |
Set price for entire bundle | Sets a single fixed total price for the whole bundle |
No discount | Groups the products together with no price incentive |
Product-level discount
Each product in the bundle appears as its own row, showing the product thumbnail, name, and variant count (e.g. The Rejuvenate — 9 variants). For every product you configure two things:
Control | Description |
Method | Choose Percentage or Fixed for this product |
Amount | Enter the discount value in the input field. The prefix reflects the chosen method — |
Use the chevron (expand) button on the right of each row to open that product's variant list.
Apply same discount to all variants
Each product row includes an Apply same discount to all variants toggle, which is on by default.
Toggle state | Behaviour |
On (default) | The product-level method and amount are applied to every variant. The per-variant fields are shown as read-only and inherit the product's discount |
Off | Each variant becomes editable, so you can set a different method and amount per variant |
Variant-level discount
Expanding a product reveals a row for each of its variants (for example, Queen, King, Cal-King Flex-Head, or size/color combinations such as King / Sage). Each variant row offers the same controls as the product row:
Control | Description |
Method | Percentage or Fixed for this specific variant |
Amount | The discount value for this variant, prefixed with % or the currency symbol |
These fields are only editable when Apply same discount to all variants is turned off for that product. While the toggle is on, they stay locked to the product-level value.
Tip: Turn the toggle off only when a particular size or color needs to be discounted differently from the rest — for example, giving a deeper cut on higher-priced Flex-Head or Split variants while keeping standard sizes at the product-level rate.
Save & Next
Once you've set discounts for each product (and any individual variants), click Save & Next to continue to the next step.
Step 3 — Settings
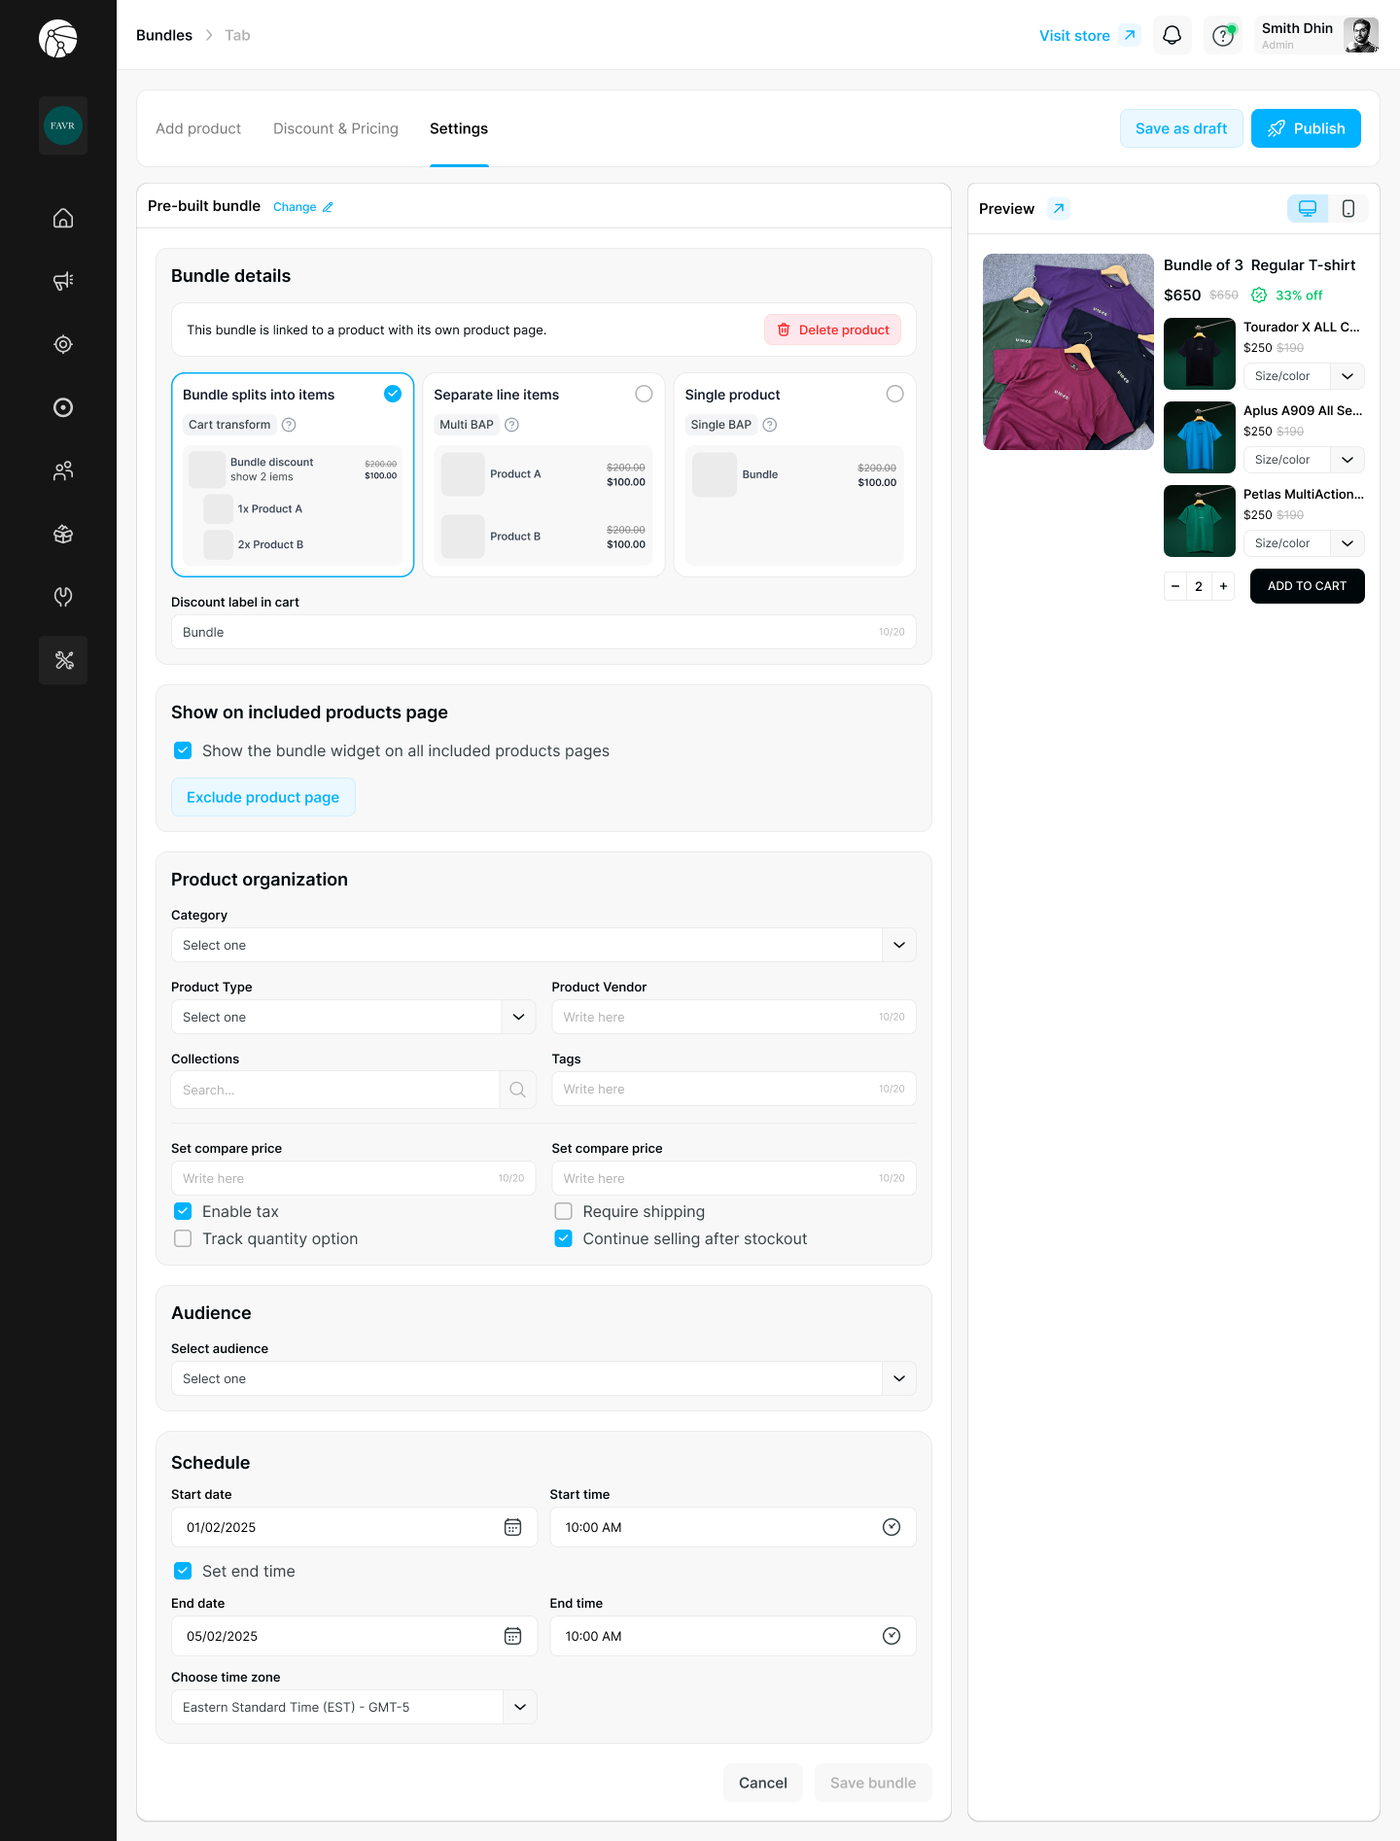
Bundle Details
This section controls how the bundle product exists in your Shopify catalog and how it appears in the cart.
Cart Display — How to present the bundle in cart:
Option | How It Works | Best For |
Bundle splits into items (Cart transform) | Shows the bundle discount as a single line, with individual products listed below it | Clean display that preserves discount visibility |
Separate line items (Multi BAP) | Lists every product as its own line item in the cart | Inventory accuracy and detailed order tracking |
Single product (Single BAP) | Shows the bundle as one consolidated line item | Simplest checkout experience |
Discount label in cart — Customize the label shown next to the bundle discount in the cart (e.g., "Bundle") — max 10 characters.
Show on Included Products Page
Setting | Description |
Show the bundle widget on all included products pages | When checked, the bundle widget automatically appears on every product page included in the bundle |
Exclude product page | Click to manually exclude specific product pages from displaying the widget |
Product Organization
Assign catalog metadata to the bundle product created in Shopify:
Field | Description |
Category | Assign a Shopify product category |
Product Type | Set the product type |
Product Vendor | Enter the vendor name |
Collections | Add the bundle to one or more collections |
Tags | Add searchable tags |
Set compare price | Display a higher "compare at" price to show savings |
Enable tax | Apply tax rules to this bundle product |
Require shipping | Mark if the bundle requires physical shipping |
Track quantity option | Enable inventory tracking for this bundle |
Continue selling after stockout | Allow purchases even when inventory hits zero |
Audience
Restrict who sees the bundle by selecting a specific customer segment from the Select audience dropdown, or leave open to everyone.
Schedule
Set a time window for the bundle to be active:
Setting | Description |
Start date / time | When the bundle becomes live on the storefront |
Set end time | Toggle to define an expiry |
End date / time | When the bundle automatically deactivates |
Choose time zone | Set the timezone for accurate scheduling |
Step 4 — Publish
Once all three tabs are configured, click Publish in the top-right corner.
A confirmation modal will appear: "Pre-built Bundle Published Successfully!" — your bundle is now live and ready to boost sales. Click Ok got it! to return to the dashboard, where you can manage the bundle at any time.
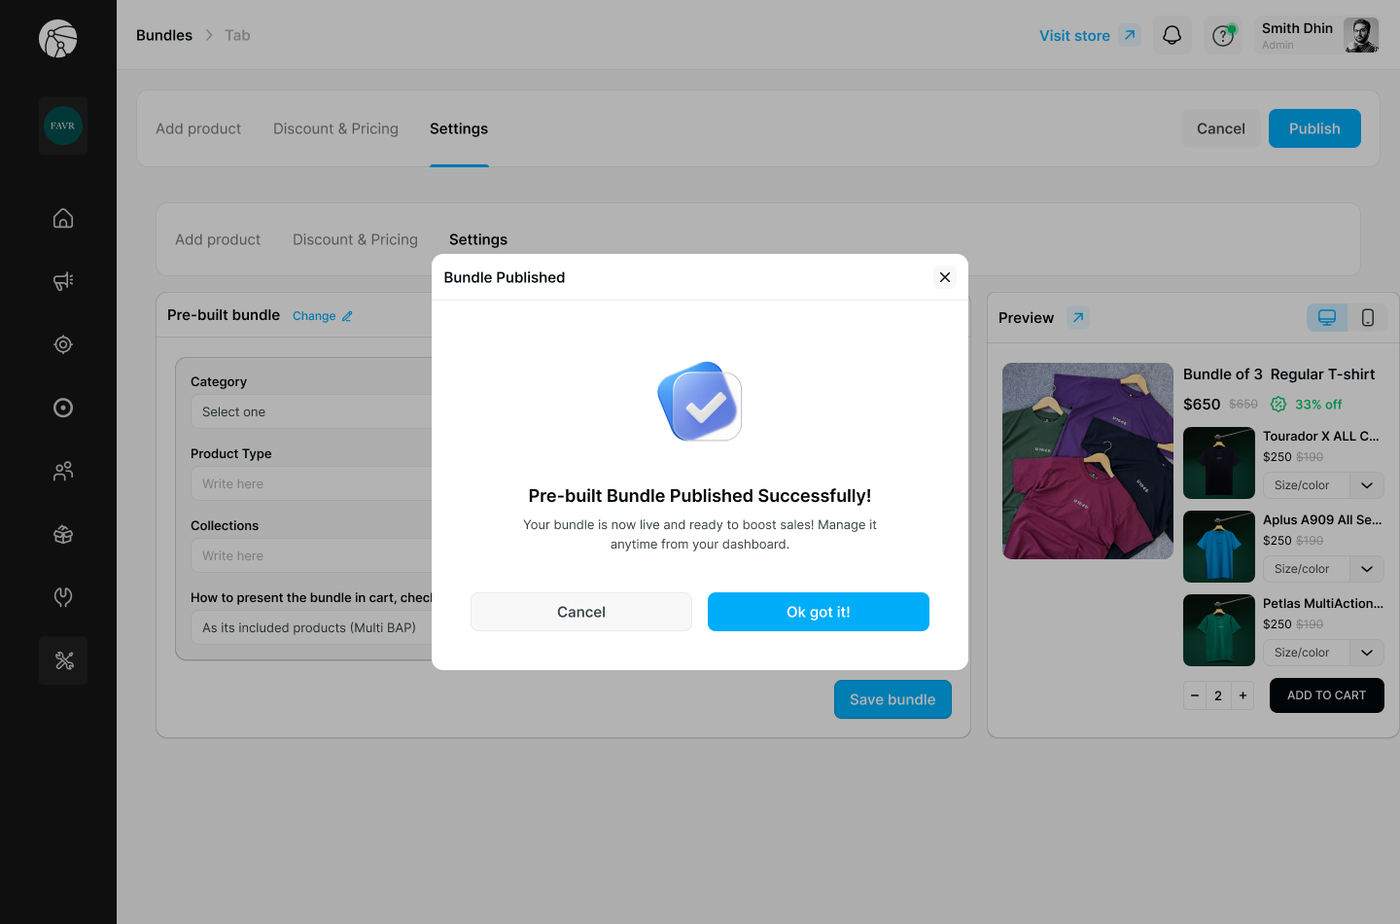
Tip: Use Save as draft at any point to preserve your progress without going live.
Before You Publish
Ensure the Dynamatic Bundles app embed is toggled ON in your Shopify Theme Editor, or the bundle widget will not appear on your storefront.
If you switch themes, you must re-enable the app embed on the new theme.
Use the Preview panel (desktop and mobile views) throughout setup to verify the bundle looks correct before publishing.