
Announcement Bar
The Announcement Bar Widget is a foundational tool for communicating critical information to your customers without interrupting their shopping flow. It's perfect for highlighting current promotions, sharing shipping updates, or announcing restock alerts store-wide.
Attribute | Description |
Widget Name | Announcement Widget |
Core Purpose | Displays a persistent, customizable message across the store to inform customers of promotions, alerts, or important updates. |
Where It Works | Cart, Webpage (all store pages), and Checkout (Plus merchants). |
Key Features | Persistent, non-intrusive display; fully customizable messaging and color; option to include a clickable link to a specific URL. |
Limitations | Messages must be kept short due to limited bar space. Advanced scheduling requires external tools (like Flow or API). |
Playbook
Be the Town Crier, not the nuisance. You need to tell every customer about your "Free Shipping" offer or your "Flash Sale," but you can't pop up a modal every time they change pages. The Announcement Bar is the solution. It sits prominently at the top (or bottom) of the visual hierarchy, delivering critical information that drives behavior without interrupting the user experience. It is the balance between visibility and usability.
The "Why" & The Metrics
Primary Metric Impact: Click-Through Rate (CTR) and Customer Satisfaction (CSAT).
The Psychological Trigger: Certainty & FOMO. Using the bar for "Free Shipping over $50" creates a clear goal (Certainty). Using it for "Sale Ends Tonight" triggers urgency (FOMO).
Best Fit Industries: Universal (Every store needs one).
Strategic Use Cases (The "Plays")
Play #1: The "Support Shield" (Operational Updates)
The Concept: Proactively answer the most common customer question to reduce support tickets.
The Logic: During holidays or weather events, customers worry about shipping. Answering "Shipping delays expected due to storm" upfront builds trust and manages expectations.
Configuration Strategy:
Zone: Webpage (Global).
Message: "Due to high volume, orders ship in 3-5 business days."
Style: Use a neutral or "Alert" color (like yellow/orange) rather than a brand color to catch attention.
Play #2: The "Checkout Closer" (Cart Placement)
The Concept: Place a specific reminder inside the Cart Drawer to ensure the sale is completed.
The Logic: Customers often forget discount codes. Reminding them right before they click "Checkout" secures the conversion.
Configuration Strategy:
Zone: Cart.
Message: "Don't forget! Use code SAVE10 at checkout."
Link: Link directly to the Checkout URL or a "How to use codes" FAQ.
Play #3: The "Traffic Director" (Campaign Link)
The Concept: Drive traffic from your homepage to a specific new collection or landing page.
The Logic: Your homepage banner is big, but the Announcement Bar follows them as they scroll. It’s a persistent signpost to your newest product.
Configuration Strategy:
Zone: Webpage.
Message: "The Summer Collection is here. Shop Now →"
Link: Paste the URL of your new Collection.
Pro-Tips & Constraints
Space is Limited: This is a "Bar," not a paragraph. If you have a lot to say, use the link to send them to a blog post or policy page.
Scheduling: This widget does not have a built-in timer or scheduler in the basic setup. To run it for a specific weekend, you must use Dynamatic Campaigns to schedule the start and end dates.
Link Logic: If you are using this in the Checkout zone (Plus Merchants), ensure the link opens in a new tab so they don't lose their checkout progress.
Step-by-Step Widget Creation
Follow these steps to set up and customize your Announcement Bar:
1. Initial Widget Selection
Click Create Widgets in your Dynamatic dashboard.
On the "Add New Widgets" page, fill in the Widget Title (e.g., "Holiday Shipping Alert") and a short description.
Search for and select the Announcement Widget from the template list.
Click Next.
2. Content Configuration
You will land on the main customization page. Start in the Content section:
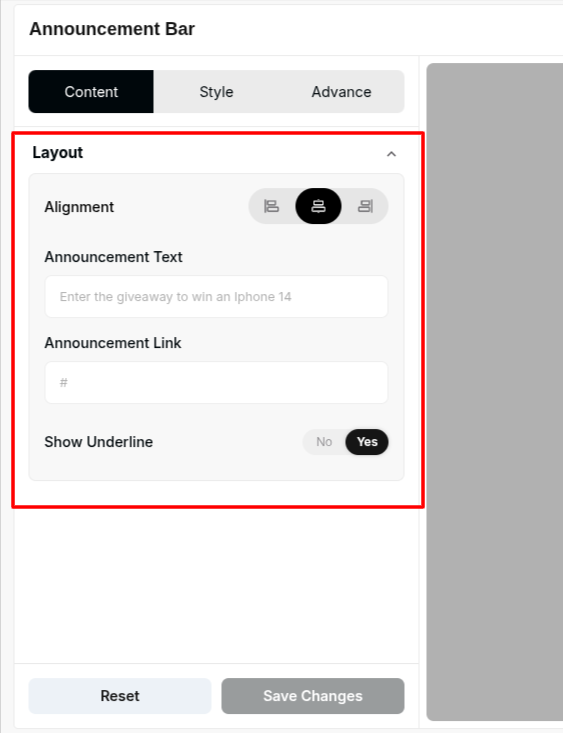
Layout: Customize the layout structure, which typically includes options for displaying text and icons.
Message Text: Enter the specific announcement message you want customers to see. Keep it clear and concise.
Link: Provide a clickable URL to direct customers to a relevant page (e.g., a promotions landing page or shipping policy).3After customizing the message and link, click Save Changes.
3. Style Customization
Navigate to the Style tab to control the visual appearance of the bar:
General Options: Adjust fundamental design elements.
Color Control: Choose the background color and the text color to maximize visibility and match your store's theme.
Typography: Customize font size and font weight for impact and readability.
4. Advanced Refinements
Use the Advanced tab for final display controls:
Device Setting: Specify whether the widget should be visible on desktop, mobile, or both.
Custom CSS: Input custom CSS for highly specific styling that goes beyond the standard options.
Once satisfied with your settings, click Save Changes. Your Announcement Bar is now complete and ready to be connected to a Placement (Zone) via a Campaign/Experience to go live!
Publishing Your Configured Widget Live
This following documentation section provides the final, detailed steps required to publish your fully configured widget and make it visible to customers on your live storefront.
01. How to successfully setup a widget
02. Understanding and Creating Audiences
03. Creating Placements and Zones
05. Displaying Your Widgets on the Storefront