
Tiered Bar
The Tiered Bar Widget is a powerful Average Order Value (AOV) booster. It encourages customers to spend more by providing a clear, visual representation of their progress toward defined reward milestones.
Attribute | Description |
Widget Name | Tiered Bar |
Purpose | Motivates customers to increase cart size by showing real-time progress toward escalating rewards (e.g., Free Shipping, Free Gift, Discounts). |
Where It Works | Cart, Checkout (Plus merchants), and any Webpage (e.g., Product Page). |
Key Features | Visually displays reward levels; offers custom messaging (e.g., “Only $20 away from Free Gift”); allows for custom styling of each tier. |
Configuration | Set specific tier amounts and rewards; customize messages and icons; match design to store theme. |
Limitations | Logic must be synced with existing discount or gift rules. Not available for Post-Purchase or Thank You pages. |
Playbook
Gamify the path to checkout. Customers hate paying for shipping, but they love unlocking a reward. The Tiered Bar leverages this psychology by showing them exactly how close they are to a "win." Instead of checking out with a $45 cart, the bar nudges them: "You are only $5 away from Free Shipping." It turns a static transaction into a progress-based game, significantly increasing Average Order Value (AOV).
The "Why" & The Metrics
Primary Metric Impact: Average Order Value (AOV) and Cart Abandonment Rate (by eliminating "shipping shock").
The Psychological Trigger: The Goal Gradient Effect. Research shows that people work harder and spend more the closer they get to a goal. Seeing a progress bar at 80% creates an urge to complete it.
Best Fit Industries: Fashion (Volume based), Beauty (Gifts with Purchase), and CPG (Bulk buying).
Strategic Use Cases (The "Plays")
Play #1: The "Free Shipping" Nudge (The Essential)
The Concept: Set a threshold slightly above your average order value to cover shipping costs.
The Logic: This is the most effective AOV booster in e-commerce. If your AOV is $42, set Free Shipping at $50. The widget does the math for the customer.
Configuration Strategy:
Zone: Cart Drawer.
Milestones: Set 1 Milestone at your shipping threshold (e.g., $50).
Copy/Creative Idea: Initial Message: "Spend $50 for Free Shipping." Progress Message: "Only [amount_left] away from Free Shipping!"
Play #2: The "Reward Ladder" (Multi-Tier)
The Concept: Don't stop at free shipping. Keep the high-spenders climbing.
The Logic: Once a customer hits free shipping, they usually stop adding items. A second and third tier (e.g., a Free Gift or Discount) keeps the momentum going for high-ticket buyers.
Configuration Strategy:
Milestones:
Tier 1: $50 (Free Shipping).
Tier 2: $100 (10% Off).
Tier 3: $150 (Free Mystery Gift).
Style: Ensure the icons change for each tier to visually represent the escalating value.
Play #3: The "Margin Protector" (Exclusion Logic)
The Concept: Offer rewards based on spending, but exclude low-margin or heavy items that kill profitability.
The Logic: You don't want to offer free shipping if the cart is full of heavy, low-cost items (like weights or liquids).
Configuration Strategy:
Content Tab: Use the Exclusions setting.
Action: Exclude specific Products or Tags (e.g., "Heavy-Shipping") from counting toward the progress bar.
Result: The customer sees the bar move only when they add eligible, profitable items.
Pro-Tips & Constraints
Critical Integration Note: The Tiered Bar is primarily a Visual Indicator. You must ensure that the actual discount or shipping rule is set up in your Shopify Admin (or via Dynamatic Scripts) to match the bar's promises. If the bar says "Free Shipping at $50," your shipping settings must actually trigger at $50.
Zone Logic: While it works on the Webpage (Product Page), it is most effective in the Cart. Placing it on the Product Page helps setting expectations, but the Cart is where it closes the deal.
Limitation: This widget is not available for Post-Purchase or Thank You pages, as the transaction is already complete.
Step-by-Step Widget Creation
Follow these steps to set up and deploy your Tiered Bar Widget:
1. Initial Widget Selection
Click Create Widgets in your Dynamatic dashboard.
On the "Add New Widgets" page, fill in the Widget Title and a brief description.
Search for and select the Tiered Bar widget from the list of available templates.
Click Next.
2. Template Choice
You will be presented with several pre-designed templates. Select the one that best suits your store's aesthetic and click Select.
3. Content Configuration
The main customization page will open with three tabs: Content, Style, and Advanced. Start in the Content section:
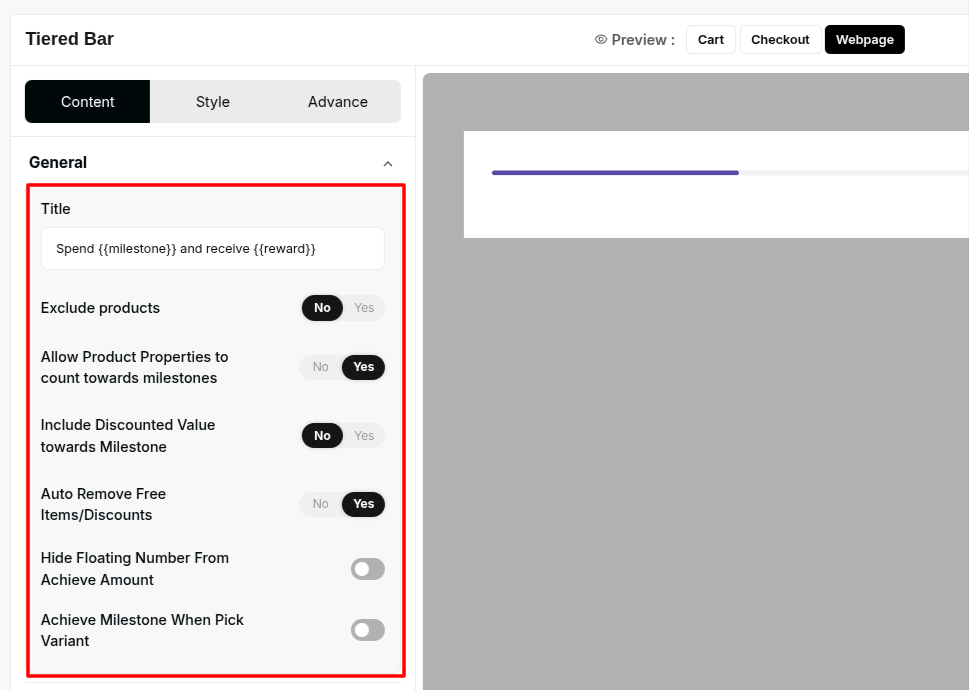
Define Milestones: This is where you create your reward levels. Click to add new milestones.

Set Amount: Define the cart threshold required for the reward (e.g., $50).
Set Reward: Specify the reward type (e.g., Free Shipping, Free Gift).
Customization: Change icons and set the motivational messages displayed to the customer.
Exclusions: Define any products or product tags that should not count toward the Tiered Bar total.
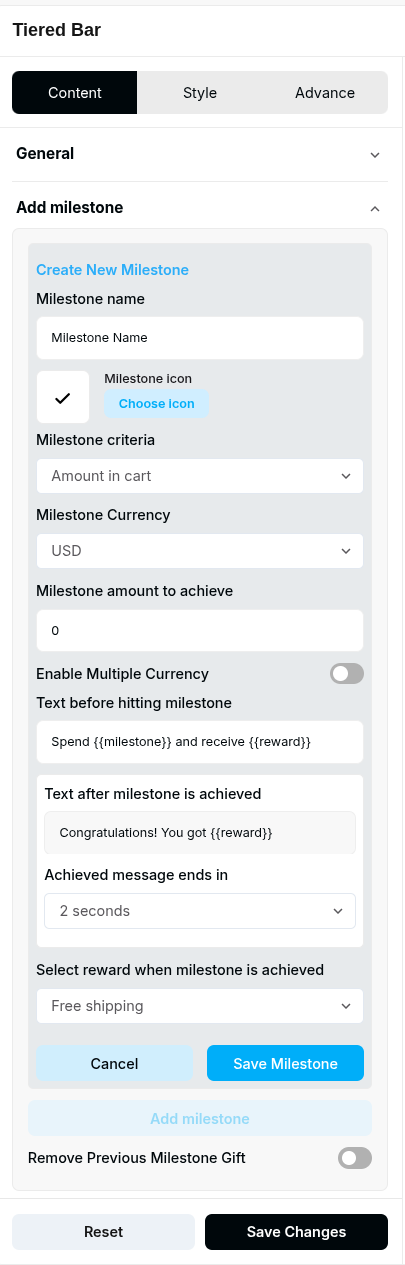
After defining all your tiers (e.g., a Free Shipping milestone and a Free Gift milestone), click Save Changes.
4. Style Customization
Navigate to the Style tab to align the widget's design with your store’s brand:
Customize design elements such as the widget's background color, font size, and the appearance of the milestone background and product cards (if applicable).
Adjust the colors of the progress bar itself to ensure maximum visibility and theme consistency.
5. Advanced Refinements
Use the Advanced tab for final control over display:
Device Setting: Specify whether the widget should display on desktop, mobile, or both.
Custom CSS: Apply custom CSS for granular design control beyond the standard styling options.
Once the configuration is complete, your Tiered Bar Widget is ready. You must now connect it to a Placement (Zone) via a Campaign/Experience to make it live on your store. Congratulations!
Publishing Your Configured Widget Live
This following documentation section provides the final, detailed steps required to publish your fully configured widget and make it visible to customers on your live storefront.
01. How to successfully setup a widget
02. Understanding and Creating Audiences
03. Creating Placements and Zones
05. Displaying Your Widgets on the Storefront