
Multiple Carousel Widget
The Multiple Carousel Widget is a dedicated post-purchase upsell tool. It is designed to maximize immediate repeat purchases and increase Customer Lifetime Value (CLV) by displaying several curated product carousels (sliders) in an engaging, scrollable format immediately after a customer completes a transaction.
Widget Overview
Attribute | Description |
Widget Name | Multiple Carousel Widget |
Core Purpose | Encourages immediate repeat purchases or showcases relevant upsells/cross-sells on the Post Purchase page. |
Key Features | Displays multiple horizontal carousels stacked vertically; supports personalized product recommendations; includes a direct “Pay now” button for quick checkout. |
Where It Works | Post Purchase page only. |
Limitations | Only appears after the initial transaction; requires styling to match the store brand; potential for reduced page speed if overloaded. |
Playbook
Why stop at one upsell? Offer the whole aisle. Standard post-purchase offers usually focus on a single "hero" product. But what if the customer doesn't want that specific item? The Multiple Carousel Widget solves this by offering variety. By stacking carousels (e.g., "New Arrivals" on top, "Best Sellers" below), you mimic the experience of walking through a digital impulse aisle. It maximizes the chances of a second conversion by catering to broader interests while the wallet is still open.
The "Why" & The Metrics
Primary Metric Impact: Customer Lifetime Value (CLV) and Immediate Repeat Purchase Rate.
The Psychological Trigger: The Dopamine Loop & Variety Seeking. The customer is currently riding the "shopping high." Offering a scrollable variety keeps them engaged in the browsing behavior rather than closing the tab.
Best Fit Industries: Fashion (Shop by Category), Beauty (Build a Routine), General Retail (Clearance & New Arrivals).
Strategic Use Cases (The "Plays")
Play #1: The "Digital Department Store" (Category Browsing)
The Concept: Replicate the in-store experience of walking past different sections on your way out.
The Logic: Use the stacked layout to show distinct options. Top Carousel: "Just In." Middle Carousel: "On Sale."
Configuration Strategy:
Structure: Enable 2 Carousels.
Top Heading: "Fresh Drops." (Source: New Arrivals Collection).
Middle Heading: "Last Chance to Buy." (Source: Clearance Collection).
Discount: Offer a small incentive (e.g., 10%) to encourage the extra add.
Play #2: The "Routine Builder" (Sequential Logic)
The Concept: If the customer bought a core item (e.g., Shampoo), show them the next steps in the regimen.
The Logic: Post-purchase is the best time for education-based selling.
Configuration Strategy:
Top Carousel: "Step 2: Condition." (Source: Conditioners).
Middle Carousel: "Step 3: Treat." (Source: Hair Masks/Oils).
Exclusions: Enable Exclude currently purchased product so they don't see the Shampoo they just bought.
Play #3: The "Gift Giver" (Seasonal Stack)
The Concept: During holidays, use the post-purchase page to remind them of people they forgot.
The Logic: "You bought something for yourself, now buy something for mom."
Configuration Strategy:
Messaging: Top Heading: "Gifts for Her." Middle Heading: "Gifts for Him."
Timer: Enable the Timer element to create urgency (e.g., "Offer expires in 5 minutes").
Button: Set text to "Add Gift & Pay Now."
Pro-Tips & Constraints
Smart Constraint: This widget only works on the Post Purchase page. It cannot be used on the Cart or Homepage.
Speed Warning: Loading multiple carousels with high-res images can impact page load speed. Optimize your images and limit the widget to 2 rows if you see performance issues.
Transaction Flow: Remember, this page appears after the initial payment but before the Thank You page. The "Pay Now" button charges the card on file immediately. Ensure your messaging is clear that this is a new purchase.
Configuration Options
The widget is configured primarily using the Content and Advanced tabs. (The Style tab offers standard visual customization.)
1. Step-by-Step Widget Creation
Click Create Widgets in your Dynamatic dashboard.
On the "Add New Widgets" page, fill in the Widget Title and a brief description, then select the appropriate template.
Click Next.
Select a visual template and click Select.
2. Content Tab
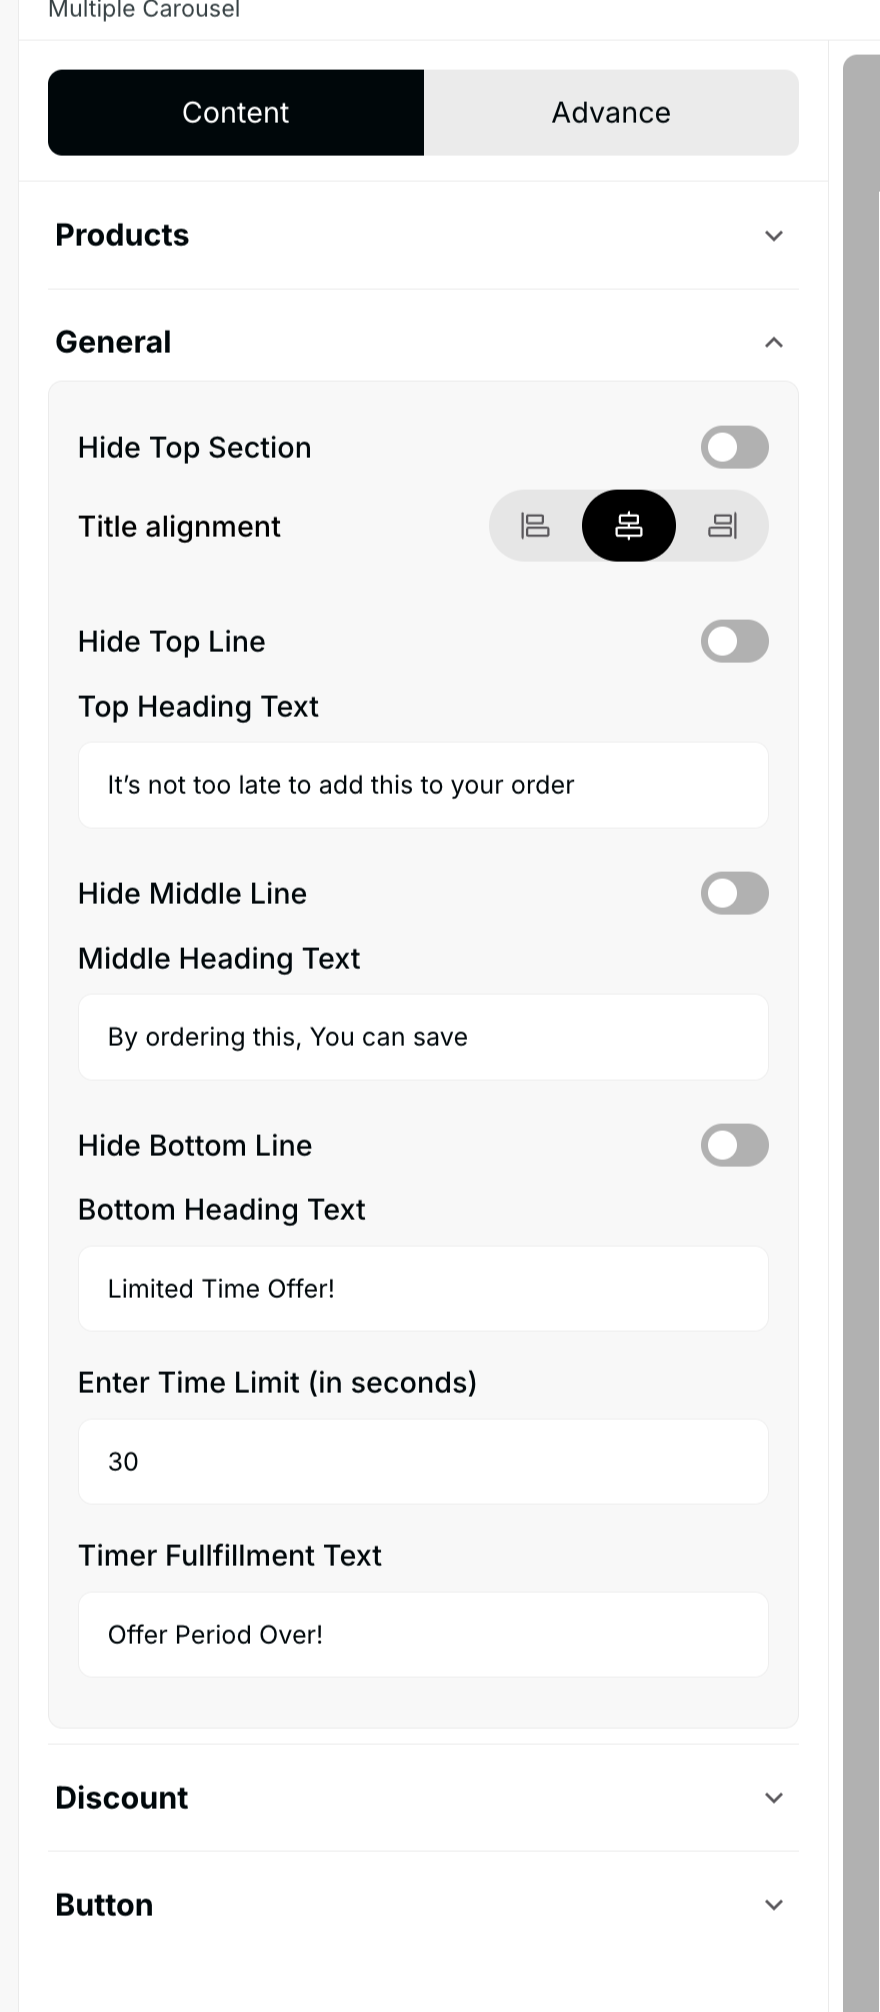 |  |
The Content section defines the product recommendations for each carousel and the widget's overall presentation.
Setting | Functionality | Detail |
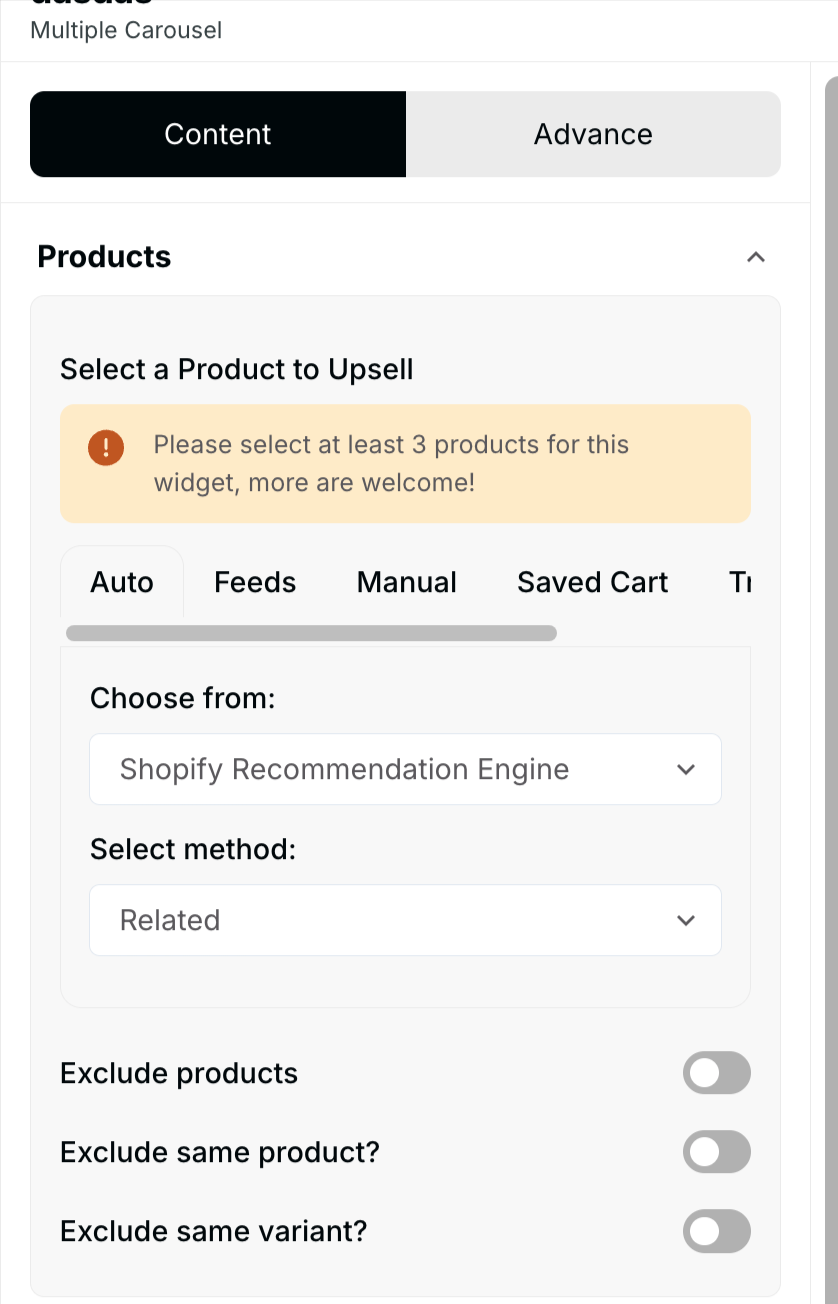
Product Selection | Defines the recommended products for the carousels. | Choose to add products Manually or Automatically based on rules or history. |
Quantity Requirements | Sets the minimum number of products needed to populate the carousel. | A minimum of at least 3 products is required per carousel. |
Exclusions | Filters out items from the recommendation set. | Users can exclude the currently purchased product, the same product (if set to automatic), and the same product variant. |
Carousel Structure | Controls the layout of the recommendations. | Set numbers of products per carousel displayed at once. Enable/disable scroll or autoplay functionality. |
Messaging | Customizes the text for each section. | Set top heading text, middle heading text, and bottom heading text. Control text alignment for headings. |
Additional Elements | Enhances the offer with urgency and action. | Configure a timer for limited-time offers, set a discount value, and customize the button text/style. |
3. Advanced Tab: Final Refinements
Setting | Functionality | Detail |
Device Setting | Control visibility across devices. | Select the specific devices where the widget should be visible (Desktop/Mobile). |
Custom CSS | Input custom styling code. | Allows the user to write custom CSS for granular design control. |
Publishing Your Configured Widget Live
This following documentation section provides the final, detailed steps required to publish your fully configured widget and make it visible to customers on your live storefront.
01. How to successfully setup a widget
02. Understanding and Creating Audiences